Create a scripts folder in SQL Server
The topic describes how to create a scripts folder by using the Create Scripts Folder or Snapshot dialog of dbForge Studio for SQL Server or by using the command line.
Tip
You can also use the Generate Scripts Wizard to script table data and/or objects into a single file.
Overview
A scripts folder is a set of object creation scripts that represent a database schema and, optionally, data. Each database object is represented by an individual script file. The files are grouped by object type and stored in user-defined subfolders.
Note
The Scripts folder feature is available only in the Enterprise edition of dbForge Studio for SQL Server.
A scripts folder contains the following components:
- Database object scripts – A set of subfolders grouped by object type: Programmability, Security, Storage, Tables, and Views. Each subfolder contains individual .sql files with
CREATEstatements for the objects in that category. - Static data scripts – A dedicated folder containing .sql files with
INSERTstatements for static data, organized by table. - config.xml file – A configuration file that stores metadata about the scripts folder, including the SQL Server version, database collation, and associated database name (entity).
- Database-level script – A single .sql file containing
ALTER DATABASEstatements that apply to the database as a whole.
Limitations
- Scripts folder can’t be updated automatically when the source database changes.
- You must regenerate scripts to capture changes in schema or stored procedures.
- Generating scripts for large databases with many objects can take significant time and CPU resources.
Create a scripts folder
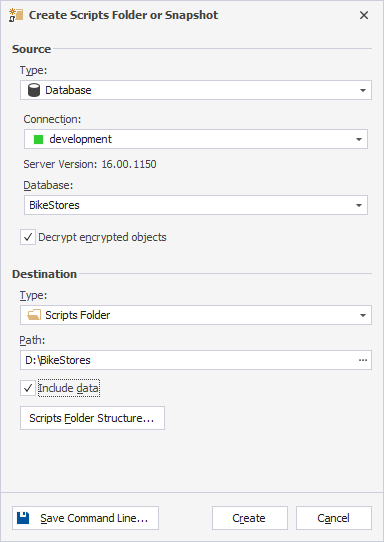
1. Open the Create Scripts Folder or Snapshot dialog in one of these ways:
- In the top menu, select Database > Tasks > Create Scripts Folder or Snapshot.
- In Database Explorer, right-click the connection and select Tasks > Create Scripts Folder or Snapshot.
- On the Start Page, select Database Sync > Create Scripts Folder.
2. Under Source, configure the source settings:
2.1. In Type, select the data source type.
2.2. Depending on the data source, specify its details.
3. Under Target, configure the destination settings:
3.1. In Type, select Scripts Folder.
3.2. In Path, specify the full path to the folder where the scripts folder will be stored, or click the ellipsis (…) and select the existing folder.
3.3. Optional: Select Include data to insert static data.
Note
The Include data checkbox is available only if the Database type is selected as the source.
4. To change the default folder and file name structure for scripts:
4.1. Click Scripts Folder Structure.
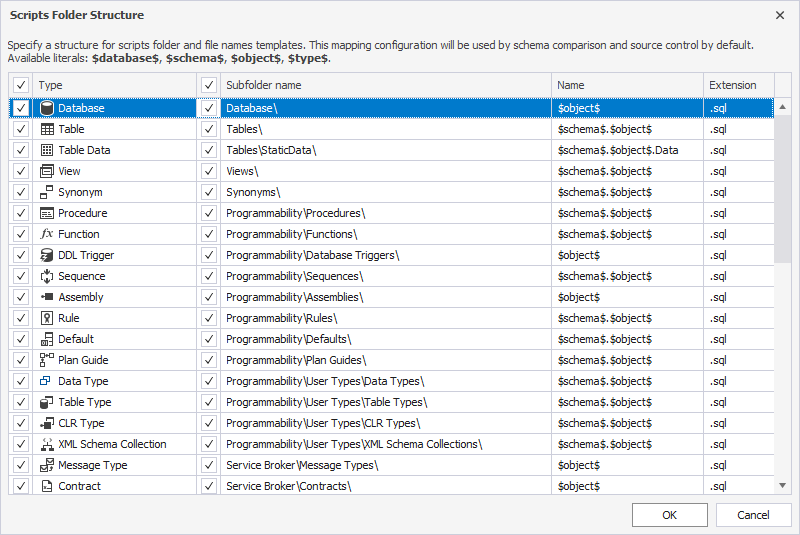
The Scripts Folder Structure dialog opens. All objects are selected by default.
4.2. Use the checkboxes:
- To include or exclude specific database object types and subfolders in a scripts folder.
- To define how folders and file names are created for each object type.
4.3. Click OK.

5. Click Create.

Select data sources
You can select the following data source types as the source:
- Database: Creates a scripts folder from the specified database.
- Scripts Folder: Creates a scripts folder from another scripts folder.
- Snapshot: Creates a scripts folder from the specified snapshot.
Database
When you select Database as the source type, configure the settings:
- Connection – Select the existing server connection or create a new one by clicking Manage. Then, in the Connection Manager, click New and establish a new connection.
- Database – Select the database based on which you want to create a scripts folder.
- Decrypt encrypted objects (optional) – Select the checkbox to decrypt database objects so that the resulting script shows the actual SQL code, not just encrypted placeholders.
Scripts Folder
When you select Scripts Folder as the source type, in Database scripts folder, specify the full path to the scripts folder, select the previously added scripts folder or click the ellipsis (…) and add the existing folder.
Snapshot
When you select Snapshot as the source type, in Snapshot, select the previously added snapshot or click the ellipsis (…) and add the existing snapshot (.snap).
Scripts Folder Structure
The table describes the values from the grid of the Scripts Folder Structure dialog.
| Column | Description |
|---|---|
| Type | Specifies the database object type, such as Table, View, or Procedure. To include the object type in script generation, select the checkbox for the required type. To exclude the object type, clear the corresponding checkbox. |
| Subfolder name | Defines the folder structure where scripts are saved. To generate a subfolder for that object type, select the checkbox for the required subfolder. Otherwise, clear the corresponding checkbox. |
| Name | Defines the file name format for each script. |
| Extension | Specifies the file extension of the generated script. The default value is .sql. |
The table describes the available literals used for folders or file names.
| Variable | Description |
|---|---|
| $database$ | Inserts the current database name. |
| $schema$ | Inserts the schema name, for example, dbo. |
| $object$ | Inserts the object name, for example, Customers. |
| $type$ | Inserts the object type, for example, Table or View. |
When you create a scripts folder of the Bikestores database with this configuration:
- Type:
Table - Subfolder name:
Tables\ - Name:
$schema$.$object$ - Extension:
.sql
dbForge Studio will create the following scripts:
Bikestores\Tables\dbo.Customers.sql
Bikestores\Tables\dbo.Orders.sql
Create a command-line execution file
You can create a command-line execution .bat file to automate or schedule the scripts folder creation.
To create a command-line execution file:
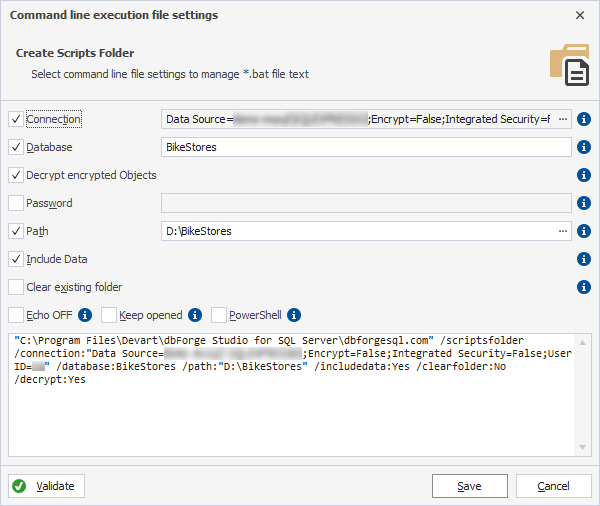
1. In the lower-left corner of the Create Scripts Folder or Snapshot dialog, click Save Command Line.
2. In the Command line execution file settings dialog, configure the command-line settings.
3. Click Validate to verify the settings.
4. Click Save.

Create a scripts folder from the command line
1. Open Command Prompt (CMD).
2. Specify the /scriptsfolder operation to create a scripts folder and replace the parameters and arguments with your actual data:
"C:\Program Files\Devart\dbForge Studio for SQL Server\dbforgesql.com" /scriptsfolder /connection:"Data Source=<server_connection>;Integrated Security=False;User ID=<user_name>" /database:<database_name> /path:"<path_to_scripts_folder>"
where:
C:\Program Files\Devart\dbForge Studio for SQL Server\dbforgesql.com– The full path to the default installation folder of dbForge Studio for SQL Server.<server_connection>– The server connection where the source database resides.<user_name>– The username you connect to the server.<database_name>– The database based on which the scripts folder is created.<path_to_scripts_folder>– The full path to the scripts folder.
Tip
To include static data, specify
Yesfor/includedata. If you don’t want to decrypt data, specifyNofor/decrypt.
3. Press Enter.
Available command-line arguments
The table provides the command-line arguments (switches) you can use in the script to create a scripts folder from the command line.
| Argument | Description |
|---|---|
/connection |
Specifies a connection string. Usage: /connection:<connection_string> |
/database |
Specifies the database to create a scripts folder. Usage: /database:<database_name> |
/decrypt |
Defines whether to decrypt source objects. Usage: /decrypt:<value>To turn the option on, specify Yes, Y, On, True, or T.To turn it off, specify No, N, Off, False, or F. |
/password |
Specifies the server password. Usage /password:<yourpassword>The switch overrides the password specified in the connection string. |
/path |
Specifies the full path to the scripts folder. Usage: /path:<folder_path> |
/includedata |
Defines whether to include data. Usage: /includedata:[value]To turn the option on, specify Yes, Y, On, True, or T.To turn it off, specify No, N, Off, False, or F. |
/clearfolder |
Removes all existing files and subfolders inside that directory before generating new scripts. Usage: /clearfolder:[value]To turn the option on, specify Yes, Y, On, True, or T.To turn it off, specify No, N, Off, False, or F. |
Tip
To see a quick help on the switches available for the
/snapshotoperation, enter the following:"C:\Program Files\Devart\dbForge Studio for SQL Server\dbforgesql.com" /snapshot /?