Copy a database to another SQL Server instance
You can copy a database from one SQL Server instance to another using the Copy Database wizard.
Limitations and prerequisites
-
You can’t copy or move the following types of databases:
- System databases.
- Databases marked for replication.
- Databases marked as inaccessible, loading, offline, recovering, or suspect.
- If the target server already contains a database with the same name as the source, you must overwrite the existing database to copy the source database.
- You must have a sysadmin server role on both the source and target servers.
- SQL Server Agent must be running on the source server. For more information, see Microsoft SQL documentation.
- The target SQL Server version must be the same as or later than the source version. If the target version is earlier, use another method. For more information, see Different Methods to Copy Data with dbForge SQL Tools.
Note
The source database is detached just before the copying begins and reattached after it completes.
Copy a database
1. Open the Copy Database wizard in one of these ways:
- In the top menu, select Database > Tasks > Copy Database.
- In Database Explorer, right-click a required database and select Tasks > Copy Database.
- On the Start Page, click Database Sync > Copy Database.
2. On the Source and target page, select the source and target connections to copy a database.
- Under Source, select the SQL Server instance that contains the database you want to copy.
- Under Target, select the SQL Server instance where you want to copy the database.
Tip
To load a saved project (.dbcopy file) created by using the Save Project feature, click Open.
To swap source and target settings, click
.
To copy source settings to the target, click
.
To copy target settings to the source, click
.
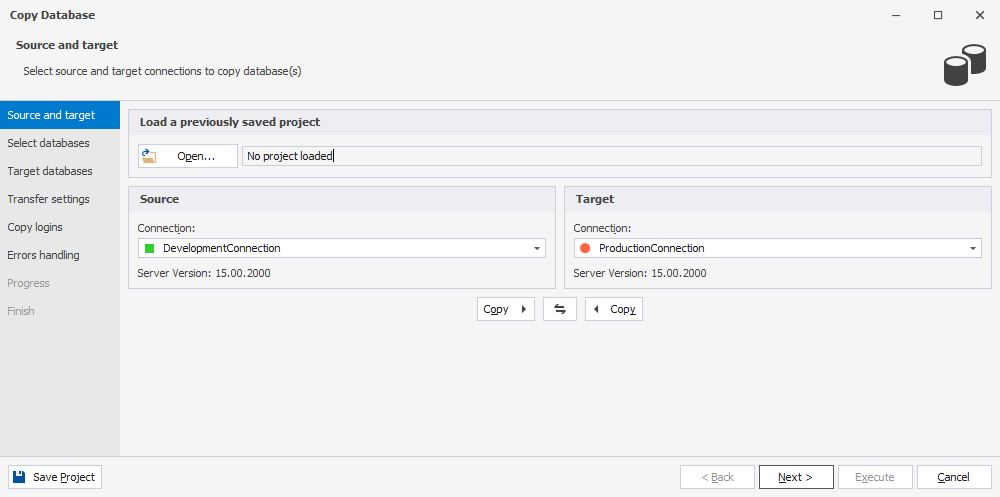
3. Click Next.
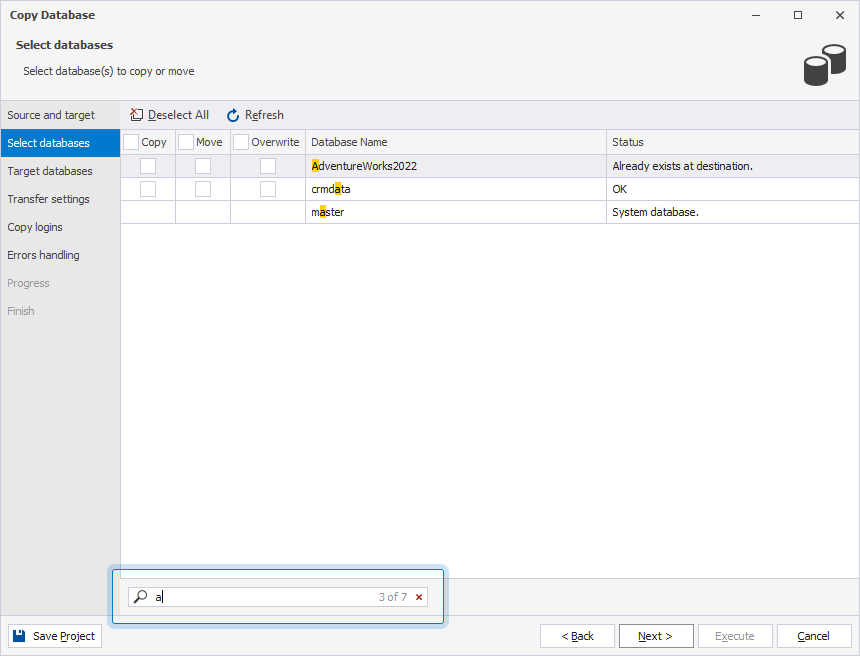
4. On the Select databases page, select one of the actions for the required database:
- Copy – Keeps the database on the source server after copying.
- Move – Deletes the database from the source server after copying.
- Overwrite – Replaces the existing database on the target server with the source database.
Tip
To find a specific database, enter its name in the search box under the grid.
To clear all the checkboxes on the Select databases page, click Deselect All.
To refresh a list of databases, click Refresh.
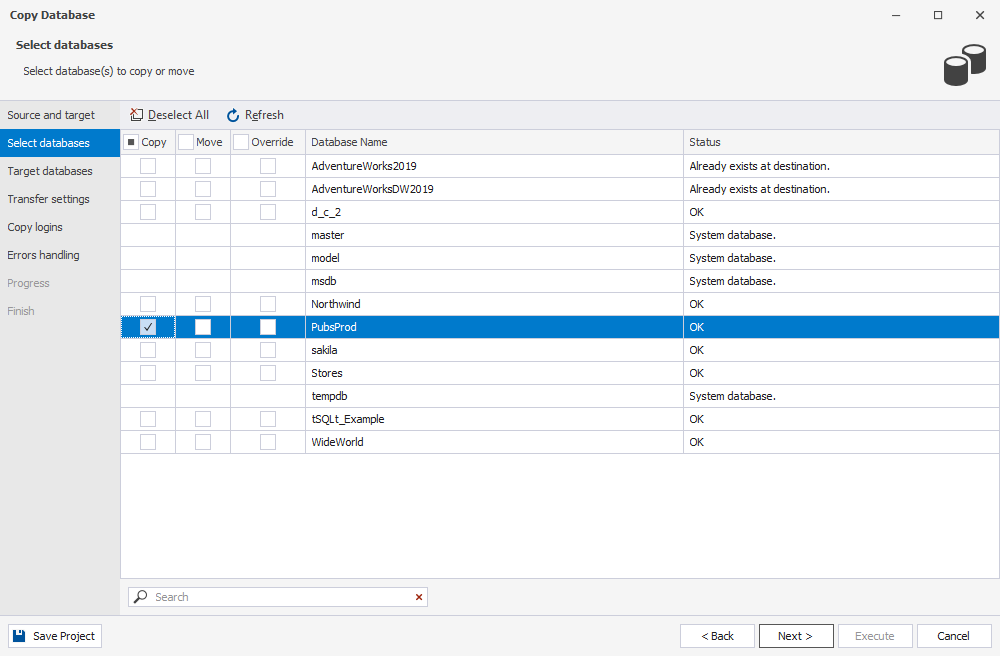
The table shows the database statuses.
| Name | Description |
|---|---|
| OK | The database is valid and available for copying. |
| System database | The database is a SQL Server system database and can’t be copied. |
| Already exists at destination | A database with the same name already exists on the target server. The Studio doesn’t copy this database unless you select Overwrite. |
| Database in ‘OFFLINE’ state | The database is set to OFFLINE and can’t be accessed or copied unless it is brought ONLINE. |
| Database in ‘RESTORING’ state | The database is in the RESTORING state and can’t be copied until the restore operation is complete. |
| Database in ‘RECOVERY_PENDING’ state | SQL can’t run restart recovery, often due to missing or corrupted logs, file-locking issues, or an unavailable drive. The database is inaccessible and can’t be copied until the issue is resolved. |
| Database in ‘EMERGENCY’ state | The database is in the EMERGENCY state (read-only, single-user) for troubleshooting severe corruption and can’t be copied. |
| Database in single-user mode | The database is restricted to one active connection. Since copying requires exclusive access, the operation may fail if another session is using it. |
5. Click Next.
6. Optional: On the Target databases page:
- To rename the target database, click the cell in Attach As and enter a new name.
- To change the directory for the database files, click the plus icon next to the database name, then modify the path.
Note
By default, the files are saved to a directory on the target server. If you change the file directory, ensure it’s shared between both servers.
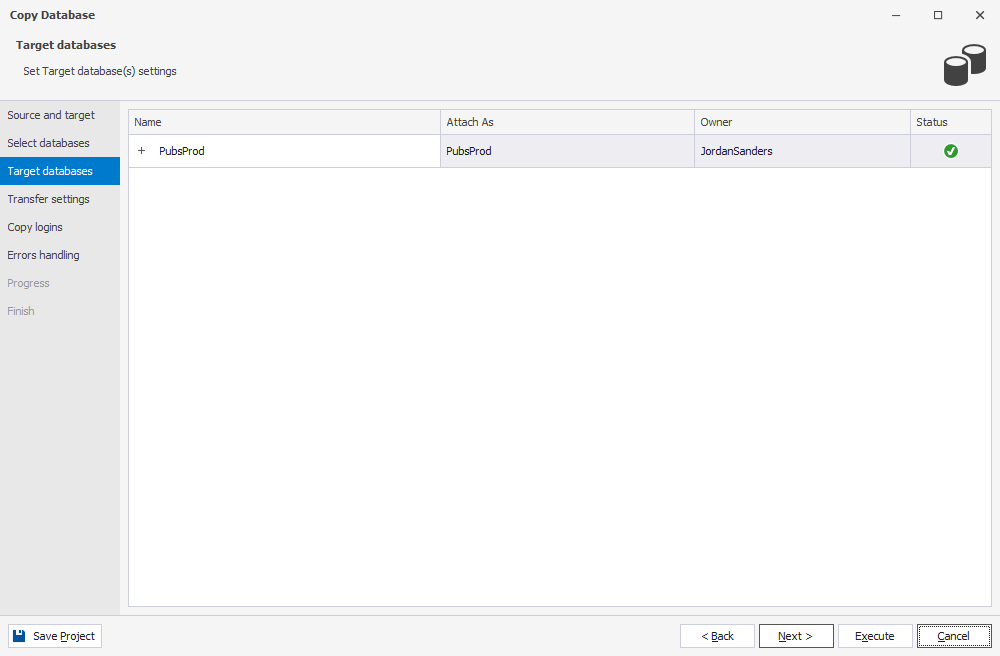
The table describes the statuses you get on the Target databases page.
| Icon | Description |
|---|---|
| The destination database can be copied. | |
An error occurred while attaching the database because a database with the same name already exists on the target server. To resolve the issue, do one of the following:
|
7. Click Next.
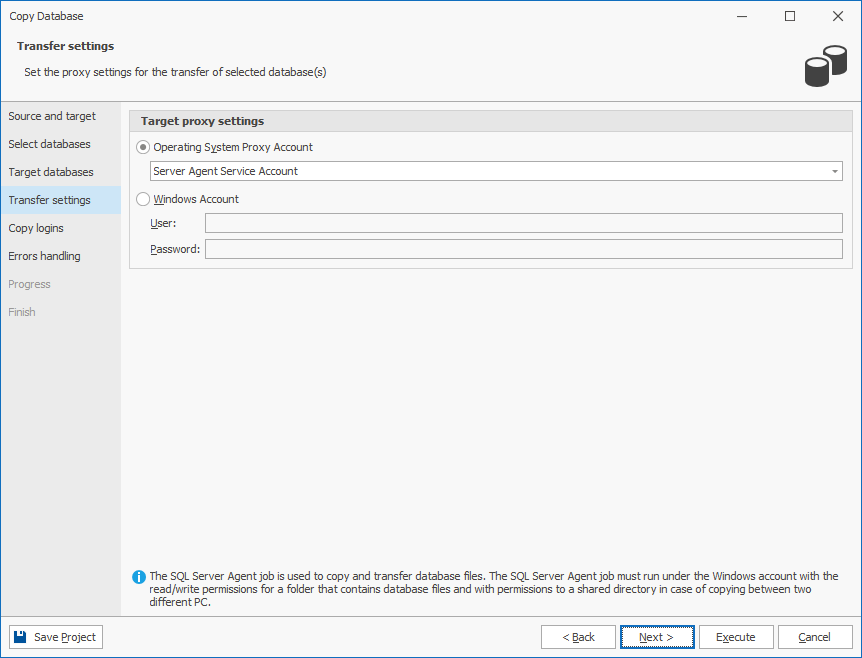
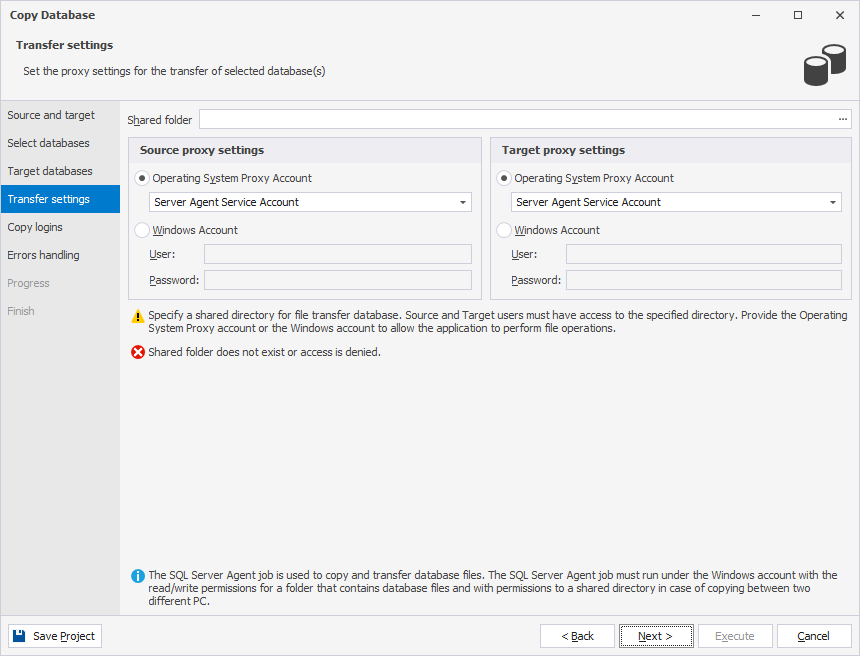
8. Under Target proxy settings, configure the proxy settings for transferring database files, then click Next.
- In Operating System Proxy Account, select one of the following options:
- Server Agent Service Account – The default account under which SQL Server Agent is running on the source server.
- your_user_proxy_account – A Windows account registered in SQL Server Agent. SQL Server Agent uses this account to run operations on behalf of a user who needs specific permissions, such as access to a network folder.
- In Windows Account, enter a specific domain account, for example,
DOMAIN\<user_name>, which has access to the shared folder.
Note
If you copy data between two servers hosted on different computers, follow the steps in Copy between servers on different computers.
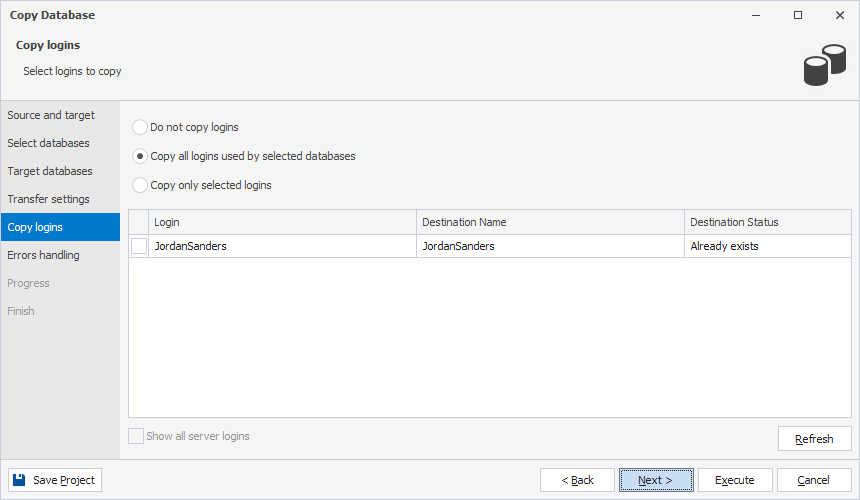
9. On the Copy logins page, choose how to copy logins, then click Next.
- Do not copy logins – Skips copying logins to the target server.
Use this mode when the required logins already exist at the destination server, when only database structure and data need to be transferred, or when both servers use the same authentication system and their logins align.
- Copy all logins used by selected databases – Copies only logins that have corresponding users in the selected databases. For example, if a database contains
User1mapped to theDomain\User1login, that login will be copied.
Use this mode when you need to transfer a database and ensure that the same users can access it. Only the required accounts are copied, reducing the risk of transferring unnecessary logins.
- Copy only selected logins – Copies only logins selected in the grid.
Tip
Selecting Show all server logins displays all server logins, including those that aren’t mapped to the specified database.
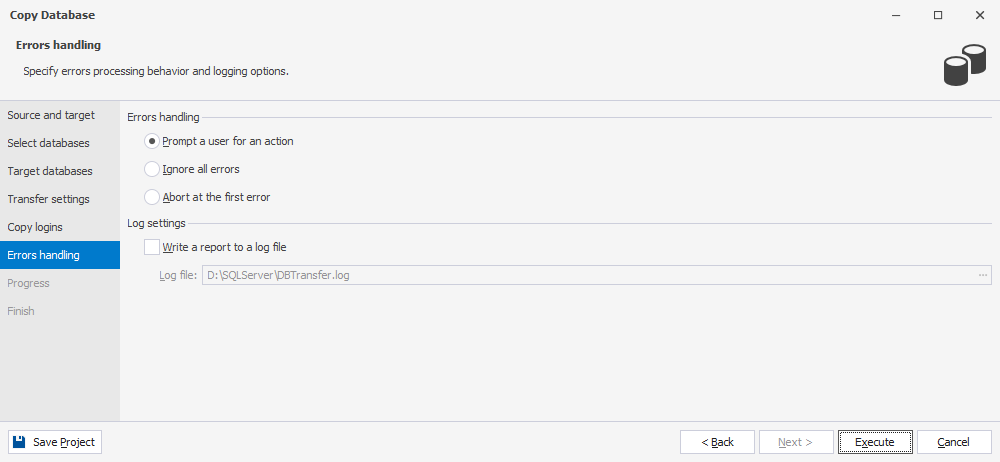
10. On the Errors handling page, choose how to process errors and how they should be logged:
- Abort at the first error – Stops the copy operation immediately when the first error occurs.
- Prompt a user for an action – Pauses the copy operation and prompts the user to choose how to proceed when an error occurs.
- Ignore all errors – Continues the copy operation, skipping any errors without interruption.
11. Click Execute.
The Progress page opens, displaying the copy operation to the target server.
After the operation completes, the Finish page appears and shows whether the data copy succeeded or failed. From this page, you can:
- View the log file.
- Save a copy project.
- Start another copy operation.
- Click Finish to close the wizard.
Copy between servers on different computers
When you copy between two servers hosted on different computers, the Shared folder and Source proxy settings options appear for the following reasons:
- There is no common file system between the servers, so the path to the .mdf and .ldf files isn’t directly accessible to both instances.
- File transfer requires a shared folder accessed over the network, which needs proper network permissions.
Therefore, you must use either a proxy account or a Windows account with access to the shared folder.
On the Target settings page, in Shared folder, enter the full path to the shared folder to transfer .mdf, .ndf, and .ldf files. The folder must exist, have sharing enabled, and both SQL Server Agent service accounts must have read and write permissions.
Under Source proxy settings and Target proxy settings, configure proxy settings on the source and target servers, respectively.
- In Operating System Proxy Account, select one of the following options:
- Server Agent Service Account – The default account under which SQL Server Agent is running on the source server.
- your_user_proxy_account – A Windows account registered in SQL Server Agent. SQL Server Agent uses this account to run operations on behalf of a user who needs specific permissions, such as access to a network folder.
- In Windows Account, enter a specific domain account, for example,
DOMAIN\<user_name>, which has access to the shared folder.
Warning
When you see the following message:
Specify a shared directory for file transfer database. Source and Target users must have access to the specified directory.
Provide the Operating System Proxy account or the Windows account to allow the application to perform file operations.
It means that dbForge Studio can’t transfer files if both the source and target servers cannot access the shared folder. To resolve the issue, grant the operating system proxy account or Windows account the necessary permissions to perform file copy operations.
Search for databases
To search for databases, type a search query in the search box.
Search behavior:
- Matching text is highlighted in yellow.
- The number of matches appears in the search box.
- The search is case-insensitive.
- If the query contains multiple words, each word is matched separately, and all matches are highlighted.
- To clear the search, click
 in the search box.
Keyboard shortcuts in the search box
The table describes the list of keyboard shortcuts you can use in the search box.
| Shortcut | Action |
|---|---|
| Ctrl+A | Selects all. |
| Ctrl+Left Arrow (←) | Moves the caret to the beginning of the word. |
| Ctrl+Right Arrow (→) | Moves the caret to the end of the word. |
| Ctrl+Shift+Left Arrow (←) | Selects text from the current caret position to the beginning of the word and moves the caret to the beginning of the word. |
| Ctrl+Shift+Right Arrow (→) | Selects text from the current caret position to the end of the word and moves the caret to the end of the word. |
| Ctrl+Backspace | Deletes the word to the left of the caret. |
Alternative methods for copying databases
Backup then Restore
Backup the source database and restore it to the target server.
Detach then Attach
Detach the source database, then attach it to the target server.
Schema & Data Compare
Use Schema & Data Compare to compare and synchronize the schema and data between the source and target.
Generate Schema Script Wizard then Schema & Data Compare
Generate the schema script, then use Schema & Data Compare to synchronize the schema and data.
Generate Scripts Folder then Schema & Data Compare
Generate scripts for the schema and data, then synchronize them using Schema & Data Compare.
For more information, see Different Methods to Copy Data with dbForge SQL Tools.