Create a full database backup
A full database backup captures the entire database, such as all data, objects, and part of the transaction log, at the moment the backup operation completes. A full backup is used as the base for differential and transaction log backups.
This topic describes how to create a full database backup in SQL Server by using the Backup wizard in dbForge Studio. You can use the backup file to move the database to another server using the Database Restore Wizard.
Note
To back up the database to a mapped network drive, first create the backup path on a local drive, then manually update the path to point to the network location.
Limitations
- You can’t restore a backup that was created in a newer version of SQL Server to an earlier version of SQL Server.
- Compressed and uncompressed backups can’t exist in a single media set.
- Previous versions of SQL Server can’t read compressed backups.
Permissions
-
To create a full database backup, you must have at least one of the following permissions or role memberships:
BACKUP DATABASEandBACKUP LOGpermissions.- Membership in the
db_ownerfixed database role. - Membership in the
sysadminfixed server role. - Membership in the
db_backupoperatorfixed database role.
Prerequisite
- Connect to the required server instance.
Back up a database
1. Open the Backup wizard in one of these ways:
- In the top menu, select Database > Tasks > Back Up.
- In Database Explorer, right-click the connection name or required database and select Tasks > Back Up.
- On the Start Page, select Administration > Back Up.
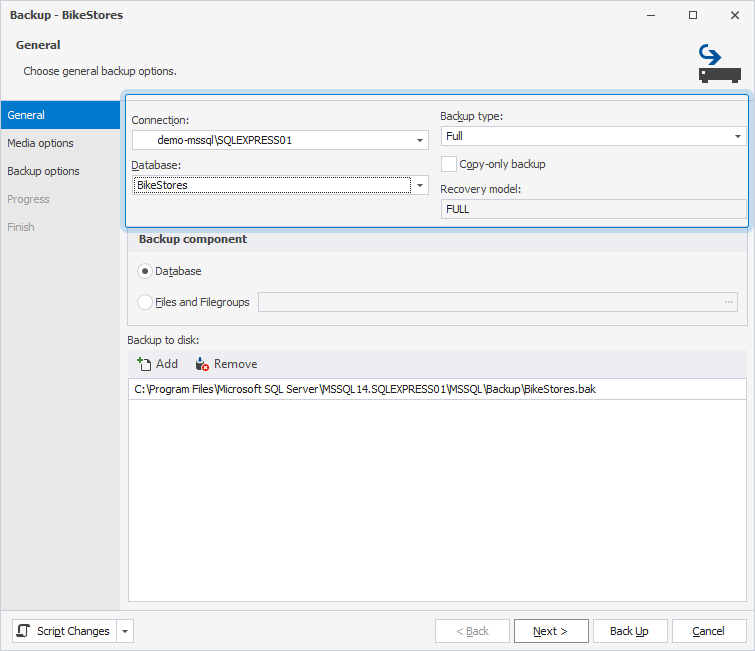
2. On the General page, configure the general backup options:
2.1. In Connection, select the server connection for the database you want to back up.
2.2. In Database, select the database you want to back up.
2.3. In Backup type, select Full.
2.4. Optional: Select Copy-only backup to create a copy-only backup that doesn’t affect your regular backup and restore sequence.
2.5. In Backup component, select Database.
2.6. In Backup to disk, click Add to change the path to the destination folder to store a backup file.
Tip
To remove a destination file, click Remove.
3. In the Browse Files dialog, select the destination folder to store the file:
3.1. In Select the file, select the backup file.
3.2. In Selected path, view the path to the backup file.
3.3. In FileName, keep the default name or enter a new one.
3.4. Click OK to save the changes.
Note
The default path to store the backup file is
C:\Program Files\Microsoft SQL Server\<instance_name>\MSSQL\Backup\file_name.bak.

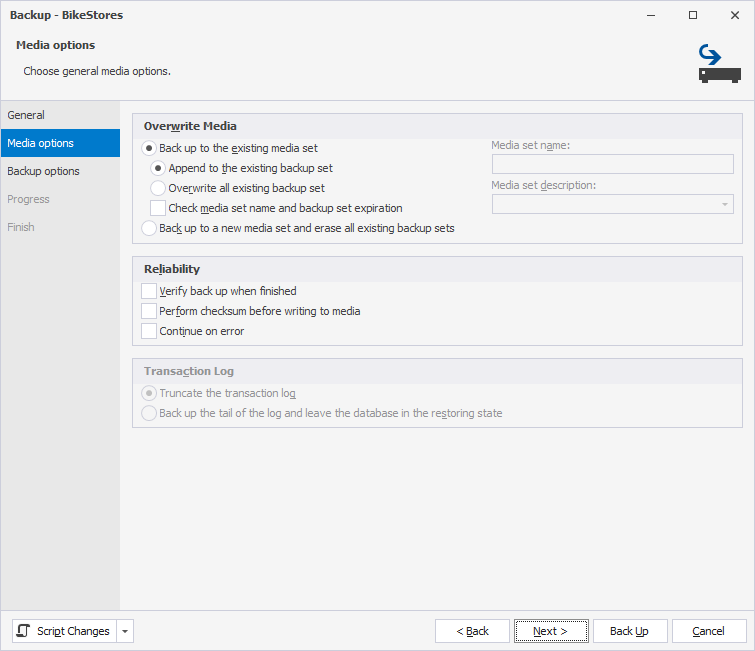
4. On the Media options page, configure the media options:
4.1. Under Overwrite Media, choose how the backup should be written to the media.
4.2. Under Reliability, configure how errors should be handled.
5. On the Backup options page, configure the backup options:
5.1. In Name, specify the backup name.
5.2. In Description, specify the backup description.
5.3. Under Backup set will expire, select one of the following options:
- After: Specify the number of days after which the backup expires and can be overwritten.
- On: Specify the date when the backup expires.
5.4. To change the backup compression behavior, select Compress backup.
Note
The
backup compression defaultserver-level configuration option determines the default backup compression behavior.

6. To create an encrypted backup, select Encrypt backup, then specify encryption options:
- Algorithm: Select an encryption algorithm. The supported encryption algorithms are: AES 128, AES 192, AES 256, and Triple DES.
- Certificate or Asymmetric key: Select a certificate or asymmetric key to secure the encryption key.
Note
The Encrypt backup option is available when the Back up to a new media set and erase all existing backup sets option is selected.
Warning
It is recommended to back up your certificate or keys and store them in a different location from the backup you encrypted.
If the certificate or asymmetric key is unavailable, you can’t restore the backup.
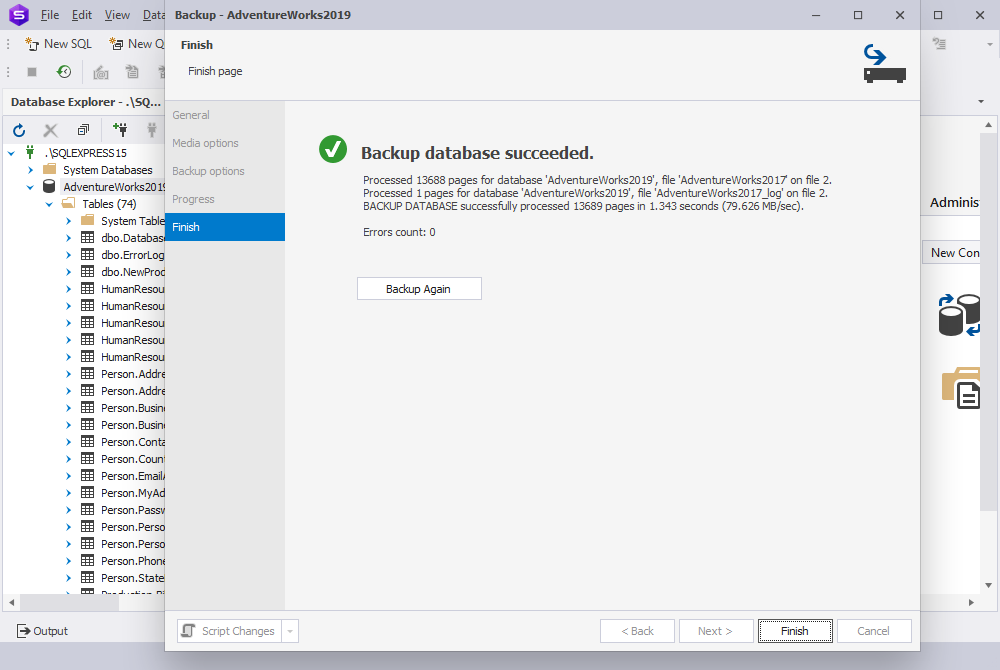
7. Click Back Up.
When the operation is complete, you can view its result on the Finish page.
8. To back up the database again, click Backup Again.
9. Click Finish to close the wizard.
For more information on configuring SQL Server backups on a Windows system, see How to Set Up Every Day Database Auto Backup in SQL Server.
Backup wizard options
Media options
The table describes the options available on the Media options page of the Backup wizard.
Overwrite Media
| Name | Description |
|---|---|
| Back up to the existing media set | Adds your backup to an existing media set, which can contain multiple backup sets. |
| Append to the existing backup set | Adds the new backup to the end of the current backup set. Existing backups are preserved. |
| Overwrite all existing backup sets | Replaces the current contents of the media set with new data. All previous backups on this set will be lost. |
| Check media set name and backup set expiration (checkbox) | Verifies the name and the expiration date of the backup sets. |
| Back up to a new media set and erase all existing backup sets | Creates a new media set, removing all existing backup sets on the media. |
| Media set name and Media set description | Specifies the name and description for the current media set. |
Reliability
| Name | Description |
|---|---|
| Verify backup when finished | Verifies the backup to ensure it can be read and restored correctly. |
| Perform checksum before writing to media | Adds a checksum for each page to detect corruption during the write operation. |
| Continue on error | Continues a backup operation if an error is encountered. |
Backup options
The table describes the options available on the Backup options page of the Backup wizard.
Backup set
| Name | Description |
|---|---|
| Name | Specifies a backup name. |
| Description | Specifies a backup description. |
| Backup set expiration | Specifies when the backup set can be overwritten:
|
| Compress backup | Reduces the size of the backup file, regardless of the server-level default. When selected, new backups are compressed by default. |
Encrypted options
| Name | Description |
|---|---|
| Encrypt backup | Creates an encrypted backup to protect data from unauthorized access during storage and transfer. |
| Algorithm | Specifies an encryption algorithm. |
| Certificate or Asymmetric Key | Specifies a certificate or asymmetric key. |