


Query History
Last modified: May 28, 2025
It’s not necessary to manually save every query that you run or those that are executed on a regular basis, such as monthly tasks, in a separate document. The Query History feature captures and stores essential details about your executed SQL commands over a given time span, allowing for easy access. This functionality enables users to review, modify, and look up past queries executed on the database. Additionally, it provides insights into who ran each query and when, alongside other pertinent details.
The Query History is particularly useful in scenarios where an examination of past actions is required, such as investigating specific cases, reviewing backup logs, or retrieving queries after an SQL Server malfunction.
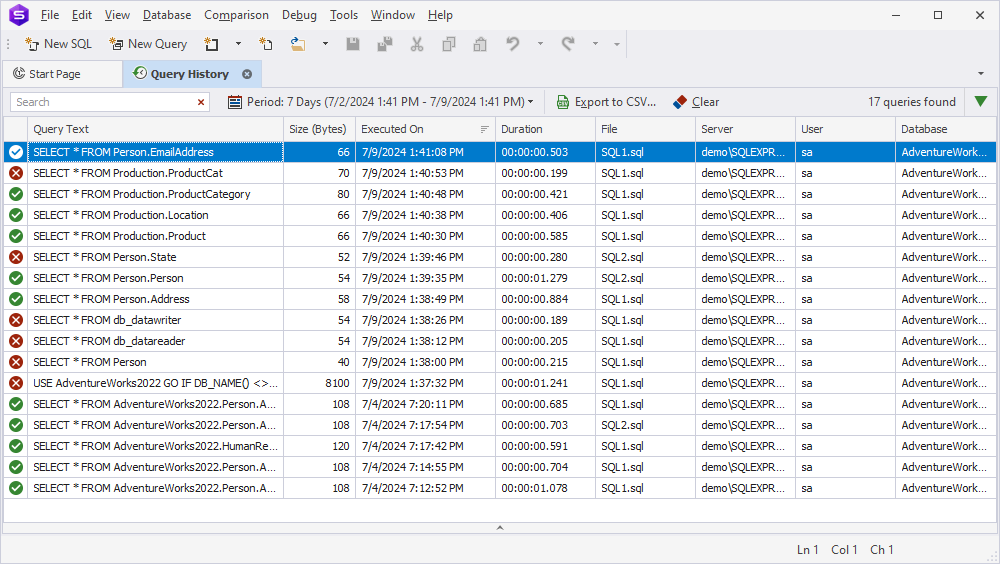
The Query History is organized into two main sections:
Query History grid: A tabular representation of the query history.
Preview pane: An area for viewing detailed query information.
The columns in the Query History grid include:
-
Status: Reflects the success or failure of the query execution.
-
Query Text: The text of SQL query that was executed.
-
Size (Bytes): The memory footprint of the query.
-
Executed On: The exact time and date the query was run.
-
Duration: The time it took for the query to execute.
-
File: The name of the file containing the SQL statement.
-
Server: The server on which the query was executed.
-
User: The individual who initiated the query execution.
-
Database: The name of the database where the query ran.
To open the Query History window, point to Other Windows in the View menu, and then select Query History.
The window looks in the following way:
Set up the Query History behavior
To set up the behavior of Query History:
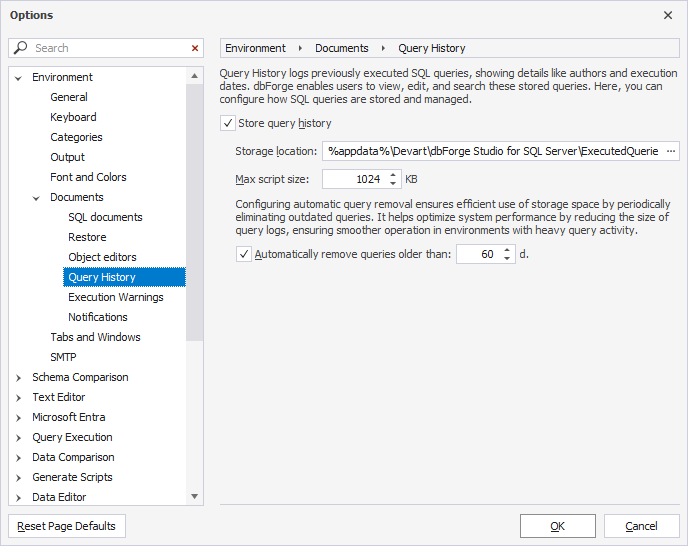
1. On the Tools menu, click Options. The Options dialog opens.
2. Navigate to Environment, Documents, Query History.
3. To enable storing query SQL Query History, select Store query history and set and set the number of days to store executed queries.
4. Optionally, modify the path to store the Query History database, and the maximum script size to store.
The default period to store executed queries is 60 days. After the specified period has ended, the history is automatically deleted. You can also upload the file with the history data by copying it from the folder on your computer to the required place. The default folder to store is C:\Users\Username\AppData\Roaming\Devart\dbForge Studio for SQL Server\ExecutedQueries.
The file cannot be later viewed from the dbForge tool because the old data will be auto-deleted.
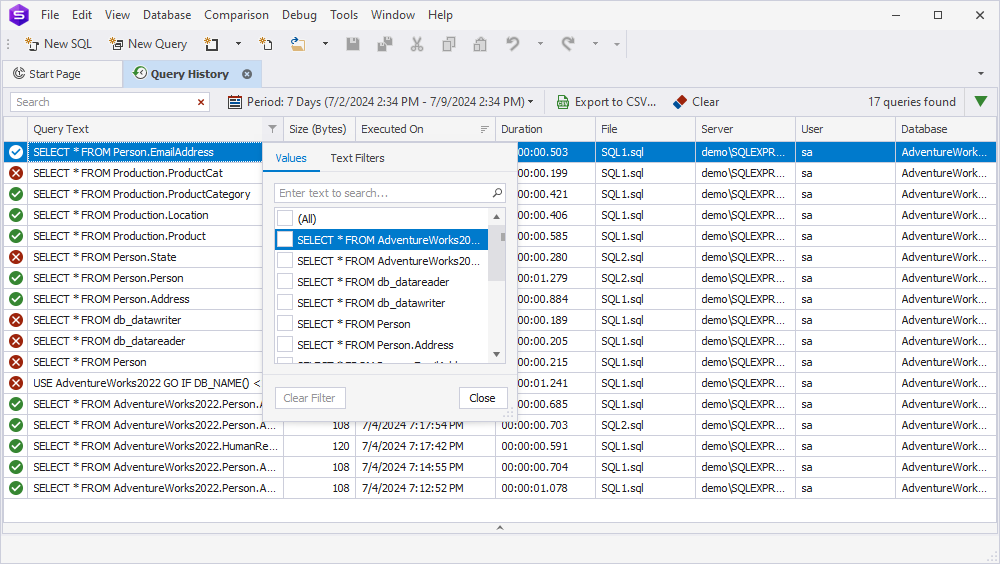
Filter SQL Query History
To quickly find the required query, you can:
- Type the search string into the Search box and specify query execution time frame.
- Use sorting, grouping, and filtering.
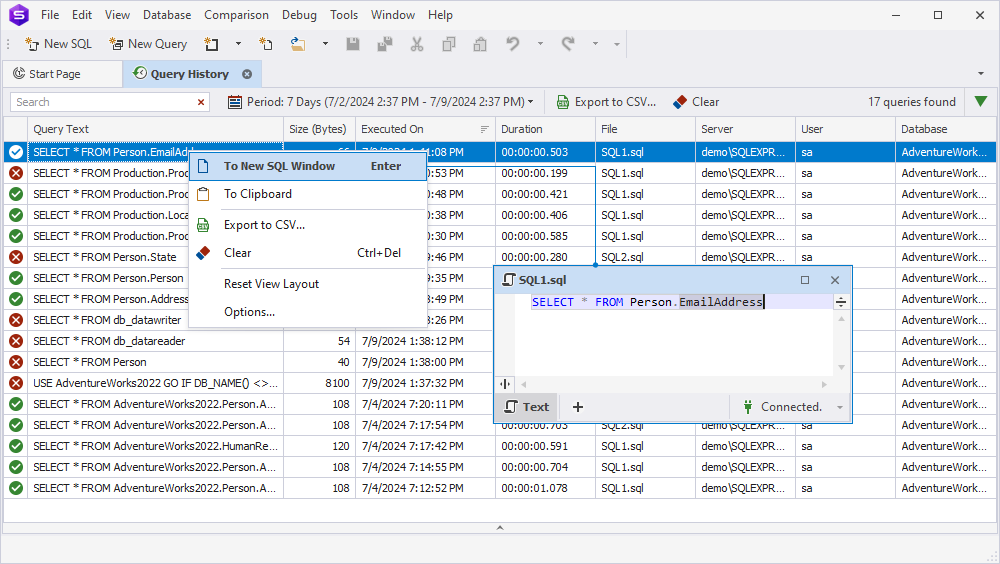
Edit a query
To edit an executed SQL query, right-click it in the Query History list and select To New SQL Window. This will open the query in a new SQL document, where you make any necessary modifications to its text.
Alternatively, simply double-click the required query in the Query History list.
Download dbForge Studio for SQL Server and try it absolutely free for 30 days!
'%3e%3cpath%20id='thumb_up_2'%20d='M15%2017H5.5V7L11.5%201L12.1667%201.45833C12.4028%201.625%2012.5833%201.83681%2012.7083%202.09375C12.8333%202.35069%2012.8681%202.61806%2012.8125%202.89583L12.7917%203L12%207H17.5C17.9167%207%2018.2708%207.14583%2018.5625%207.4375C18.8542%207.72917%2019%208.08333%2019%208.5V9.6875C19%209.79861%2018.9896%209.89931%2018.9688%209.98958C18.9479%2010.0799%2018.9167%2010.1736%2018.875%2010.2708L16.3944%2016.0875C16.2703%2016.3625%2016.0833%2016.5833%2015.8333%2016.75C15.5833%2016.9167%2015.3056%2017%2015%2017ZM7%2015.5H15L17.5%209.6875V8.5H10.1667L11.1875%203.4375L7%207.625V15.5ZM5.5%207V8.5H2.5V15.5H5.5V17H1V7H5.5Z'%20fill='%2327282C'/%3e%3c/g%3e%3c/g%3e%3c/svg%3e) Yes
Yes'%3e%3cpath%20id='thumb_down_2'%20d='M5%203H14.5V13L8.5%2019L7.83333%2018.5417C7.59722%2018.375%207.41667%2018.1632%207.29167%2017.9062C7.16667%2017.6493%207.13194%2017.3819%207.1875%2017.1042L7.20833%2017L8%2013H2.5C2.08333%2013%201.72917%2012.8542%201.4375%2012.5625C1.14583%2012.2708%201%2011.9167%201%2011.5V10.3125C1%2010.2014%201.01042%2010.1007%201.03125%2010.0104C1.05208%209.92014%201.08333%209.82639%201.125%209.72917L3.60417%203.91667C3.71528%203.63889%203.89931%203.41667%204.15625%203.25C4.41319%203.08333%204.69444%203%205%203ZM13%204.5H5L2.5%2010.3125V11.5H9.83333L8.8125%2016.5625L13%2012.375V4.5ZM14.5%2013V11.5H17.5V4.5H14.5V3H19V13H14.5Z'%20fill='%2327282C'/%3e%3c/g%3e%3c/g%3e%3c/svg%3e) No
NoWant to find out more?
'%3e%3cpath%20id='Vector'%20d='M4%204V24H24V4H4ZM22%2022H6V9H22V22ZM19%2019H9V18H19V19ZM19%2016H9V15H19V16ZM19%2013H9V12H19V13ZM21%202H2V21H0V0H21V2Z'%20fill='%230071CE'/%3e%3c/g%3e%3cdefs%3e%3cclipPath%20id='clip0_676_40052'%3e%3crect%20width='24'%20height='24'%20fill='white'/%3e%3c/clipPath%3e%3c/defs%3e%3c/svg%3e)
Overview
Take a quick tour to learn all about the key benefits delivered by dbForge Studio for SQL Server.

All features
Get acquainted with the rich features and capabilities of the tool in less than 5 minutes.

Request a demo
If you consider employing this tool for your business, request a demo to see it in action.

