Hide columns and filter data
dbForge Studio for SQL Server provides multiple options for hiding columns and filtering data at both column and row levels.
Hide columns
You can hide columns in one of these ways:
- Use a
SELECTstatement - Use the Visible Columns dialog
Hide columns using a SELECT statement
To hide columns from the result set, delete or omit the column names you no longer want to include in the result set.
For example, the original query is as follows:
SELECT FirstName, LastName, Email, PhoneNumber
FROM Person.Person;
Revise the original query to omit the Email and PhoneNumber columns:
SELECT FirstName, LastName
FROM Person.Person;
Tip
Since
SELECT *can impact both performance and readability, selecting specific columns is the recommended approach.
Hide columns using the Visible Columns dialog
1. Right-click the column header and select Visible Columns.
2. Clear the checkboxes next to the columns you want to hide from the grid.
3. Click OK to apply the changes and close the dialog.
Filter data
You can filter data in one of these ways:
- Add a
WHEREclause to your query. - Use the Filter option.
- Apply a quick filter.
Add a WHERE clause to your query
Use the WHERE clause after the FROM clause and before any GROUP BY or ORDER BY clauses.
Syntax example
SELECT column1, column2
FROM table_name
WHERE condition;
Filter data by values
1. In the upper-right corner of the column header, click Filter.
2. Select a value from the list.
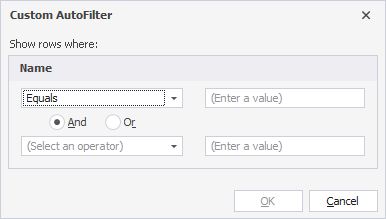
Apply a custom filter to the column
1. In the upper-right corner of the column header, click Filter.
2. Select Custom from the list.
3. In the Custom AutoFilter dialog, specify a filtering condition.
4. Click OK to save the changes.
Apply a quick filter
To apply a quick filter, right-click the grid and select Quick Filter, then select one of the predefined options.
Customize a filtering condition
1. Right-click the grid and select Quick Filter > Condition.
2. In the Filter Editor dialog, specify a filtering condition:
- In Name, select the column by which you want to filter the data.
- In Begins with, select the comparison or logical operator.
- In Enter a value, specify a value by which you want to filter the data.
3. Click Apply to save the changes.
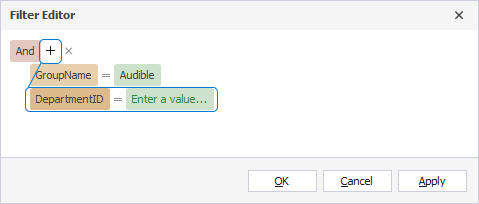
Manage filtering conditions in Filter Editor
Filter Editor displays filter conditions as a tree structure with condition nodes and group nodes. A group consists of multiple conditions or subgroups combined using a logical operator, such as AND or OR.
To change a group logical operator, click it and select a different one.
To navigate between conditions and groups, use the Up Arrow and Down Arrow keys.
To navigate between a condition column, operator, and value, use the Left Arrow and Right Arrow keys.
To remove a condition, click the cross icon next to it. Alternatively, navigate to the condition and press the Delete or Minus keys.
To remove a group, click its logical operator and select Remove Group.
You can also copy, cut, and paste conditions and groups using the standard keyboard shortcuts:
- Ctrl+C to copy.
- Ctrl+X to cut.
- Ctrl+V to paste.
Add a condition to the group
1. In Filter Editor, select ![]() .
.
2. In the Filter Editor dialog, specify a filtering condition:
- In Name, select the column by which you want to filter the data.
- In Begins with, select the comparison or logical operator.
- In Enter a value, specify a value by which you want to filter the data.
3. Click Apply to save the changes.
Create a new filtering condition
1. In Filter Editor, click the upper-level group operator, then select Add Group.
Alternatively, press the Ctrl+Plus keys.
2. Create a new filtering condition in one of these ways:
- Click the upper-level group operator, then select Add Condition.
- Navigate to the group you want to update and press the Insert or Plus keys.
- Click the + icon for the group.
3. Select the condition column from the list.
4. Select the condition criteria operator you want to apply.
If the condition operator requires operand values, specify them.
5. Click Apply to save the changes.
Remove a condition
To remove a condition, in Filter Editor, click ![]() next to the condition you want to remove.
next to the condition you want to remove.
Manage filters
When data is filtered, the Filter option changes to the active filter to indicate that a filter is applied.
The filter condition appears on the bottom toolbar, providing quick, one-click access to its parameters.

To remove all filter conditions, select  on the bottom toolbar.
To remove the column’s filter condition, right-click the column and select Clear Filter.
To remove the filter and show all records, clear the checkbox on the bottom toolbar.
Edit a filter condition
1. In the bottom-right corner, select Edit Filter.
2. In Filter Editor, modify the filtering condition.
3. Click Apply to save the changes.