Build and manage queries
To start building a query, open a Query Builder diagram by doing one of the following:
- On the standard toolbar, click New Query.
- On the Start Page, click SQL Development > Query Builder.
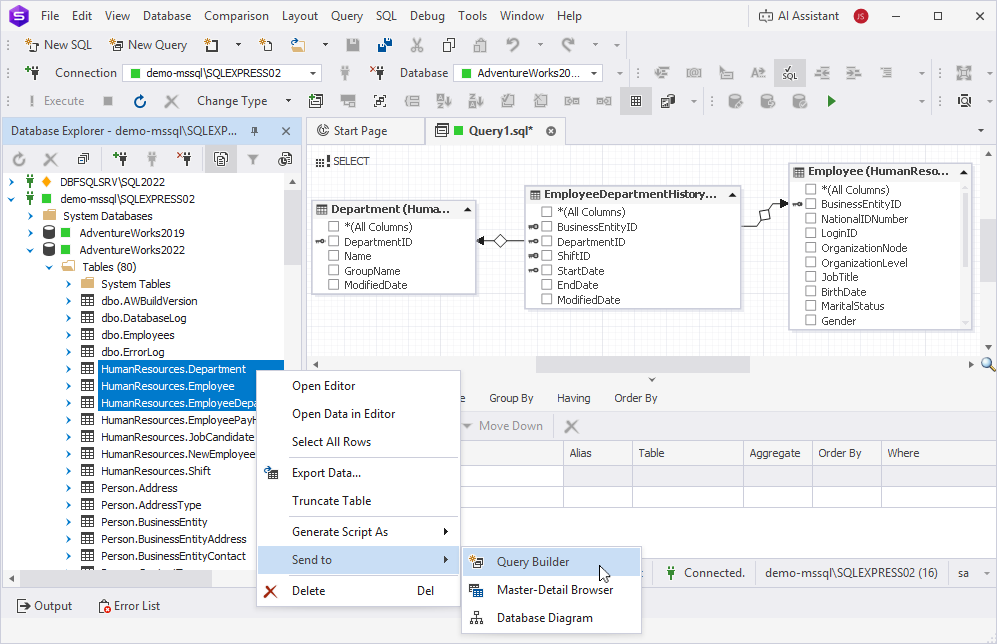
- In Database Explorer, right-click a table and select Send to > Query Builder.
- In the top menu, select File > New > Query.
Add tables to a query
When you create a query, you retrieve data from tables, or other table-valued objects, such as views or certain user-defined functions. To include any of these objects in your query, add them to the diagram.
To add tables to the diagram, do one of the following:
-
In Database Explorer, select the tables or table-valued objects and drag them onto the diagram.
-
In Database Explorer, right-click the selected tables and select Send to > Query Builder.
To add tables in bulk:
1. Press and hold Ctrl, then select the tables in Database Explorer.
2. Drag the tables to the diagram.
When you add tables or views to the query in the Text view, they’re automatically added to the Query Builder diagram.
Note
The database objects you drag onto the diagram and add to the Text view must be connected to the same server.
Remove tables from a query
To remove a table or any table-valued object from the query, do one of the following:
-
On the diagram, right-click the table you want to delete and select Remove from Diagram. Alternatively, press Delete.
-
At the bottom of the Query Builder document, select Text and remove all references to the object in the SQL Editor.
To remove multiple objects:
1. Hold down Ctrl and select the objects.
2. Right-click them and select Remove from Diagram.
Note
When you remove a table or table-valued object, Query Builder automatically removes any related JOINs and column references from the SQL Editor.
Removing a table or table-valued object from the diagram doesn’t delete the object from the database—it only removes it from the current query.
Manage columns of the query
You can add a column to the query, sort its data, search its contents, or summarize its values.
Add a column
To add a column, do one of the following:
-
On the diagram, select the checkbox next to the column you want to add.
-
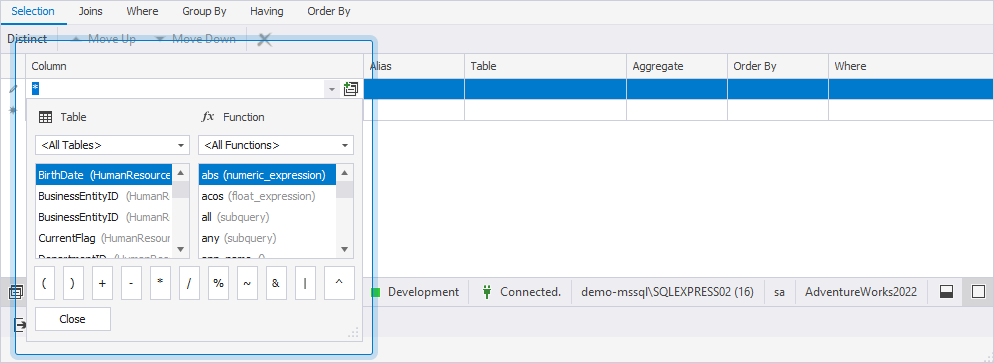
In Tabbed Editor, select the empty row in the Column grid column and then select a table and a column name from the list.
Note
To open Tabbed Editor, on the Query toolbar, click
.
Alternatively, in the top menu, select Query > Show Tabbed Editor.
Add all columns for a table
To add all columns for a table or table-valued object, do one of the following:
-
On the diagram, select the checkbox next to *(All Columns).
-
On the Query toolbar, click
 .
. -
In the top menu, select Query > Select all columns.
Add columns for all tables on the diagram
To add all columns for all tables:
1. On the diagram, hold down Ctrl and select all tables.
2. Right-click any table header and select Select all columns.
Note
Before selecting all columns, ensure no JOINs are selected on the diagram.
Arrange shapes on the diagram
You can arrange the diagram layout automatically or manually.
To align a shape to the grid:
1. Select the table on the diagram.
2. On the Layout toolbar, click ![]() .
.
Alternatively, in the top menu, select Layout > Align > to Grid.
Align shapes in a row
To align shapes in a row:
1. Select the shapes you want to align.
2. On the Layout toolbar, choose one of the following options:
-
 Align Top – Aligns the shapes by their top of the primary selection.
 -
 Align Middle – Aligns the shapes by their center of the primary selection.
 -
 Align Bottom – Aligns the shapes by their center of the primary selection.
Note
Aligning shapes in a row does not change their horizontal positions.
Align shapes in a column
To align shapes in a column:
1. Select the shapes you want to align.
2. On the Layout toolbar, you can align shapes as follows:
-
 Align Right – Aligns the shapes by their right side of the primary selection.
 -
 Align Left – Aligns the shapes by their left side of the primary selection.
 -
 Align Center – Aligns the shapes by center of the primary selection.
Note
Aligning shapes in a column does not change their horizontal positions.
Resize the diagram
To resize the diagram, do one of the following:
-
Right-click the diagram and select Layout Diagram.
-
On the Diagram toolbar, select the diagram and click
 .
.
To change the shape size, select it and drag the square resize markers on the sides or corners.
Align the shape size to the grid
To align the shape size to the grid:
1. Select the shape whose size you want to change.
2. On the Layout toolbar, click ![]() .
.
Alternatively, in the top menu, select Layout > Make Same Size > Size to Grid.
Shapes have maximum and minimum dimensions:
- The minimum width and height are fixed.
- The maximum width is based on the length of the longest column name in the table shape.
- The maximum height depends on the number of columns in the table shape.
Align multiple shapes to the same size
To align multiple shapes to the same size:
1. Select the shapes you want to align.
2. On the Layout toolbar, click ![]() or
or ![]() .
.
Alternatively, in the top menu, select Layout > Make Same Size, then choose the required option.
Note
All selected shapes are resized to match the dimensions of the primary selection.
Change the shape order
To change the order of overlapping shapes on the diagram, do one of the following:
-
Right-click a shape and select Bring to Front or Send to Back.
-
On the Layout toolbar, click
 or
or  .
.
Note
The primary selection is the shape with blue resize handles. All other selected shapes display black handles.
If a shape can’t be resized to exactly match the primary selection, it will be resized as closely as possible.
Control spacing between shapes
You can adjust the horizontal and vertical spacing between the shapes on the diagram by increasing or decreasing it, making it equal, or removing it entirely.
Increase spacing between shapes
1. Select the shapes to apply spacing changes to.
2. On the Layout toolbar, click ![]() or
or ![]() .
.
Alternatively, in the top menu, select Layout > Horizontal Spacing or Vertical Spacing > Increase.
Decrease spacing between shapes
1. Select the shapes to apply spacing changes to.
2. On the Layout toolbar, click ![]() or select
or select ![]() .
.
Alternatively, in the top menu, select Layout > Horizontal Spacing or Vertical Spacing > Decrease.
Make spacing between shapes equal
1. Select the shapes to apply spacing changes to.
2. On the Layout toolbar, click ![]() or
or ![]() .
.
Alternatively, in the top menu, select Layout > Horizontal Spacing or Vertical Spacing > Make Equal.
Remove spacing between shapes
1. Select the shapes to apply spacing changes to.
2. On the Layout toolbar, click ![]() or
or ![]() .
.
Alternatively, in the top menu, select Layout > Horizontal Spacing or Vertical Spacing > Remove.
Note
When you change spacing, the distance between shapes is measured from the center of each shape.
When you remove spacing, the distance is measured between the borders of the shapes.
For example, when removing vertical spacing:
The top edge of the second shape aligns with the bottom edge of the first shape.
The third shape aligns with the bottom edge of the second shape.
This pattern continues for all selected shapes.