Connect to Azure SQL Database using Microsoft Entra ID
Microsoft Entra ID is a Microsoft identity and access management service that uses single- or multi-factor authentication to help secure access to the database.
If you have a Microsoft Entra instance configured, you can connect to an Azure database using Microsoft Entra authentication in dbForge Studio for SQL Server.
dbForge Studio for SQL Server supports the following Microsoft Entra ID authentication methods:
- Microsoft Entra MFA
- Microsoft Entra Password
- Microsoft Entra Integrated
When you connect using Microsoft Entra multi-factor authentication (MFA), dbForge Studio for SQL Server must be registered as a Microsoft Entra ID application. During registration, an application (client) ID is generated. You must provide this ID to authenticate and connect to the Azure SQL database using Microsoft Entra MFA. For instructions, see Register Studio for SQL Server as a Microsoft Entra ID application
Microsoft Entra MFA
To connect using Microsoft Entra MFA:
1. Open the Database Connection Properties dialog in one these ways:
-
In the Database menu, select New Connection.
-
On the Database Explorer toolbar, click
 .
. -
In Database Explorer, right-click an existing connection, then select New Connection.
-
In Database Explorer, right-click anywhere in the pane, then select New Connection.
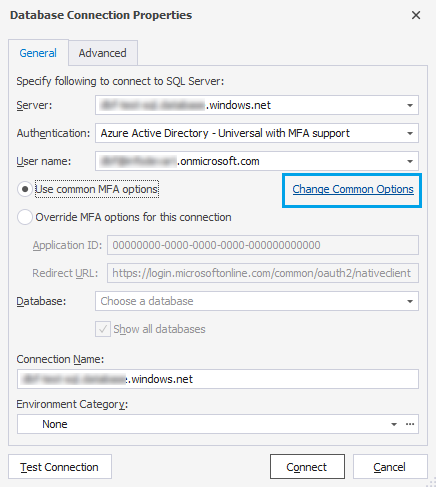
2. In Authentication, select Microsoft Entra MFA as an authentication type.
3. In Server, enter the URL of the Azure SQL Server instance.
4. In User name, enter the name of a Microsoft Entra user who has permissions for the Azure SQL database.
5. Click Change Common Options to open the Options dialog.
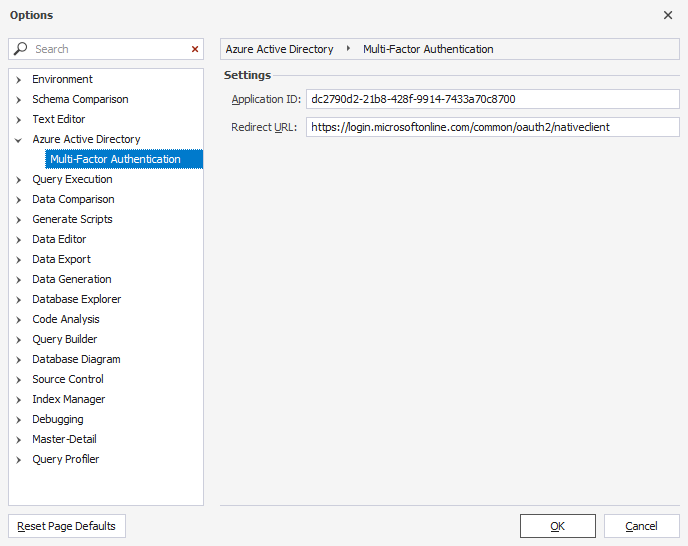
6. In Application ID and Redirect URL, enter the application (client) ID and redirect URL generated when you registered dbForge Studio for SQL Server.
7. To save the changes, select OK.
Tip
To use a different Application ID:
1. Select Override MFA options for this connection.
2. Specify the application ID and redirect URL.
8. Click Connect.
9. In the Sign in to your account dialog, enter the password for the Microsoft Entra ID account.
After a successful sign-in, you can access the databases associated with the Azure SQL instance.
The same dialog appears when you click Test Connection or when you select a database in the Database Connection Properties dialog.
Note
When you create a new connection to the same SQL Server in another instance of dbForge Studio for SQL Server or in a different standalone dbForge SQL tool, the Application ID and Redirect URL are automatically read from the corresponding fields in the Options dialog.
Microsoft Entra Password
To connect using Microsoft Entra Password:
1. Open the Database Connection Properties dialog in one these ways:
-
In the Database menu, select New Connection.
-
On the Database Explorer toolbar, click
. -
In Database Explorer, right-click an existing connection, then select New Connection.
-
In Database Explorer, right-click anywhere in the pane, then select New Connection.
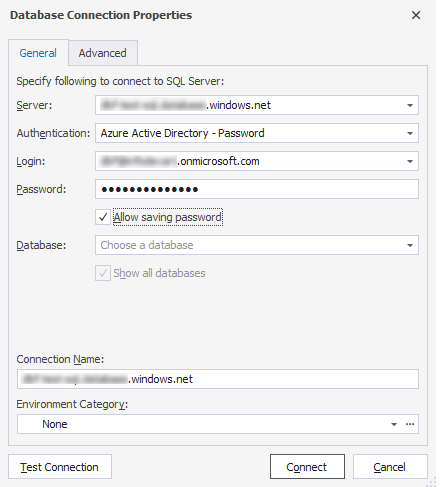
2. In Authentication, select Microsoft Entra Password as an authentication type.
3. In the Server box, enter the URL of the Azure SQL Server instance.
4. In the Login box, enter the Microsoft Entra ID username with Azure SQL database permissions.
5. In the Password box, enter the password for the specified user.
6. Click Connect.
Microsoft Entra Integrated
To connect using Microsoft Entra Integrated:
1. Open the Database Connection Properties dialog in one these ways:
-
In the Database menu, select New Connection.
-
On the Database Explorer toolbar, click
. -
In Database Explorer, right-click an existing connection, then select New Connection.
-
In Database Explorer, right-click anywhere in the pane, then select New Connection.
2. In Authentication, select Microsoft Entra Integrated as an authentication type.
3. In the Server box, enter the URL of the Azure SQL Server instance.
4. Optional: Click Test Connection to verify the connection settings.
5. Click Connect.
The connection and its databases appear in Database Explorer.
