Create a database connection
You can create a database connection using the Database Connection Properties dialog.
To create a connection:
1. Open the Database Connection Properties dialog by doing one of the following:
-
In the Database menu, select New Connection.
-
On the Database Explorer toolbar, click
 .
. -
In Database Explorer, right-click any connection and select New Connection.
-
Right-click anywhere in Database Explorer and select New Connection.
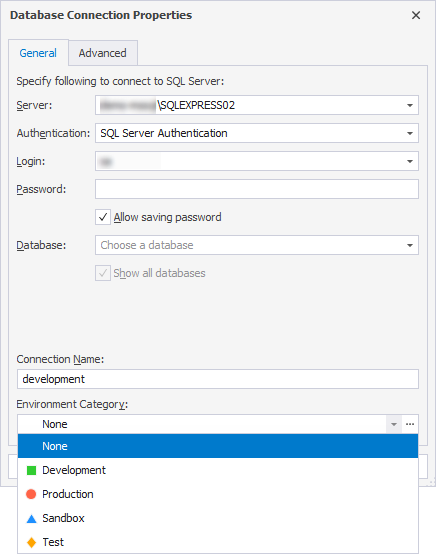
2. On the Database Connection Properties > General tab, set up general connection parameters:
2.1. In the Server list, specify the server name or choose the server:
- Recent – Lists the SQL Server instances you have recently connected to.
- Local – Displays SQL Server instances that are installed and running on your local machine.
- Imported from SSMS – Displays SQL Server instances that you connect to in SSMS.
Tip
Select Refresh to scan your network for available SQL Server instances. If any are found, they appear under Network in the Server list. This option helps you quickly identify and connect to accessible database servers within your local network.
2.2. In the Authentication list, select the authentication mode:
- Windows Authentication – Uses your Windows credentials to log in to SQL Server. There is no need to enter a username or password; the operating system handles authentication.
- SQL Server Authentication – Requires a manually entered username and password stored in SQL Server. This method is independent of Windows credentials.
- Microsoft Entra MFA – Uses Multi-Factor Authentication (MFA) via Microsoft Entra ID (formerly Azure AD). It requires additional verification, for example, a phone app, SMS, or hardware token, for secure login.
- Microsoft Entra Password – Authenticates using Microsoft Entra ID credentials with a username and password, similar to SQL Server Authentication but managed by Entra ID.
- Microsoft Entra Integrated – Uses your current Microsoft Entra ID credentials automatically, similar to Windows Authentication but for cloud-based identity management.
For instructions, see How to connect with Microsoft Entra ID authentication.
Note
To connect to a SQL Server using a custom port, specify the server name followed by a comma and the custom port number. For example,
localhost,62005.
2.3. In the Login and Password boxes, enter the user credential details, respectively. By default, the password is saved automatically.
To cancel saving the password, clear the Allow saving password checkbox.
2.4. In the Database box, enter the name of a SQL database you want to connect to or select the database from the list.
By default, the Show all databases checkbox is selected.
To hide all databases available for the connection in Database Explorer, clear the checkbox.
2.5. Optional: In the Connection Name box, the connection name is generated automatically from the server name. To specify a different name, enter it here.
2.6. Optional: From the Environment Category list, choose the document category, such as Development, Production, Sandbox, and Test.
Note
Categories are not associated with a specific connection. They are determined by rules configured through connection attributes, such as a data source (a name or network address of the SQL Server instance to connect to) and a database name. If two connections share identical values for these attributes, they are assigned the same category.
Alternatively, you can create a DNS alias for the connection to assign a unique environment category.
To create a new environment category, select ![]() Browse in the Environment Category list. For instructions about customizing environment categories, see Window connection coloring.
Browse in the Environment Category list. For instructions about customizing environment categories, see Window connection coloring.

3. Optional: On the Database Connection Properties > Advanced tab, configure advanced connection properties:
- Connection timeout – Set the time (in seconds) when the server should wait to establish a connection. The default value is 15 seconds.
- Execute timeout – Set the time (in seconds) when the task should be completed. The default value is 0 seconds.
- Encrypt connection – Select the checkbox to encrypt the connection.
- Enter additional string connection parameters – Set additional connection properties to the string.
4. Optional: To verify the connection, select Test Connection.
4.1. The window with the message informing about a successful connection appears. Select OK to close the window.
5. To create the connection, select Connect.
You can also watch this video to learn how to connect to a SQL Server database in dbForge Studio for SQL Server.