How dbForge Studio for MySQL is involved in the DevOps process
Suppose that the source code for the testing database is stored in a scripts folder on a remote repository. From time to time, it becomes necessary to restore the testing data to execute different business logic scenarios. This ensures that the data aligns with the conditions required for accurate testing.
The guide provides a step-by-step procedure on how to automate the test data recovery process using a single IDE - dbForge Studio for MySQL.
Workflow
- Step 1: Clone a scripts folder from the remote repository
- Step 2: Create a target database on the server
- Step 3: Synchronize the source scripts folder and target database
- Step 4: Fill the target database with data
Prerequisites
Before starting, ensure that:
- A Git for a Windows client is installed on the machine.
- The following template files must be configured and saved before running the scripts:
- .sql template file to create a MySQL database.
- .scomp template file to synchronize databases based on the synchronization settings stored in the file. The file can be generated using the Schema Comparison functionality.
- .dcomp template file to populate the database with test and realistic data. It can be configured and saved using the Data Comparison functionality.
- .dit template file to import data into the specified tables. The file can be configured and saved using the Data Generation functionality.
 Click to learn how to create a .scomp template file
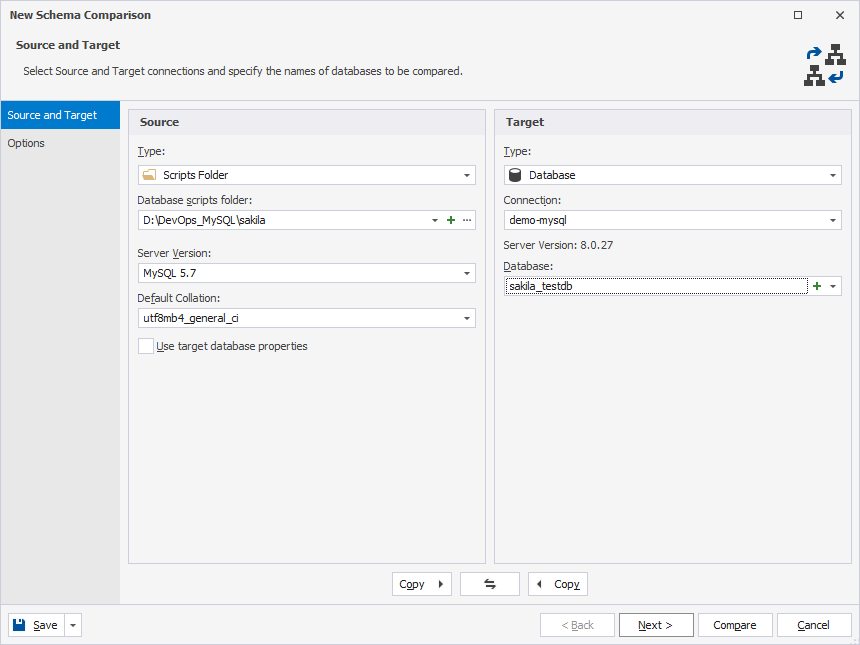
1. On the ribbon, select Comparison > New Schema Comparison to open the New Schema Comparison wizard.
2. On the Source and Target page of the wizard, specify the source and target details:
- Under Source:
- In the Type field, select Scripts Folder.
- In the Database scripts folder field, specify the path to the scripts folder cloned from the remote repository.
- Under Target, select Database as a type and choose the target connection and database.
3. Optional: On the Options page, select the comparison options to be applied to the schema comparison and then select Compare.
3. The Schema Comparison document opens, displaying the objects to be synchronized.
4. On the ribbon, select File > Save [default file name].scomp As to save the schema comparison (.scomp) template file.
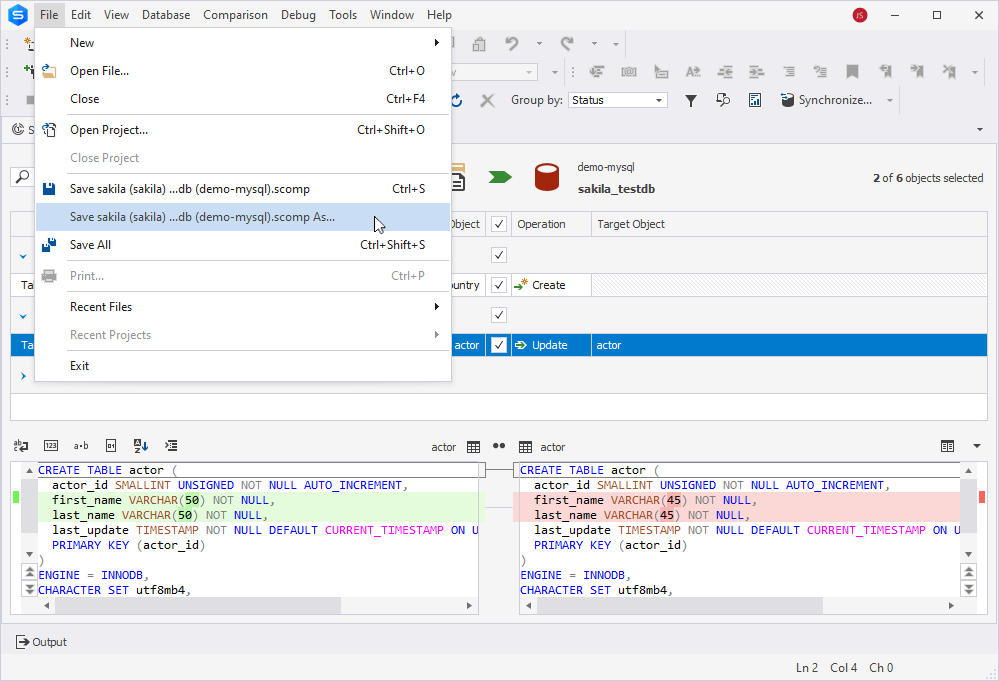
5. In the Save As dialog that opens, specify the .scomp file name and select Save to save the file.
Click to learn how to create a .dcomp template file
1. On the ribbon, select Comparison > New Data Comparison to open the New Data Comparison wizard.
2. On the Source and Target page of the wizard, specify the source and target details:
- Under Source:
- In the Type field, select Scripts Folder.
- In the Database scripts folder field, specify the path to the scripts folder cloned from the remote repository.
- Under Target, select Database as a type and choose the target connection and database.
3. Optional: On the Options page, select the comparison options to be applied to the schema comparison and then select Compare.
3. The Data Comparison document opens, displaying the object data to be synchronized.
4. On the ribbon, select File > Save [default file name].dcomp As to save the data comparison (.dcomp) template file.
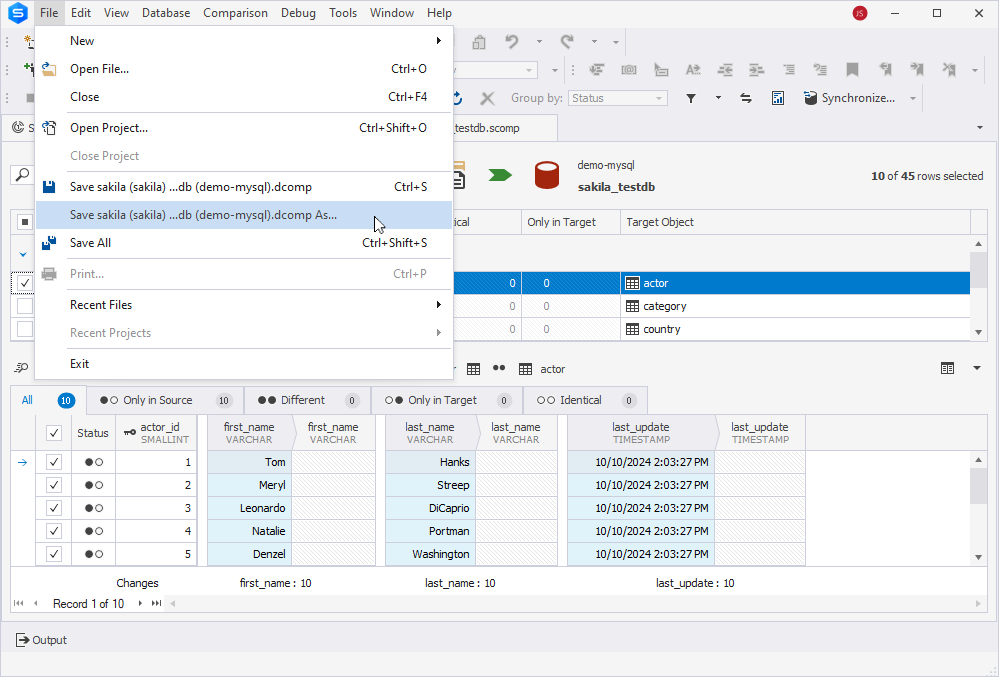
5. In the Save As dialog that opens, specify the .dcomp file name and select Save to save the file.
Click to learn how to create a .dit template file
1. On the ribbon, select Database > Tasks > Import Data to open the Data Import from [file_format] wizard.
2. In the wizard, set the data import options.
3. On the Errors Handling page, select Save > Save Template.
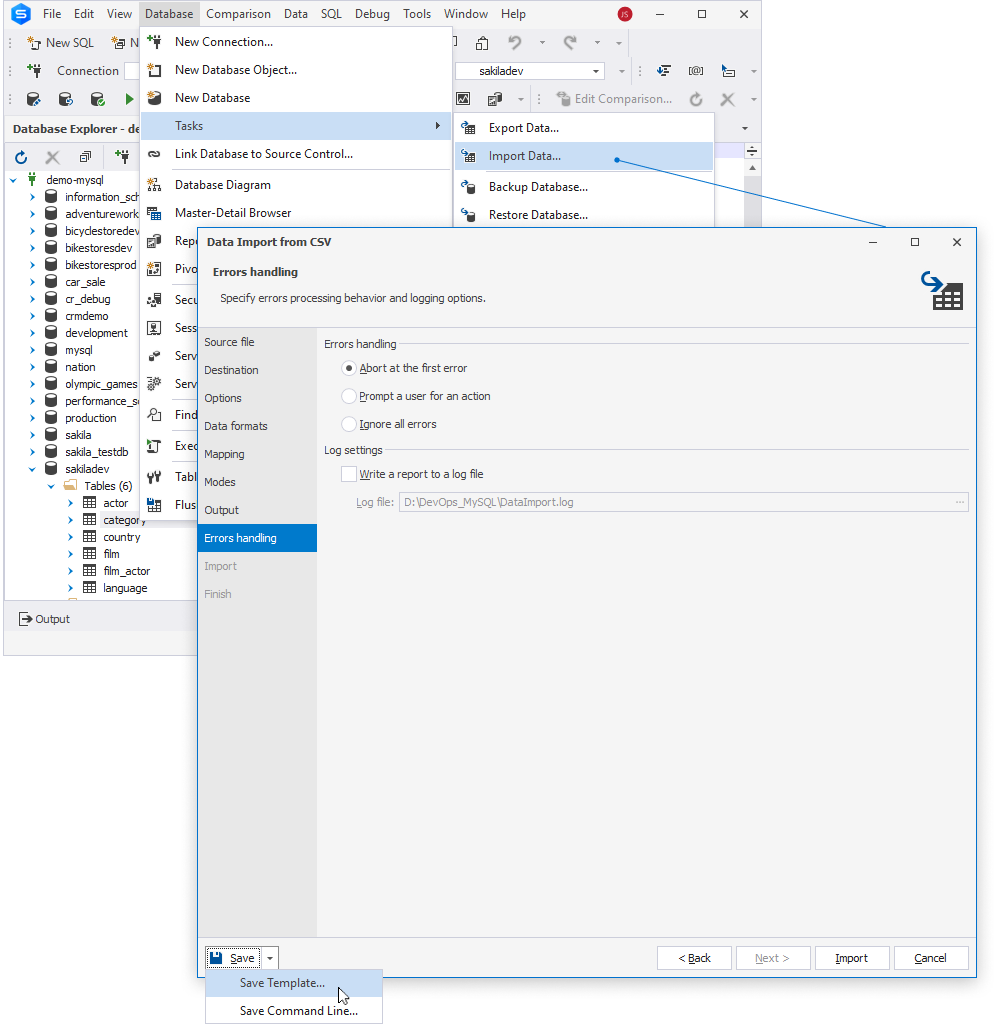
4. In the Save As dialog that opens, specify the .dit file name and select Save to save the file.
Click to learn how to create a .dgen template file
1. On the ribbon, select Database > Tasks > New Data Generation to open the Data Generator Project Properties wizard.
2. On the Connection page of the wizard, choose the connection and database.
3. On the Options page, customize the default data generation options and select Open.
3. In the Data Generation document that opens, select the table to be populated and select File > Save [filename].dgen As on the ribbon.
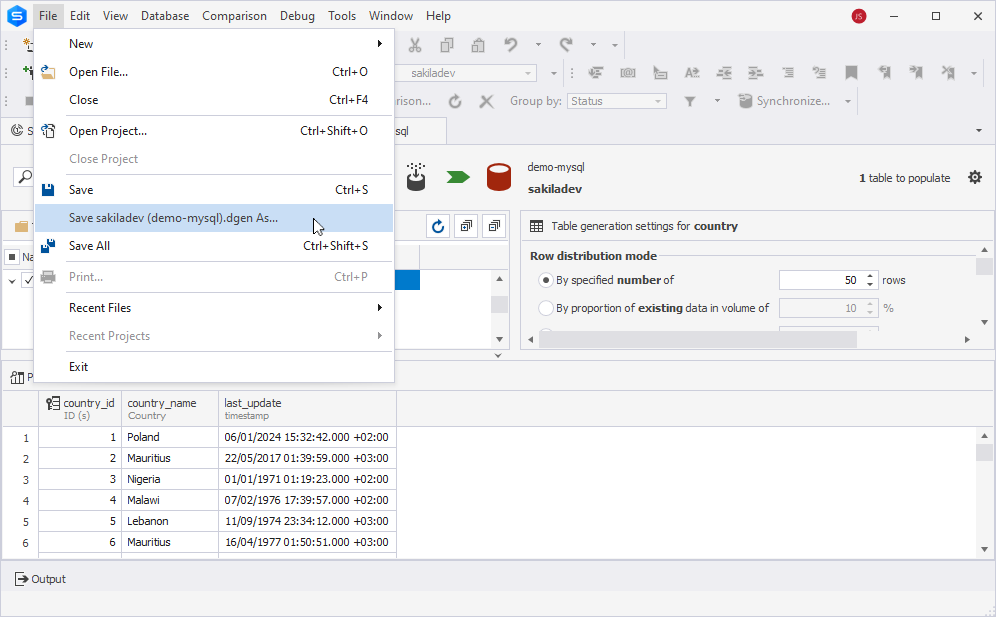
4. In the Save As dialog that opens, specify the .dgen file name and select Save to save the file.
Step 1: Clone a scripts folder from the remote repository
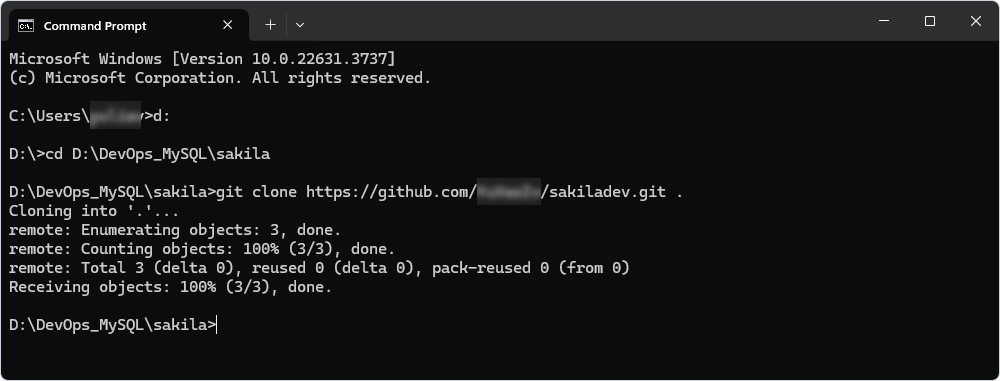
In this step, create a local copy of the scripts folder located on the remote repository to the following directory - D:\DevOps_MySQL\sakiladb:
1. Create an empty folder on the disk of the computer where the local copy of the scripts folder will be stored.
2. Start Windows Command Prompt (CMD) and navigate to the created folder. In this case, it is D:\DevOps_MySQL\sakiladb
3. In the Command Prompt, type the git clone command and specify the URL of the remote repository and the path to the local folder to store the repository copy.
Note
Specify a dot at the end of the command to clone the repository to the specified folder.
git clone <url> <path> .
where:
urlis the URL of the remote repository to be cloned.pathis the path to the local folder to store the cloned copy of the repository.
4. Press Enter to execute the command. This will create a cloned copy of the scripts folder.
Step 2: Create a target database on the server
To create the target database on the server, use the command-line functionality available in dbForge Studio.
To create a database on the server:
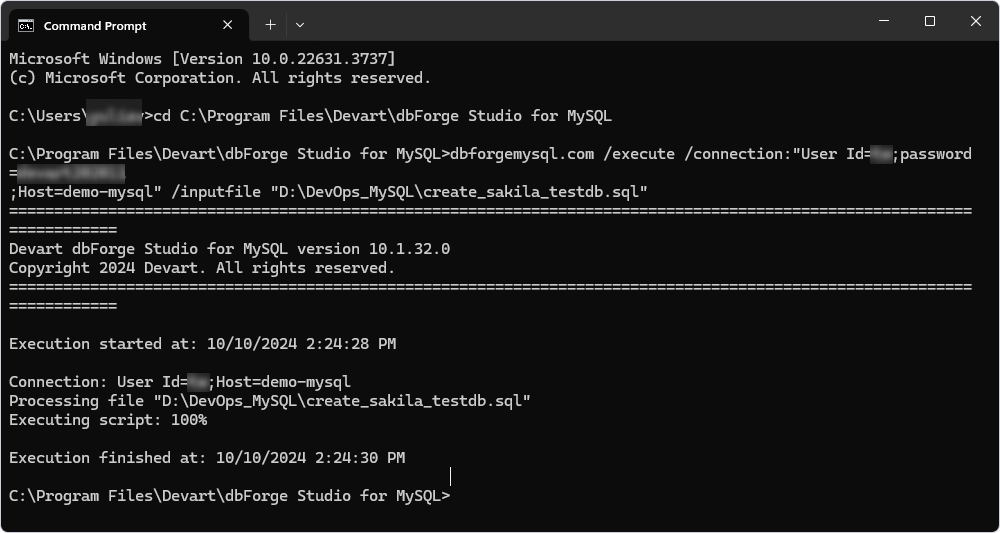
1. In the Command Prompt, navigate to the installation folder of dbForge Studio for MySQL. The default installation folder is C:\Program Files\Devart\dbForge Studio for MySQL.
2. Enter the command-line (CMD) or PowerShel (PS) script and replace %user-name%, %password%, %host%, and database_name with the actual data.
CMD
dbforgemysql.com /execute /connection:"User Id=%user-name%;password=%password%;Host=%host%" /inputfile "sql_file_to_create_the_database"
PS
.\dbforgemysql.com /execute /connection:"User Id=%user-name%;password=%password%;Host=%host%" /inputfile "sql_file_to_create_the_database"
if ($? -eq $true) { Write-host "Database database_name created" -ForegroundColor Cyan } else { Write-host "Error" -ForegroundColor Yellow }
where:
sql_file_to_create_the_databaseis the path to the .sql file to create the database on the specified server.database_nameis the name of the created database.
3. Press Enter to execute the script.
Step 3: Synchronize the source scripts folder and target database
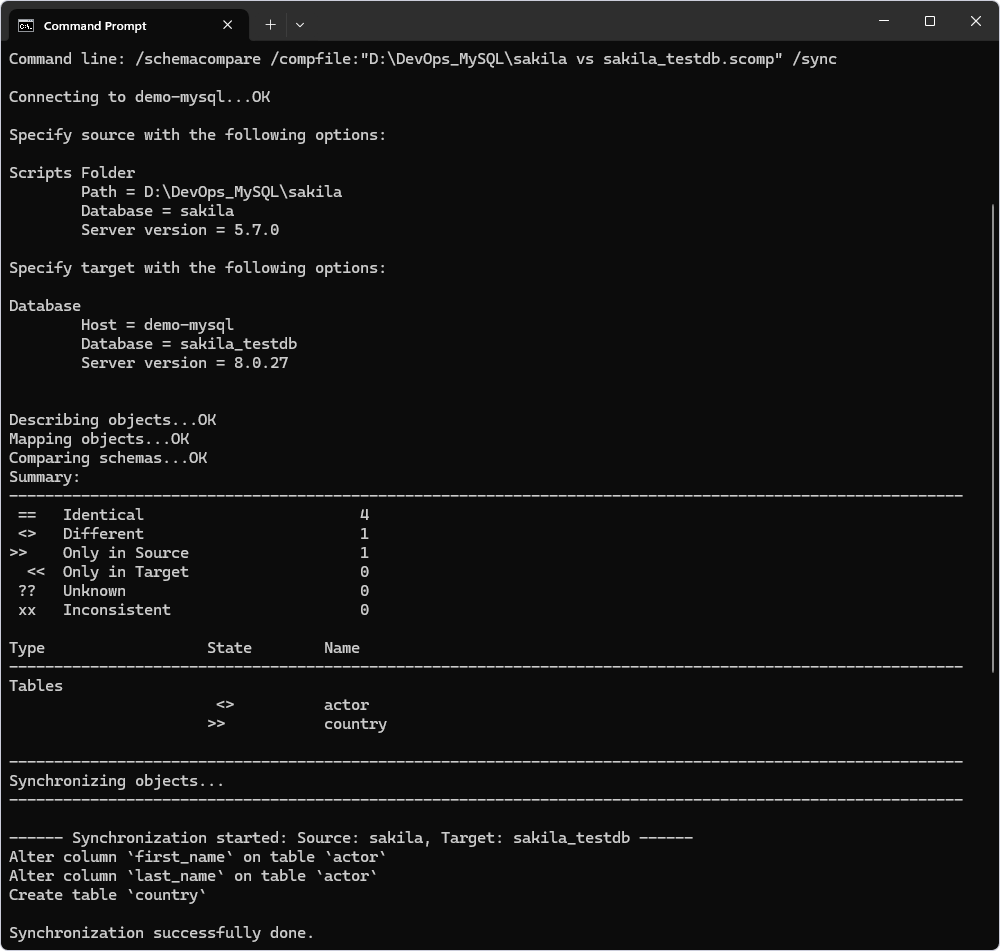
Next, it is necessary synchronize the source scripts folder with the target database based on the synchronization settings stored in the .scomp template file. This will create all the tables, views, procedures, functions, and triggers selected when configuring the template on the target database.
To synchronize schemas, execute the command-line (CMD) or PowerShell (PS) script:
CMD
dbforgemysql.com /schemacompare /compfile:"D:\Temp\DevOps_MySQL\sakiladb vs. sakila_testdb.scomp" /sync
@echo %ERRORLEVEL%
PS
.\dbforgemysql.com /schemacompare /compfile:"D:\DevOps_MySQL\sakiladb vs. sakila_testdb.scomp" /sync
if ($? -eq $true) { Write-host "Objects for database_name created" -ForegroundColor Cyan } else { Write-host "Error" -ForegroundColor Yellow }
where:
D:\Temp\DevOps_MySQL\sakiladb vs. sakila_testdb.scompis the path to the .scomp template file.database_nameis the target database name that contains the created database objects.
Step 4: Fill the database with data
After restoring the database structure, the next step is to populate it with test data. dbForge Studio provides several advanced tools for this purpose, including Data Comparison, Data Import/Export, and Data Generator. These tools offer command-line support, making it easy to automate the data population process:
- Populate the database using the Data Comparison functionality
- Populate the database using the Data Import/Export functionality
- Populate the database using the Data Generator functionality
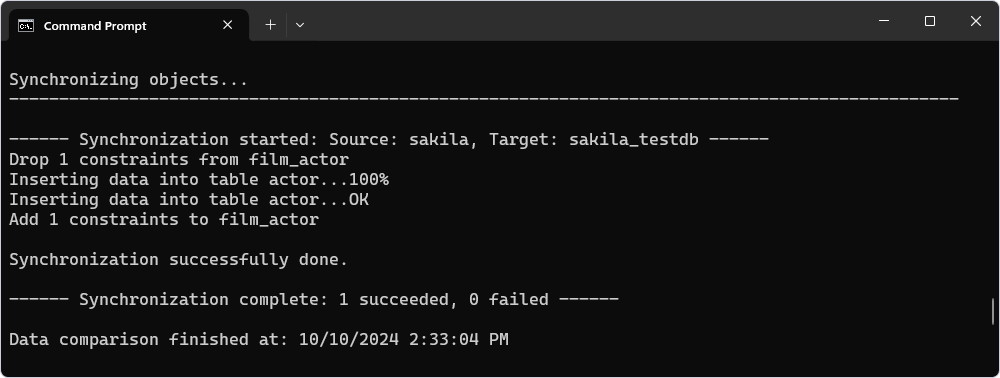
Populate the database using the Data Comparison functionality
To restore reference data from a scripts folder or another database, use the Data Comparison functionality. This step illustrates how to insert data into the actor table by executing the command-line (CMD) or PowerShell (PS) script and using a .dcomp file:
CMD
dbforgemysql.com /datacompare /compfile:"D:\Temp\DevOps_MySQL\actor.dcomp" /sync
@echo %ERRORLEVEL%
PS
.\dbforgemysql.com /datacompare /compfile:"D:\Temp\DevOps_MySQL\actor.dcomp" /sync
if ($? -eq $true) { Write-host "Data inserted in database_name" -ForegroundColor Cyan } else { Write-host "Error" -ForegroundColor Yellow }
where:
D:\Temp\DevOps_MySQL\actor.dcompis the path to the previously generated .dcomp template file.database_nameis the database name that has been populated with data.
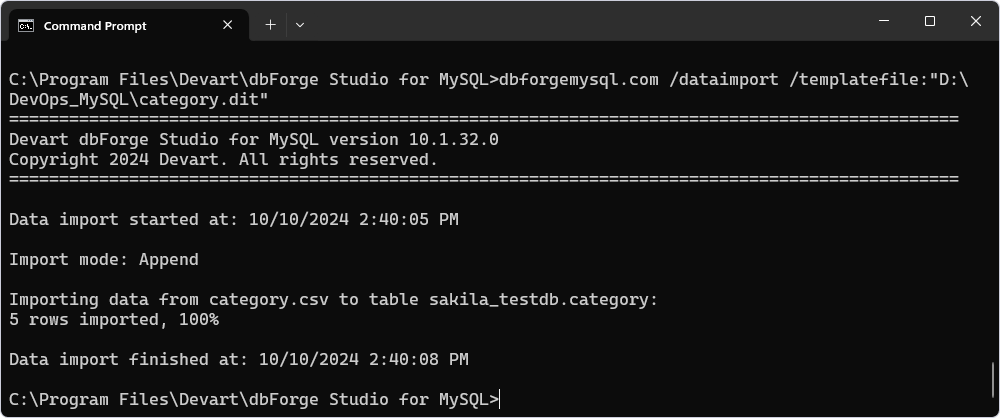
Populate the database using the Data Import/Export functionality
To insert reference data into a specific table stored in a separate file, it is recommended to use the Data Import/Export functionality. This step demonstrates how to populate data into the category table by executing the command-line (CMD) or PowerShell (PS) script and using a .dit file:
CMD
dbforgemysql.com /dataimport /templatefile:"D:\Temp\DevOps_MySQL\category.dit"
@echo %ERRORLEVEL%
PS
.\dbforgemysql.com /dataimport /templatefile:"D:\Temp\DevOps_MySQL\category.dit"
if ($? -eq $true) { Write-host "Data inserted in database_name" -ForegroundColor Cyan } else { Write-host "Error" -ForegroundColor Yellow }
where:
D:\Temp\DevOps_MySQL\category.ditis the path to the previously generated .dit template file.database_nameis the database name into which data has been imported.
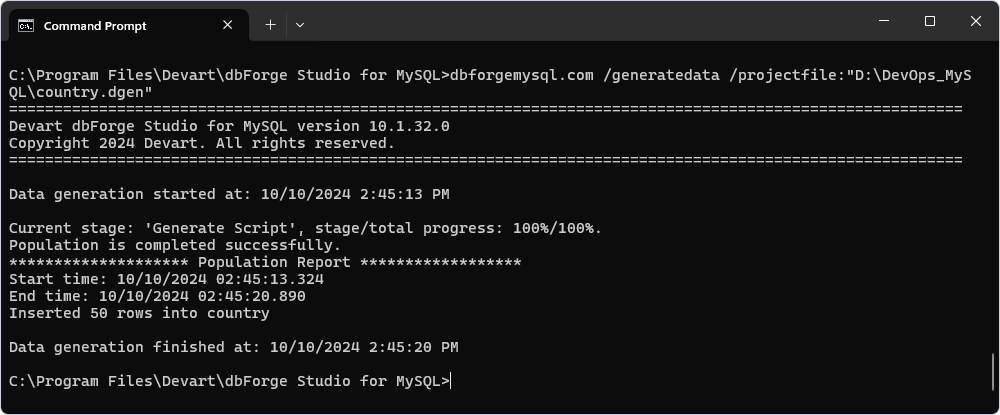
Populate the database using the Data Generator functionality
When dealing with large volumes of test data that cannot be stored locally, dbForge Data Generator is the ideal tool to efficiently populate the database. This step shows how to generate and insert data into the film table by executing the command-line (CMD) or PowerShell (PS) script and using the .dgen file:
CMD
dbforgemysql.com /generatedata /projectfile:"D:\Temp\DevOps_MySQL\country.dgen"
@echo %ERRORLEVEL%
PS
.\dbforgemysql.com /generatedata /projectfile:"D:\Temp\DevOps_MySQL\country.dgen"
if ($? -eq $true) { Write-host "Data inserted in database_name" -ForegroundColor Cyan } else { Write-host "Error" -ForegroundColor Yellow }
where:
D:\Temp\DevOps_MySQL\film.dgenis the path to the previously generated .dgen template file.database_nameis the name of the database that has been populated with data.
By compiling scripts for tasks, such as restoring the database structure, synchronizing schemas, and populating the database, it is possible to create a MySQL automation script. It simplifies the process of restoring test data and ensures that all necessary steps are automated and consistent.