Creating SSH Connection
SSH (Secure Shell Host) connection is established between an SSH server and a client (it is built in dbForge Studio). The client is used to access remote machines and execute commands.
SSH protocol offers SSH tunneling to provide secure transmit of data. All the data transmitted over the insecure network is encrypted on one side of SSH connection and decrypted on another side. This ensures privacy, authenticity, and integrity of transmitted data and allows you to connect to a remote MySQL Server, when a port is blocked.
SSH connection includes the following stages:
- Connection between the SSH Server and the MySQL Server is created.
- Authentication between the SSH Server and the MySQL Server is successfully done. The SSH Server can use two types of authentication:
- Password authentication - it uses a password of a user account on the SSH Server.
- Public key authentication - it uses a pair of public and private keys which you can generate by a key generator tool, for example, PuTTygen.
- The client and MySQL Server exchange the data which is transmitted through the SSH Server.
SSH Connection using Password authentication:
- Check that you have the SSH Server installed and set up. If no, see Installing and Setting Up SSH Server.
- Open the Database Connection Properties dialog by any of these ways:
- On the Database menu, select New Connection.
- Click New Connection on the Database Explorer toolbar.
- Right-click the Database Explorer window and select New Connection on the shortcut menu.
- Switch to the Security tab, select Use security protocol and then select Use SSH.
- Select Password authentication and input login information required to connect to the SSH server:
- Host - the name or ip address of the SSH Server.
- Port - the TCP/IP port to connect to the SSH Server. By default, it is 22.
- User - the name of the user account on the SSH Server.
- Password - the password of a user account on the SSH Server.
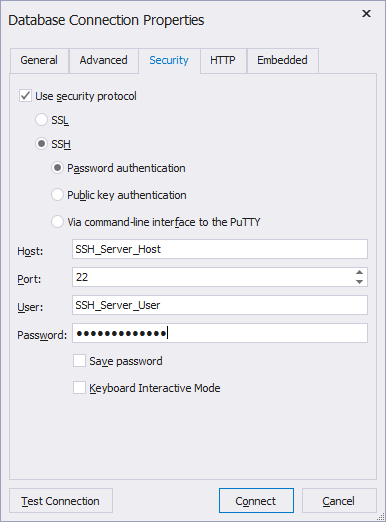
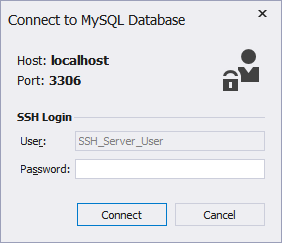
Tip: Select the Save password checkbox, otherwise while opening the connection, the Connect to MySQL Database dialog will appear and dbForge Studio will ask you to enter the password again.
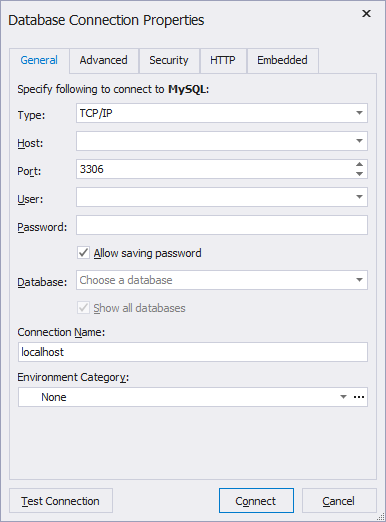
- On the General tab, set login information required to connect to the MySQL Server. It should be set relatively to the SSH Server. Specify the following:
- Host - the name of the MySQL Server host. If SSH and MySQL Servers are on the same machine, the host name can be localhost. It is highly recommended to specify the IP address explicitly (especially for the Linux OS).
- Port - the TCP/IP port to connect to the MySQL Server. By default, it is 3306.
- User - the name of the user account on the MySQL Server.
- Password - the password of the user account on the MySQL Server.

- Specify the default database of the MySQL Server. To see all databases of the selected MySQL Server in the Database Explorer window, select Show all databases, otherwise you will see only the selected one.
- (Optional) To test the created connection, click Test Connection.
- Click OK to establish the database connection.
SSH Connection using Public key authentication:
- Check that you have the SSH Server installed and set up to allow public key authentication. If no, see Installing and Setting Up SSH Server.
- Open the Database Connection Properties dialog by any of these ways:
- On the Database menu, select New Connection
- Click New Connection on the Database Explorer toolbar
- Right-click in the Database Explorer window and select New Connection on the menu
Note
The Database Explorer is not available in the dbForge Data Compare for MySQL, Schema Compare for MySQL, Data Generator for MySQL, Documenter for MySQL, Query Builder for MySQL.
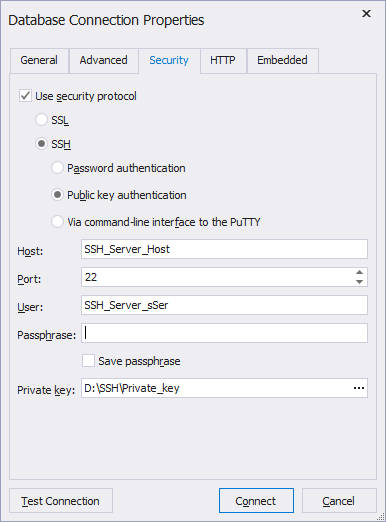
- Switch to the Security tab, check Use security protocol and select Use SSH.
- Select Public key authentication and input login information required to connect to the SSH Server:
- Host - the name or ip address of the SSH Server.
- Port - the TCP/IP port to connect to the SSH Server. By default, it is 22.
- User - the name of the user account on the SSH Server.
- Passphrase - the passphrase for a private key. You can set it while generating public and private keys through a key generator tool, for example PuTTygen.
- Private key - the private key file location on your local machine. Click in the field to specify the location or enter it manually. (You can generate the private key along with a public key using a key generator tool. Note if you are using PuTTygen, you can either convert a generated private key into OpenSSH format (by selecting Conversions>Export OpenSSH key in the menu) or use it without conversion. dbForge Studio supports both formats.
- On the General tab set login information required to connect to the MySQL server. It should be set relatively to the SSH server. Specify the following:
- Host - the host name of the MySQL Server. If SSH and MySQL Servers are on the same machine, the host name can be localhost.
- Port - the TCP/IP port to connect to the MySQL Server. By default, it is 3306.
- User - the user of the MySQL Server.
- Password - the password of the user account on the MySQL Server.
- Specify the default database of the MySQL Server. To see all databases of the selected MySQL Server in the Database Explorer window, select Show all databases, otherwise you will see only the selected one.
- (Optional) To test the created connection, click Test Connection.
- Click OK to establish the database connection.
Tip: To see in the Database Explorer a more appropriate name for the created connection, change the default connection name. By default, it is generated like this: selected database.MySQL Server host.
SSH Connection to the PuTTY via command-line interface:
- Check that you have the SSH Server installed and set up to allow public key authentication. If no, see Installing and Setting Up SSH Server.
- Open the Database Connection Properties dialog by any of these ways:
- On the Database menu, select New Connection
- Click New Connection on the Database Explorer toolbar
- Right-click in the Database Explorer window and select New Connection on the menu
- Switch to the Security tab, check Use security protocol and select Use SSH.
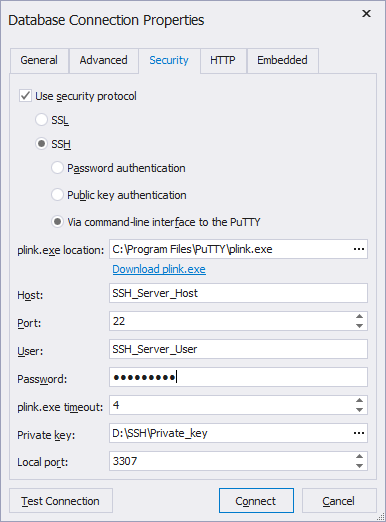
- Select Via command-line interface to the PuTTY and input login information required to connect to the SSH Server:
- plink.exe location - the location of the PuTTY plink.exe file on your local machine.
- Host - the name or IP address of the SSH Server.
- Port - the TCP/IP port to connect to the SSH Server. By default, it is 22.
- User - the name of the user account on the SSH Server.
- Password - the password for a private key. You can set it while generating public and private keys through a key generator tool, for example PuTTygen.
- plink.exe timeout - the waiting time till the connection is considered unsuccessful.
- Private key - the private key file location on your local machine. Click in the field to specify the location or enter it manually. (You can generate the private key along with a public key using a key generator tool. Note if you are using PuTTygen, you can either convert a generated private key into OpenSSH format (by selecting Conversions>Export OpenSSH key in the menu) or use it without conversion. dbForge Studio supports both formats.
Note
Download the plink.exe file by following the link below the plink.exe location. Note that this type of connection is only available from user interface.
- On the General tab set login information required to connect to the MySQL server. It should be set relatively to the SSH server. Specify the following:
- Host - the host name of the MySQL Server. If SSH and MySQL Servers are on the same machine, the host name can be localhost.
- Port - the TCP/IP port to connect to the MySQL Server. By default, it is 3306.
- User - the user of the MySQL Server.
- Password - the password of the user account on the MySQL Server.
- Specify the default database of the MySQL Server. To see all databases of the selected MySQL Server in the Database Explorer window, select Show all databases, otherwise you will see only the selected one.
- (Optional) To test the created connection, click Test Connection.
- Click OK to establish the database connection.
See the blog post - How to connect to MySQL remotely with SSH PuTTY tunnels: a step-by-step guide to learn more about how to use PuTTY to establish a secure connection to MySQL over the SSH tunnel.