How to set up Data Generator
This topic describes how to set up Data Generator to generate test data.
Tip
Before generating data, back up the database you want to populate.
If you’re not satisfied with the results, you can adjust the settings and regenerate the data.
To set up Data Generator:
1. Open the Data Generator Project Properties dialog in one of these ways:
- In the top menu, select Database > Tasks > New Data Generation.
- In Database Explorer, right-click the server connection or database and select Tasks > New Data Generation.
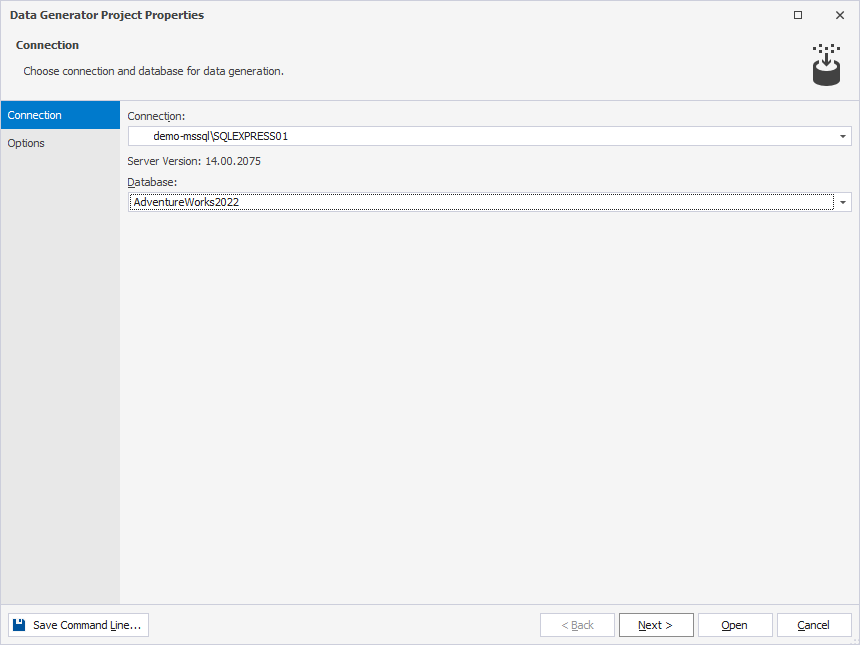
2. On the Connection page, select the connection and database for data generation, then click Next.
3. On the Options page, set up data generation options.

The table describes the data generation options.
| Name | Group | Description | Default value |
|---|---|---|---|
| By specified number of | Row distribution mode | Sets the number of rows to populate. | 1000 rows |
| By proportion of existing data in volume of | Row distribution mode | Specifies the percentage of rows to populate. | 10% |
| By generation of data by time | Row distribution mode | Specifies the time period in seconds during which data will be generated for each table. | 10 sec |
| Truncate data from table before generation | Row distribution mode | Determines if existing data in the target table should be removed before generating new test data.
|
|
| Random by timestamp | Value distribution mode | Populates every subsequent data generation with new random numbers. | |
| Random by seed | Value distribution mode | Generates values based on a specified seed. Repopulating the column will generate the same set of values each time. | 1 |
| Sequential | Value distribution mode | Generates new random numbers for each subsequent data generation. | |
| Set values to be unique | Column properties | Generates unique values. | |
| Include NULL values % of rows | Column properties | Specifies the percentage of NULL values to generate. |
10% |
| Include empty values % of rows | Column properties | Specifies the percentage of empty values to generate. | 10% |
| Country-specific data | Column properties | Applies data conventions of a specific country to the generated data. | United States |
4. Click Open to open a data generation project with the .dgen extension.
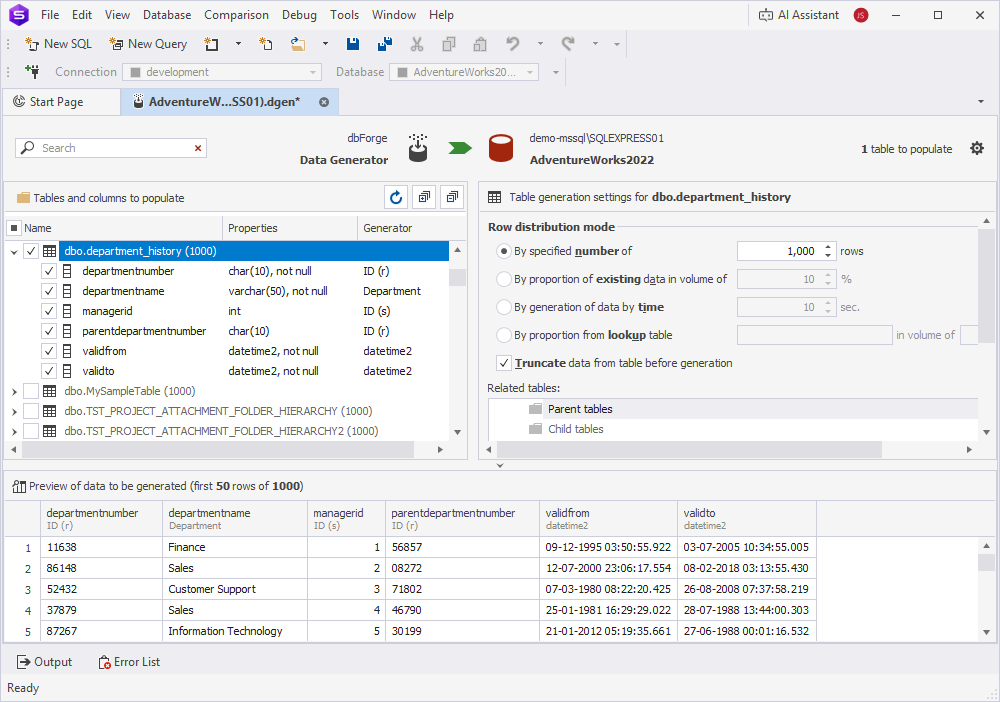
5. In the Tables and columns to populate pane, select the tables and columns for which you want to generate data.
Note
If dbForge Studio for SQL Server encounters columns with unsupported data types, it can’t assign a generator to those columns. You can still include columns with unsupported data types in data generation; however, this might cause unpredictable behavior or unexpected results.
6. Select the table and set up table generation settings. Repeat this step for each table you want to populate with data.
7. Select the column and set up column generation settings. Repeat this step for each selected column.
Note
All changes are displayed in the preview pane in real time.
Warning
Data generation may fail if a column includes a foreign key that references a table not included in the generation process.
To resolve the issue:
1. Select the table causing the error.
2. In the Table generation settings pane, navigate to the Related tables section.
3. Include or exclude the related parent and child tables as needed.
8. Click ![]() to open the Data Population Wizard.
to open the Data Population Wizard.
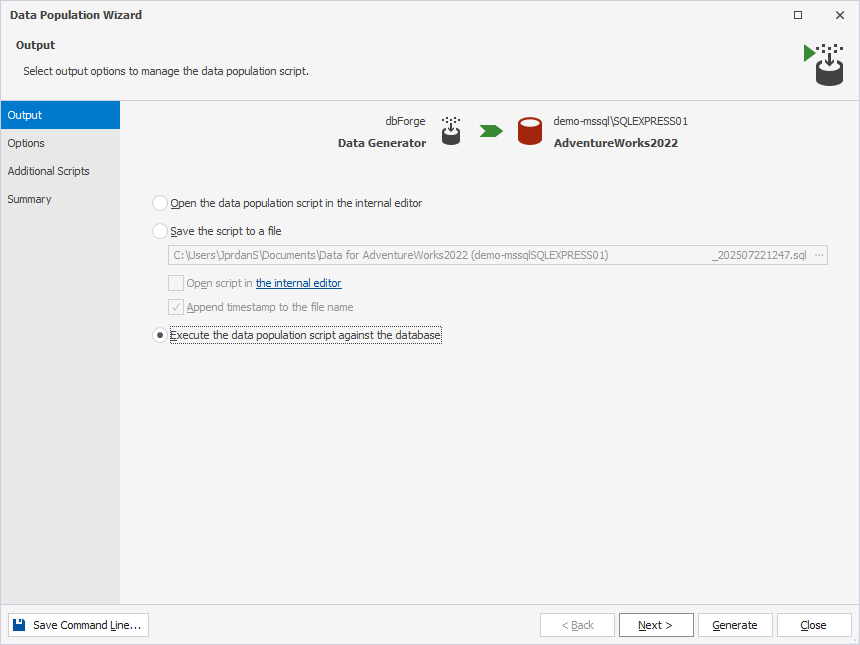
9. On the Output page, select the output option to manage a data population script.
- Open the data population script in the internal editor to add custom data to the database.
- Save the SQL script to a file.
- Execute the data population script against the database immediately.
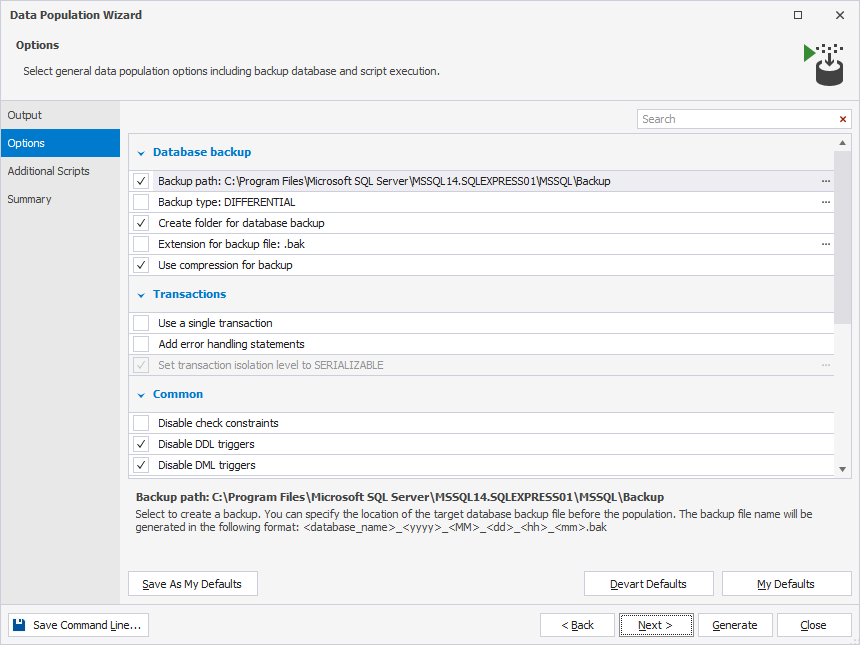
10. On the Options page, select general data population options.
Tip
You can click the name of an option to view its detailed description.
In the search box, you can start typing the option name. The options matching your search will be highlighted.
To save the options you’ve set for later use, click Save As My Defaults.
To use the default settings of the tool, click Devart Defaults.
To use the options you saved earlier, click My Defaults.
The table provides a list of data generation options available on the Options page.
| Name | Group | Description | Default State |
|---|---|---|---|
| Backup path | Database backup | Creates a backup. You can specify the location of the target database backup file. The backup file name will be generated in the following format: <database_name>_yyyy_MM_dd_hh_mm.bak |
On |
| Backup type | Database backup | Creates a backup in the selected mode. Creating a differential database backup requires a previous full database backup. If you have never backed up the database, a full database backup will be created. |
Off |
| Create folder for database backup | Database backup | Creates a folder on the server for a database backup. | On |
| Extension for backup file | Database backup | Specifies the extension for a backup file. When the option isn’t selected, the default extension (.bak) is used for a backup file. |
Off |
| Use compression for backup | Database backup | Performs the backup compression. This option is available for SQL Server 2008 or later versions. |
On |
| Use a single transaction | Transactions | Executes a data population script as a single transaction. All the changes to the databases will be rolled back if any error occurs during the script execution. | On |
| Add error handling statements | Transactions | Stops executing a script when encountering an error. | Off |
| Set transaction isolation level to | Transactions | Sets the transaction isolation level. This option is available when Use a single transaction is selected. You can specify the following transaction isolation levels: SERIALIZABLE, SNAPSHOT, REPEATABLE READ, READ UNCOMMITTED, and READ COMMITTED. |
On |
| Check for concurrency updates | Common | Prevents accidental data overwriting by adding the WHERE clause with a non-key column values to the UPDATE and DELETE statements and adding the IF NOT EXISTS statement before the INSERT statement. |
Off |
| Disable check constraints | Common | Drops the CHECK and NOT NULL constraints at the beginning of the data population process. After data population, those constraints are restored by adding the WITH NOCHECK parameter. To restore the constraints with the WITH CHECK parameter, select Restore constraints using WITH CHECK. |
Off |
| Disable DDL triggers | Common | Disables DDL triggers before data population. After data population, the triggers are enabled. |
Off |
| Disable DML triggers | Common | Disables DML triggers before data population. After data population, the triggers are enabled. The option is applicable to tables and views. |
On |
| Disable foreign keys | Common | Drops foreign keys before data population. After data population, the foreign keys are restored. |
On |
| Disable primary keys, indexes, and unique constraints | Common | Drops primary keys, indexes, and unique constraints before data population. After data population, they are restored. If a primary key, index, or unique constraint is used as a comparison key, it cannot be dropped. |
Off |
| Generate fully qualified object names | Common | Generates fully qualified object names in the data population script. If the option is selected, the names of objects in the data population script will include a schema name. | On |
| Include USE <database_name> | Common | Adds the USE <database_name> clause to the script. |
On |
| Reseed identity columns | Common | Reseeds the current value for identity columns. | On |
| Restore constraints using WITH CHECK | Common | Creates constraints with the WITH CHECK parameter.If the option isn’t selected, constraints will be created in the fast mode with the WITH NOCHECK parameter |
Off |
| Synchronize database in the single user mode | Common | Synchronizes a database in the single user mode. | Off |
| Synchronize via files path | Common | Creates a separate file using the OPENROWSET function for each value which size is greater than 1MB. To upload these files on a remote server, specify a shared network folder accessible both from the client and server machines. |
Off |
| Exclude comments | Script Comments | Prevents comments generation in the synchronization script. | Off |
| Include print comments | Script Comments | Adds comments to the output during the script execution. If print comments are included in the synchronization script, it is easier to locate the items in the output. |
Off |
11. On the Additional Scripts page, enter or select the script you want to execute before or after data population.
You might use this option in scenarios, such as dropping existing data or temporarily disabling triggers before data generation, then re-enabling them afterward.
12. On the Summary page, review the data generation action plan and check for any errors or warnings that highlight potential problems.
13. Click Generate to complete the data generation process.