Managing Views in Oracle
View is a logical table based on one or more tables or views. A view contains no data itself, but retrieves it from underlying tables and views when requested.
The topic learns you how to:
- create, modify, and drop views, retrieve and alter data in underlying tables in dbForge Studio
- create, change, and drop views using the CREATE VIEW, ALTER VIEW, and DROP VIEW statements respectively
Creating a View
To create a view, do the following:
- On the Start Page, switch to the Database Design tab and click New Database Object.
-
In the New Object dialog, select View. By default, your own schema is selected.
- Specify a unique name of the view and click Create. Note that views share the same namespace with tables.
-
In the Query Text field, type a query that will represent the view. You do not have to type CREATE OR REPLACE VIEW … AS because dbForge Studio adds this clause for you. To view the query, switch to the SQL tab.

- Optional: On the Main tab, do the following:
- change the view name and the owner schema in which the new view will be created
Note
Keep in mind that to change the database owner, you should have privileges to create Oracle database objects in a schema of another user.
- leave a view comment
- set column aliases
- select Force view creation to create the view regardless of whether the view refers to a non-existent table or object type or the owner of the view has no required privileges on them.
- select Restrict query > Read Only to indicate that the tables cannot be updated through the view.
- select Restrict query > Check option to prevent any modification to a view that would produce rows that are not included in the defining query.
-
Optional: You can set column aliases on the Main > Query Text tab or in the Main > Alias column or on the Query Design > Selection tab.
- Optional: On the Query Design tab, add the view parameters:
- select Unique records to filter duplicate rows in the SELECT statement result.
- set or modify aliases
- insert the JOINS clause by clicking the Add key
- insert the WHERE clause to indicate a condition to filter rows returned by a query
- add the GROUP BY clause to group rows by specified value in the result set
- add the HAVING clause to filter groups that the GROUP BY clause returns
- add the ORDER BY clause to indicate the order in which rows will appear in the result set
- To save the view, click Apply Changes. If there are any errors in the SQL syntax, a notification will be displayed.
- To view the generated script, click Script Changes.
Creating a View Using the CREATE VIEW Statement
To create a view using the CREATE VIEW statement, do the following:
-
On the Start Page > SQL Development tab, click SQL Editor.
-or-
On the Standard toolbar, click New SQL.
-
In the SQL editor, type the query. The syntax is as follows:
 CREATE VIEW view_name [(column_aliases)] AS
 defining-query
 [WITH READ ONLY]
 [WITH CHECK OPTION]
where defining query is a SELECT statement that defines the columns and rows of the view.
- Specify the view name, column aliases, and defining query.
- Add view constraints, if applicable. All the parameters have the same meaning as described in Creating a View.
- To run the query, click
 .
.
Editing a View
To edit a view, follow the steps:
- In Database Explorer, expand the Views folder.
- Right-click the required view and select Edit View on the shortcut menu.
- Alter the query text. Note that after a view has been created, you can not modify its name and owner.
- To save the changes made to the view, click Apply Changes.
Dropping a View
To drop a view, follow the steps:
- In Database Explorer, expand the Views folder.
- Right-click the required view and select Delete on the shortcut menu.
- In the pop-up window, do the following:
- click Yes to confirm the deletion of the view.
- click No to cancel the deletion of the view.
Dropping a View Using the DROP VIEW statement
To remove a view from the Oracle database, do the following:
-
On the Start Page > SQL Development tab, click SQL Editor.
-or-
On the Standard toolbar, click New SQL.
-
In the SQL editor, type the query. The syntax is as follows:
DROP VIEW schema_name.view_name [CASCADE CONSTRAINT]; - Specify a name of the schema containing the view.
- Specify a name of the view to be removed. If there are dependent views, materialized views, or synonyms, they will not be removed, but will be marked as INVALID.
- Add the CASCADE CONSTRAINTS clause to remove all referenced constraints of the view. Otherwise, dropping the view fails if there is a reference to primary and/or foreign keys, and you didn’t indicate the constraints clause in the statement.
- To run the query, click .
Retrieving and Modifying View Data
To retrieve view data, follow the steps:
- In Database Explorer, expand the Views folder.
- Right-click a required view and then click Retrieve Data on the shortcut menu.
The data is rendered in the grid-based editor. You can browse and edit view data in the same way as you browse and edit table data.
Example of Creating a View Using dbForge Studio for Oracle
Let’s create a view that represents a join between the DEPT and EMP tables. The view will do the following:
- return the columns Department Name, Employee Name, and Job
- return data in a specific order
- view should not be updatable
- create force view so that it will not fail if some referenced objects are wrong
To create the view, perform the following steps:
- In Database Explorer, right-click the Views folder and select New View.
- Specify a name of the view, for example, TestView.
-
Type the following SQL in the Query Text field:
SELECT dname, ename, job FROM emp, dept WHERE emp.deptno = dept.deptno - In the Alias column, change default column names to the custom ones. For example, DNAME to Department Name, ENAME to Employee Name, and JOB to Job.
- Select the Force view creation checkbox. This allows you to create or modify a view even if some Oracle objects referenced by the view are missing or have the NOT VALID status.
- Select the Restrict Query checkbox and then select Read Only.
-
On the Query Design tab, you can see graphical representation of a query.
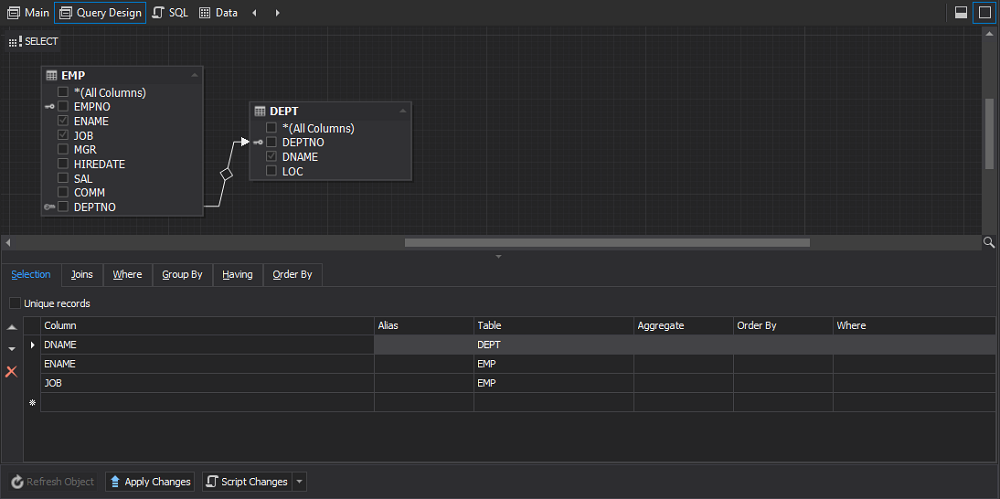
- To save the view, click Apply Changes.
You can invoke the text view of the document to inspect the query generated by dbForge Studio.