Customize formatting styles with profiles
A formatting profile is a saved set of options that help layout and beautify SQL code. dbForge Studio for MySQL includes two groups of formatting profiles - Devart and Custom. The Devart profiles are the default profiles that come with the tool.
dbForge Studio supports the following predefined formatting profiles:
- Collapsed
- Commas before
- Compact
- Default
- Extended
- Indented
- MSDN SQL
- Right aligned
- Stack compact
Select and apply a formatting profile
To select and apply a formatting profile:
1. Right-click anywhere in a SQL document, select Format > Active Format Profile, and then choose one of the predefined formatting profiles.
2. To apply the selected profile, press Ctrl+K, then Ctrl+D.
Set a preferred formatting profile
By default, the active formatting profile is the built-in Default formatting profile.
To set a different profile:
1. On the Tools menu, select Options.
2. In the Options dialog, go to Text Editor > Formatting > Profiles.
3. Choose one of the predefined formatting profiles and select Set as Active.
4. To save the changes, select OK.
Modify a formatting profile
You cannot modify predefined profiles. However, you can use the settings of these profiles as a basis for your custom profiles to format your SQL code.
To modify a formatting profile:
1. On the Tools menu, select Options.
2. In the Options dialog, go to Text Editor > Formatting > Profiles.
3. Choose one of the predefined formatting profiles and select Open Selected.
4. In the Edit Formatting Profile dialog that opens, select the formatting option you want to update in the left-hand pane and edit the option text in the right-hand pane.
5. To save the changes, select Save As.
6. Enter a name for your new custom profile.
7. Select OK.
Create a custom profile
You can create a custom profile based on the existing profile from the Formatting > Profiles page of the Options dialog.
To create a custom profile:
1. On the Tools menu, select Options.
2. In the Options dialog, go to Text Editor > Formatting > Profiles.
3. Select Create New.
4. In the New Profile window that opens, do the following:
- In the Name box, enter a name for a profile.
- In the Copy settings from box, choose a profile from which you want to copy the settings.
- In the File Path box, specify the full path to the profile.
- The Set Active checkbox is selected by default. To deactivate the profile, clear the checkbox.
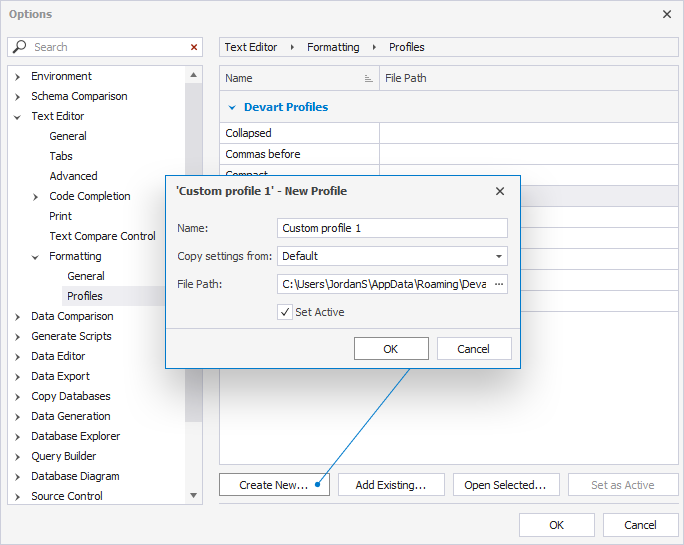
5. To save the profile, select OK.
Configure formatting profile settings
Every formatting profile has a number of rules, which are grouped mainly by a statement. Each group has a set of options, such as Line Breaks, Indentation, and Insert Spaces.
You can preview the changes in the right-hand Formatting preview pane.
To configure formatting options or rules for a specific profile:
1. On the Formatting > Profiles page, choose one of the predefined formatting profiles or create a new one.
2. Select Open Selected to open the Edit Formatting Profile dialog.
3. In the Edit Formatting Profile dialog, select the formatting option you want to update in the left-hand pane and edit the option text in the right-hand pane.
4. Select Save As.
5. In the Save As window that opens, do the following:
- In the Name box, enter a name for a profile.
- In the File Path box, specify the full path to the profile.
- The Set Active checkbox is selected by default. To deactivate the profile, clear the checkbox.
- Select OK to save the changes.
6. Select OK to save the file.
Text options
The table displays text options you can configure for a formatting profile.
| Option | Description |
|---|---|
| Tab size | Defines how many spaces a tab character represents. For example, a tab size of 4 means each tab equals four spaces when displayed. The default value is 2. |
| Indent size | Sets the number of spaces used for each indentation level in your SQL code. This determines how far indented lines shift to the right. The default value is 2. |
| Keep tabs | When selected, indentation will use actual tab characters (\t) instead of spaces. This keeps file size smaller but may display differently in various editors. |
| Insert spaces | Replaces tab characters with spaces for indentation. This ensures consistent alignment regardless of the environment or editor. The option is selected by default. |
| Right margin | Specifies the maximum number of characters allowed per line. If a line exceeds this margin, SQL Formatter may wrap the code to the next line, improving readability. The default value is 80. |
The table displays the toolbar controls you can use to manage formatting options.
| Control | Control name | Description |
|---|---|---|
| Expand all option groups | Expands all option groups in the left-side pane. | |
| Collapse all option groups | Collapses all option groups in the left-side pane. | |
| Show text options | Shows or hides the text options. | |
| Show white spaces | When selected, it displays invisible characters, such as spaces, tabs, and line breaks, in the code editor as visible symbols. | |
| Reload Sample | Shows the original code sample for the selected option. | |
| Format Text | Formats text in the code editor. |
Add a previously created profile
To add a previously created profile:
1. On the Formatting > Profiles page, select Add Existing.
2. In the Select File Path window that opens, select the .xml file and then select Open.
3. To save the changes, select OK.
Activate a formatting profile
To activate a formatting profile:
1. On the Formatting > Profiles page, select the file and then select Set as Active.
2. To save the changes, select OK.