Work with aliases
dbForge Studio can automatically generate aliases for all table objects referenced in the FROM clause, including tables, views, and table-valued functions. You can set up alias generation in the Options dialog.
Open the Options dialog
To open the Options dialog:
1. Navigate to the Tools menu and select Options.
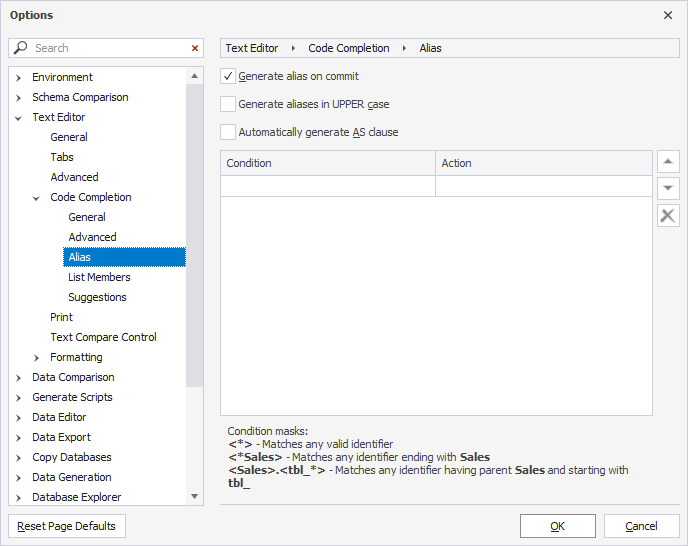
2. In the Options dialog that opens, go to Text Editor > Code Completion > Alias.
3. Add or modify the alias.
4. To save the changes, select OK.
Automatic alias assignment
The table displays options available on the Code Completion > Text Editor > Alias page of the Options dialog.
| Name | Description | Default state |
|---|---|---|
| Generate alias on commit | Automatically creates an alias for tables or database objects when a query is committed. | On |
| Generate aliases in UPPER case | When selected, the option automatically creates aliases in uppercase letters. | Off |
| Automatically generate AS clause | Includes the AS keyword when aliases are generated. |
Off |
When the Generate alias on commit checkbox is selected, the Studio operates as follows:
-
Adds aliases to tables, views, table-valued functions, and synonyms: When the user selects a database object from the suggestion list, dbForge Studio automatically assigns an alias to it.
-
Adds table alias to column names: When the user selects all columns using the asterisk (*) wildcard or individually selects specific columns from the suggestion list, dbForge Studio adds a table alias to each column name.
Alias generation rules
dbForge Studio applies a set of naming rules and heuristics to automatically generate aliases. Whenever possible, dbForge Studio generates aliases using the first letter of a table object name.
The table explains the rules for alias generation.
| Name | Description | Example |
|---|---|---|
| For names with underscores | When an object name includes underscores, dbForge Studio uses the first letter of each word to form the alias. | TBL_Address → ta |
| For names with hyphens | Similar to underscores, hyphenated names are split into parts, and the alias is generated from the initials. | Tbl-address → t |
| For names with CamelCase | For names written in CamelCase, the alias is created from the uppercase letters (initials of each word). | TblAddress → ta |
| For object names that contain numbers | If the object name consists only of numbers or begins with a digit, dbForge Studio assigns a default alias, such as a. | 111 → a |
| For names that match keywords | If the generated alias matches a SQL keyword, the Studio automatically wraps the alias in square brackets to prevent syntax errors. | GeneralObjects → go |
| For object names that would produce duplicate aliases | If an alias already exists in the current query, for example, in a multi-table JOIN, dbForge Studio adds a numeric suffix to avoid conflicts. | If ta already exists, the next alias becomes ta1, then ta2, and so on. |
| No Alias | If No Alias is specified in the Action column for a given condition, no alias will be generated for matching objects. |
Custom alias mapping
You can manually set conditions for inserting an alias while writing a query using the Completion List in a SQL document.
To add a custom alias
1. Navigate to the Tools menu and select Options.
2. In the Options dialog that opens, navigate to Text Editor > Code Completion > Alias.
3. In the Condition column of the grid, specify the database object name (you may use a mask) to which you want to assign an alias.
4. In the Action column, specify the custom alias you prefer.
5. Select OK to save the changes.
When a custom alias is created, dbForge Studio assigns the alias name to an object referenced in a SQL statement according to a specified alias mask.
Note
Custom aliases have precedence over automatically created ones.
Alias refactoring
To rename an alias:
1. In the Code Editor, select the alias and press F2 - the alias will be highlighted.
2. Type a new name for the alias. As you type, a tooltip appears, prompting you to Press F2 to preview changes or Enter/Tab to apply.
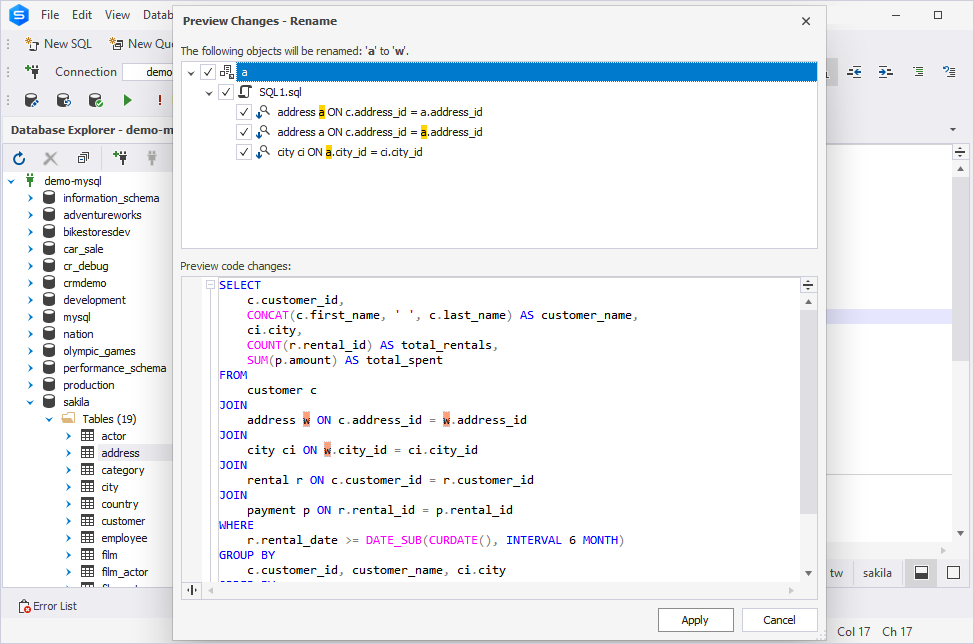
3. Press F2 to open the Preview Changes - Rename dialog and preview code changes.
4. To apply the changes, press Apply. Alternatively, press Enter/Tab to apply the changes in the code.
To discard the changes, select Cancel.
Alias masks
dbForge Studio supports alias masks, allowing you to define custom rules for alias generation based on object naming patterns. These masks help manage how aliases are applied, especially when dealing with objects that share similar or identical names.
By using alias masks, you can define conditions and corresponding actions to control how aliases are assigned in different scenarios.
The following examples illustrate how condition masks work:
<product>- exact match.<*product>- matches object names ending with “product”.<product*>- matches object names starting with “product”.<*product*>- matches object names, including “product”.<*>- matches any valid object name.<database>.<product>- specifies an exact match for the object name “product” with “database” as its prefix.<database*>.<product*>- matches object names where the prefix starts with “database” and the object name starts with “product.”
The following list demonstrates examples of the action masks:
Id<1>- adds the prefix “Id” to a generated alias.<[Dept]1>- excludes “Dept” from a generated alias.
Rules for defining a condition in the Condition column
In the Condition column, you can define the criteria under which an alias will be applied based on the corresponding rule in the Action column. These rules are triggered when an identifier—such as a table, view, table-valued function, or synonym—is inserted into a SQL document from the Completion List.
For a condition to apply, its criteria must be fully satisfied. If the condition is met, dbForge Studio generates the alias specified in the Action column.
Note
Each identifier in the condition must be enclosed in angle brackets
< >.
Note
The condition is case-insensitive, meaning it can be written in either lowercase or uppercase. The rule is applied based on the identifier name, regardless of its case.
Consider several examples to understand how to create custom aliases in the Options dialog.
Case 1: Generate an alias for the database object regardless of prefixes
To assign a custom alias, for example, NewAlias, to a database object–such as the Employee table–regardless of its server, schema, or database, use the following configuration.

Note
This rule applies to any object named Employee, regardless of which database or schema it belongs to.
Alias application example
When you write a SQL query and select employee from the Completion List, dbForge Studio automatically inserts the alias NewAlias:
SELECT * FROM sakila.employee NewAlias

SELECT * FROM sales.employee NewAlias

SELECT * FROM production.employee NewAlias
This ensures consistent aliasing of the employee object across different databases and schemas.
Case 2: Generate an alias for the database object from a specific database
To assign a custom alias, for example, NewAlias, specifically to the employee table from the sakila database, use the following configuration:

This condition applies only to the employee object in the sakila database. Objects with the same name in other databases will follow default alias generation rules.
Alias application example
The custom alias NewAlias is applied only when the employee table belongs to the sakila database. In all other cases, dbForge Studio generates aliases according to the standard rules.
SELECT * FROM sakila.employee NewAlias

SELECT * FROM sales.employee e

SELECT * FROM production.employee e
Case 3: Generate an alias for the database object with multiple prefixes
The Condition column can include up to three prefixes, such as a server, a database, and a schema, depending on how the object is referenced in the script. An alias is generated only when all specified prefixes are present in the SQL statement.
If the prefixes listed in the Condition column are matched exactly in the SQL statement, the corresponding alias will be applied. Otherwise, no alias will be generated.
For example, if the Condition column has the following criteria as shown in the screenshot:

Alias application example
The NewAlias alias is generated for the dev_rel_employee table only when the expression includes all prefixes specified in the Condition column:
SELECT * FROM production.dev_rel_employee AS NewAlias
If any prefix is missing from the object reference, the alias will not be generated. This ensures precise alias control when working with objects that may exist across multiple environments or schemas.
Case 4: Use an asterisk (*) for any characters in the condition
In the Condition column, you can use an asterisk (*) as a wildcard to match any sequence of characters before or after an identifier. The wildcard can be placed anywhere within angle brackets < >.
If we specify the following condition as shown in the screenshot:

This condition matches any object name that ends with employee, regardless of the server, database, or schema it belongs to.
Alias application example
The alias NewAlias is applied to any employee object, regardless of its fully qualified name or prefixes.
SELECT * FROM sakila.employee NewAlias

SELECT * FROM sales.employee NewAlias

SELECT * FROM production.employee NewAlias
Case 5: Use an asterisk (*) in the identifier name
You can use an asterisk (*) within an identifier name in the Condition column to match partial names. This allows you to generate aliases for multiple objects that share a common naming pattern.

This condition applies the alias NewAlias to all objects in the production database whose names start with emp.
Alias application example
SELECT * FROM production.employee_agent NewAlias

SELECT * FROM production.employee NewAlias
Note
The asterisk (*) can be used in any part of the identifier within angle brackets
< >, enabling flexible matching patterns, such as<*name>,<na*me>, or<name*>.
Rules for defining an action in the Action column
The Action column lets you control how aliases are generated when a matching condition from the Condition column is met. In the Action column, you can do the following:
- Define a custom alias format
Specify the characters or structure that will be automatically applied as an alias when an identifier is inserted from the Completion List.
- Exclude parts of the identifier
To omit specific parts of an identifier from the alias, enclose them in square brackets [ ]. These excluded elements will not be used in alias generation.
- Target specific identifier segments/Use specific identifier elements/Define alias structure using identifier parts
You can refer to specific parts of the identifier, such as server, database, schema, or object name, to customize how the alias is constructed.
- Disable alias generation
Use No Alias to explicitly prevent alias generation for objects matching the corresponding condition in the Condition column.
Case 1: Use one element in the Action column
If the Condition column contains only one element, for example, an object identifier, the Action column will have the <1> value by default. This means that if you specify <1> in the Action column for this condition, an alias will be generated according to the standard alias generation algorithm.

Alias application example
SELECT * FROM production.employee AS e
Case 2: Add characters before or after one element
You can modify the generated alias by adding characters before or after the <1> placeholder in the Action column. These characters will be automatically included in the resulting alias.
Adding characters before or after <1> will automatically add those characters to the generated alias.
Example 1: Add characters after <1>
For example, add NewAlias after <1>.

This configuration adds NewAlias after the alias generated for employee.
Alias application example
SELECT * FROM sakila.employee eNewAlias
Example 2: Add characters before <1>
Writing NewAlias before <1> will generate the alias as follows.

This configuration places NewAlias before the alias generated for employee.
Alias application example
SELECT * FROM sakila.employee NewAliase
Case 3: Exclude any characters from the identifier element
To exclude specific characters from an identifier element defined in the Condition column, use the Action column to specify which part to omit. The excluded portion must be placed within square brackets [ ], and the entire element must be enclosed in angle brackets < >.
For example, exclude emp from the second identifier in this expression:
SELECT * FROM sakila.employee
The second identifier is employee. So, the following must be written in the Action column:

Alias application example
dbForge Studio will exclude emp from the second identifier when generating the alias. Thus, the next character after emp in the second identifier will be l.
SELECT * FROM sakila.employee l
Case 4: Add a static set of characters to the action
You can append a static set of characters to the alias by including them directly in the Action column. To add the static value NewAlias to the end of the generated alias, use the following configuration:

Alias application example
SELECT * FROM sakila.employee klNewAlias
The generated alias consists of the auto-generated value (kl) followed by the static string NewAlias.
Note
You can place static characters before, after, or between placeholder elements (
<1>,<2>, etc.) to construct aliases in a consistent format.
Mask prioritization
User-defined alias masks take precedence over automated alias generation in dbForge Studio. Within the custom mask list, masks are evaluated from top to bottom, meaning the condition at the top of the list in the Condition column has the highest priority.
When multiple conditions match a database object, the first matched condition in the list determines the alias to be applied.
Example 1: Condition with higher priority

Now, consider the SQL statement:
SELECT * FROM Person.BusinessEntity
Since both conditions match (BusinessEntity starts with Business), Alias1 is applied because its condition appears higher in the list:
SELECT * FROM Person.BusinessEntity AS Alias1
Note
The
ASclause is included automatically when the Automatically generate AS clause checkbox is selected on the Options > Text Editor > Code Completion > Alias dialog page.
Example 2: Reversed priority
If you reverse the order of the two conditions:

Then Alias2 will be applied instead, because <Business*> is now at the top:
SELECT * FROM Person.BusinessEntity AS Alias2
Note
The
ASclause is included automatically when the Automatically generate AS clause checkbox is selected on the Options > Text Editor > Code Completion > Alias dialog page.
Tip
You can change the order of aliases using Move up and Move down next to the Alias grid on the Options > Text Editor > Code Completion > Alias dialog page.

Example: Prioritization in practice

Alias assignment logic
alias1is applied to all objects containing Person (highest priority).alias2is applied to all objects whose names start with Product.alias3is applied to objects starting with Product that belong to the Sales schema.