Select data for synchronization
After you have reviewed and analyzed the comparison results, you can select the rows you want to synchronize and run the synchronization.
Note
When you select the Source and Target, the sync operation only applies changes to the target database, while the source database keeps unchanged.
Select rows for synchronization
By default, all rows that differ in the Source and Target are selected for deployment.
You can clear the checkboxes in the results grid to exclude rows from deployment:
Note
Your selections are saved when you save a project.
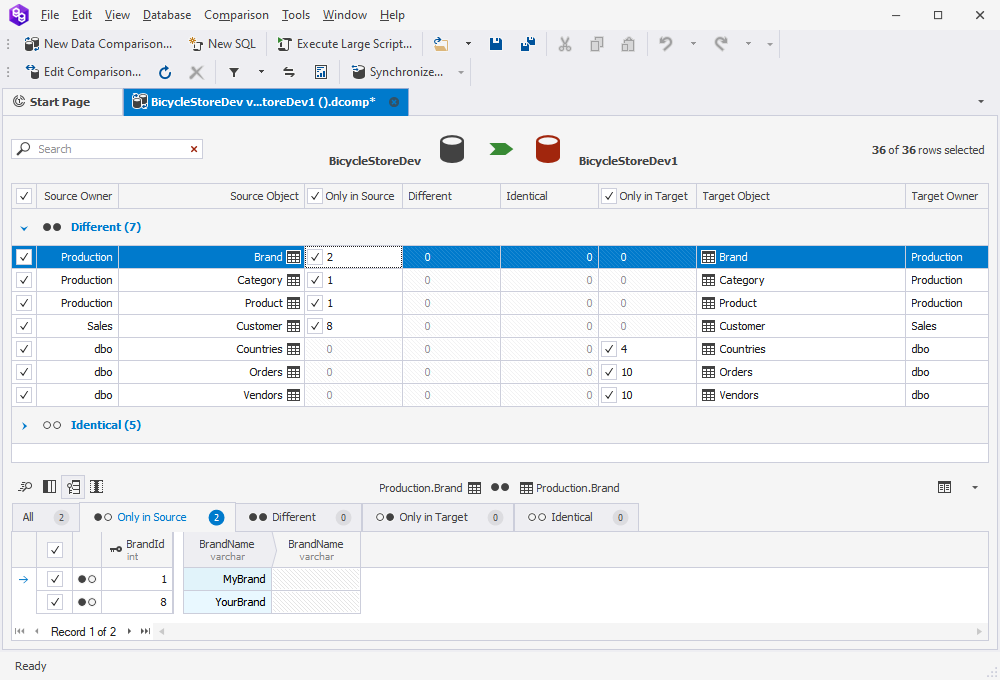
Select records for synchronization
Data Compare for SQL Server allows selecting objects for synchronizations right from the comparison results grid.
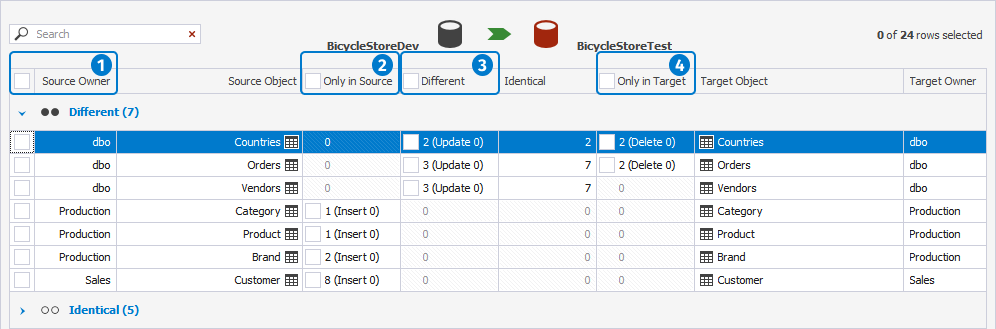
1. To exclude/include all objects, select/clear the first main checkbox.
2. To exclude/include the objects that exist only in Source, select/clear the Only in Source checkbox.
3. To exclude/include all different objects, select/clear the Different checkbox.
4. To exclude/include the objects that exist only in Target, select/clear the Only in Target checkbox.
To exclude/include records by objects they belong to, select/clear the checkboxes at the beginning of the grid rows.
To select individual rows for synchronization:
1. In the upper (Results) grid, click a table or view to display its row differences.
2. In the lower (Row differences) grid, click the appropriate tab to view the row differences.
3. Select or clear the checkboxes in the All Records column as required.

Note
Data synchronization can not be rolled back! It may change or delete data in your target database. It is highly recommended to backup the target database before deploying data changes.
Select rows for synchronization using shortcut keys
To select or deselect a row for synchronization, use SPACEBAR.
To navigate between cells, use SHIFT+Page UP or SHIFT+Page DOWN.
To highlight multiple rows, use SHIFT+UP or SHIFT+DOWN.
To highlight all rows, use CTRL+A.
To highlight all rows from the current row to the last one, use CTRL+SHIFT+END.
You can also use CTRL+Click to highlight multiple non-successive rows.
Synchronize databases
After you have selected objects, you can run the process of synchronization:
1. On top of the document, click Synchronize  to open the Data Synchronization Wizard.
2. In the Data Synchronization Wizard that opens, select one of the output options to manage the synchronization script:
- Open the synchronization script in the internal editor
- Save the script to a file
- Execute the script directly against the target database
Tip
When you perform a database comparison and save the synchronization script using the default file name, which includes the source and target database names, re-synchronizing the same databases with the same file-saving option may overwrite the existing script. To avoid this, enable the Add Timestamp option when saving the script. This appends a timestamp to the file name, ensuring each synchronization script remains distinct.
For more detailed information about managing output options, see Select synchronization output.
3. Click Synchronize to close the wizard and complete the synchronization process.