Setting Up a New User Account
The following walkthrough describes how to connect to an Oracle server, create a new user account with the Security Manager tool and how to grant required privileges and roles to this account. You can skip this walkthrough if you don’t need to know how to set up user accounts.
To get acquainted with dbForge Studio for Oracle, let us perform some common operations and see how a database and data within it can be managed. In order to interact with Oracle, a client must first establish a connection with an Oracle server, so first of all you have to connect to a server.
Note
In this topic as well as in the other topics, clicking with the right mouse button is referred as right-click. Clicking with the left mouse button is referred as click. Double-click means that you should click with the left mouse button twice quickly.
After establishing connection to server, you can start working with security objects.
Creating a Profile
Let us create a new user profile to specify a password policy, for example, a profile in which user passwords will expire after 30 day. To do this, perform the following steps.
- Select Security Manager on the Database menu. The Security Manager window opens.
- Right-click the Profiles node in the object tree in the right part of the Security Manager.
- Select New Profile on the shortcut menu.
- Enter a unique profile name (for example, Expired30).
- Switch to the Password tab.
- Enter 30 into the Life Time box.
- Enter 3 into the Grace Time box.
- Click the Save button on the Security Manager toolbar.
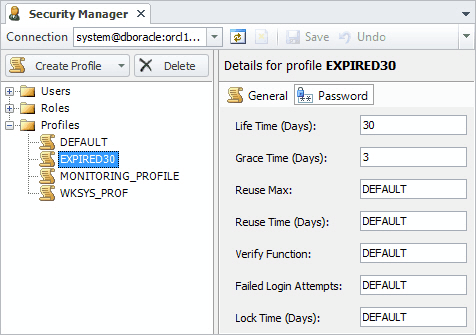
Now our profile is created. Password life time set to 30 means that after 30 days user should change password. Grace time set to 3 means that user will get warning messages when connects to database for three days after first connect after password lifetime is over. After that user should change his password to work with database.
Creating a New User Account
To create new user account perform following steps.
- Open the Security Manager by selecting Security Manager on the Database menu.
- Select the Users node in the object tree in the right part of the Security Manager.
- Click the Create User button on the Security Manager toolbar.
- Enter a unique user name. In this and following walkthroughs the name HR will be used.
- Select Database in the Authentication box.
- Enter the user’s password in the Password field and re-enter it in the Confirm Password field. In this and the following walkthroughs the password test will be used.
- Click the Save button on the Security Manager toolbar to save this user account.
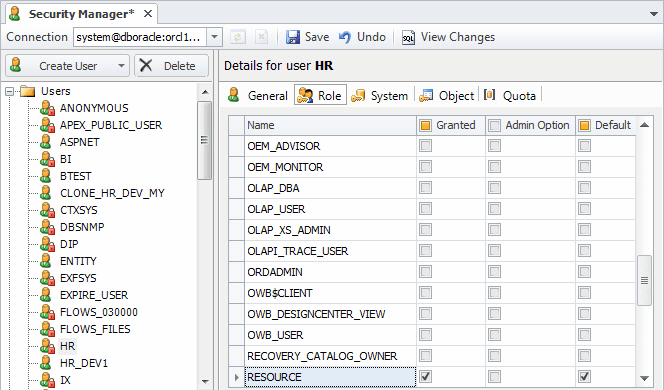
Granting Required Roles and Privileges
By now as you have set up a connection, set up a profile, and created a user account. Let’s grant required roles and privileges to this account. To grant required roles and privileges, perform the following steps:
- In the Security Manager, expand the Users node.
- Select the user HR.
- Switch to the Role tab.
-
Select check boxes in the Default column for CONNECT and RESOURCE roles.
Note
Two roles were granted as default roles.
- Switch to the System tab.
- Select the check box in the Granted column for the UNLIMITED TABLESPACE privilege.
- Click the Save button on the Security Manager toolbar to save changes.
Now the account is ready for work. You can create a connection for it just like the previous connection for the administrator account. In future this user schema and therefore these login parameters will be used.