How dbForge Studio for Oracle is involved in the DevOps process
The guide provides a step-by-step procedure on how to automate the database development. The following workflow illustrates how dbForge Studio for Oracle is involved in the DevOps process.
Prerequisites
Before starting, prepare the following template files using dbForge Studio for Oracle. These files will be used to perform a specific operation when running the corresponding command-line scripts:
- .sql file that contains the command-line script to create a user in an Oracle database. Ensure to replace the
USERNAMEandPASSWORDwith the actual data:
DECLARE
USEREXIST INTEGER;
BEGIN
  SELECT COUNT(*) INTO USEREXIST FROM DBA_USERS WHERE USERNAME='USERNAME';
  IF (USEREXIST = 0) THEN
    EXECUTE IMMEDIATE 'CREATE USER USERNAME IDENTIFIED BY PASSWORD';
    EXECUTE IMMEDIATE 'GRANT CONNECT, RESOURCE TO USERNAME';
  END IF;
END;
- .sql file that contains the command-line script to create tables in the database. Ensure to replace a schema name, table names, and columns with the actual data:
ALTER SESSION SET CURRENT_SCHEMA = schema_name;

CREATE TABLE DEPT
    (
    DEPTNO NUMBER(2) CONSTRAINT PK_DEPT PRIMARY KEY,
    DNAME VARCHAR2(14),
    LOC VARCHAR2(13)
    );
--------------------------------------------------------------
CREATE TABLE EMP
    (
    EMPNO NUMBER(4) CONSTRAINT PK_EMP PRIMARY KEY,
    ENAME VARCHAR2(10),
    JOB VARCHAR2(9),
    MGR NUMBER(4),
    HIREDATE DATE,
    SAL NUMBER(7,2),
    COMM NUMBER(7,2),
    DEPTNO NUMBER(2) CONSTRAINT FK_DEPTNO REFERENCES DEPT
    );
--------------------------------------------------------------
CREATE TABLE BONUS
    (
    ENAME VARCHAR2(10),
    JOB VARCHAR2(9),
    SAL NUMBER,
    COMM NUMBER
    ) ;
--------------------------------------------------------------
CREATE TABLE SALGRADE
    (
    GRADE NUMBER,
    LOSAL NUMBER,
    HISAL NUMBER
    );
- .dgen template file to generate test data for tables. The file stores data generator settings that have been set up and saved using the Data Generator tool.
- .dit template files to import data into the tables. Note that it is also required to prepare files, such as .csv, from which data will be imported using .dit template files. The template files store the configured settings for data import, saved using the Data Import functionality.
- .scomp template file to synchronize the databases based on the synchronization settings stored in the file. The file can be generated using the Schema Compare tool.
- .dcomp template file to populate the database with test and realistic data. It can be configured and saved using the Data Compare tool.
- .ddoc template file to generate documentation in the required file format. The file stores the documentation settings, which can be configured using the Documenter tool.
The testing data is SCOTT_USER user, DBFORCL and dbforacle18 as test servers, and DEPT, EMP, BONUS, and SALGRADE tables. When executing scripts in the project, it is required to replace parameters, such as a server, a service name, a username, a password, and a path to the files, in the scripts with the actual data.
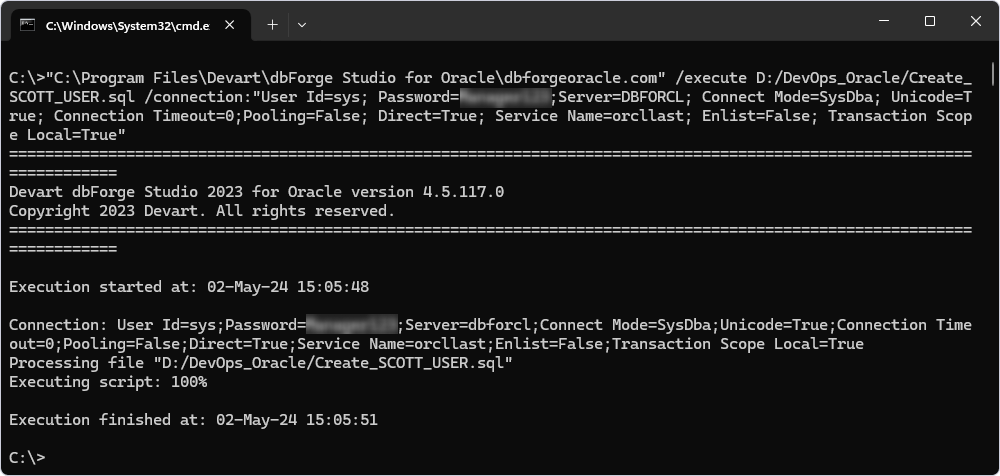
Step 1: Create a user
To create a user on the server, open the command prompt and execute the following command-line script:
"C:\Program Files\Devart\dbForge Studio for Oracle\dbforgeoracle.com" /execute Create_user.sql /connection:"User Id=[username]; Password=[password];Server=[server]; Connect Mode=SysDba; Unicode=True; Connection Timeout=0;Pooling=False; Direct=True; Service Name=[service_name]; Enlist=False; Transaction Scope Local=True"
Substitute the parameters with the actual values:
C:\Program Files\Devart\dbForge Studio for Oracle\dbforgeoracle.comis the default installation folder of dbForge Studio for Oracle. If the tool is installed in a different folder, specify its path.D:/DevOps_Oracle/Create_user.sqlis the path to the template file to create a user in the Oracle database.[username]is the username to connect to the database.[password]is the password for the specified username.[server]is the server name or IP address of the Oracle database server on which a user will be created.[service_name]is the service name of the Oracle server to connect.
In the example, the script creates a SCOTT_USER user on the DBFORCL server.
Note
The user must have privileges on tablespace ‘USERS’; otherwise, the following error may occur: no privileges on tablespace ‘USERS’, and some operations will fail.
To grant privileges, run the command-line script:
GRANT UNLIMITED TABLESPACE TO username;
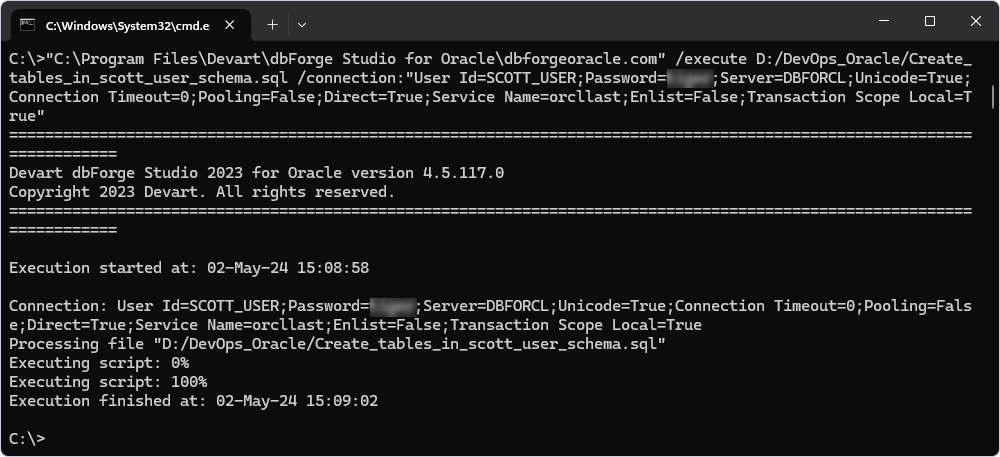
Step 2: Create tables
The next step is to create empty tables. To do this, execute the following command-line script as a SCOTT user:
"C:\Program Files\Devart\dbForge Studio for Oracle\dbforgeoracle.com" /execute Create_tables.sql /connection:"User Id=[username];Password=[password];Server=[server];Unicode=True;Connection Timeout=0;Pooling=False;Direct=True;Service Name=[service_name];Enlist=False;Transaction Scope Local=True"
Substitute the parameters with the actual values:
C:\Program Files\Devart\dbForge Studio for Oracle\dbforgeoracle.comis the default installation folder of dbForge Studio for Oracle. If the tool is installed in a different folder, specify its path.Create_tables.sqlis the path to the template file containing the CREATE TABLE statements to create tables on the server.[username]is the username to connect to the database.[password]is the password for the specified username.[server]is the server name or IP address of the Oracle database server on which tables will be created.[service_name]is the service name of the Oracle server to connect.
In the example, the script creates tables, such as DEPT, EMP, BONUS, and SALGRADE, in the SCOTT_USER schema on the DBFORCL server.
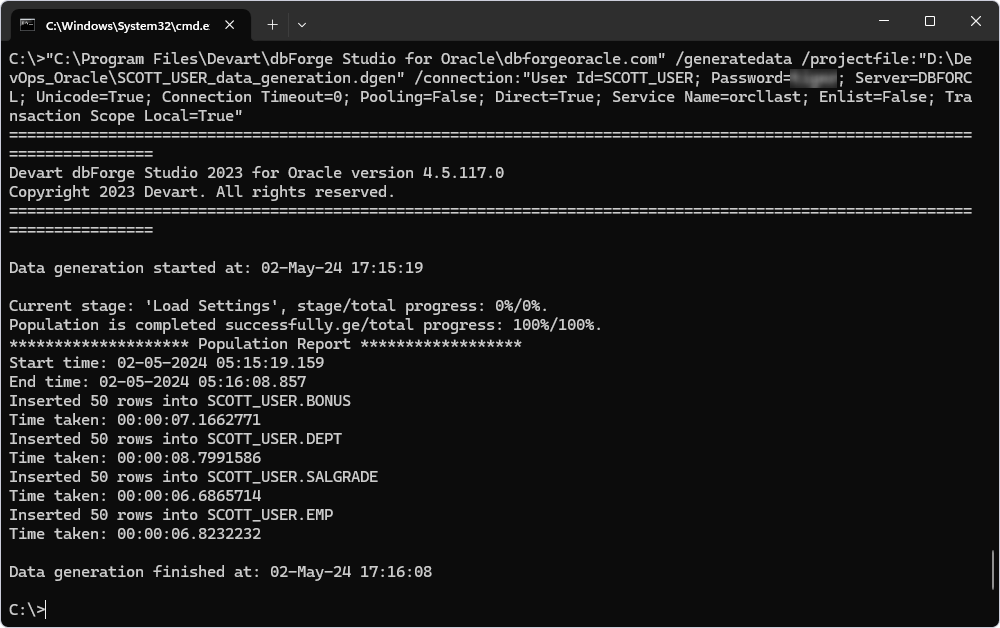
Step 3: Populate tables with data
After creating the tables, fill them with random and test data using the following tools available in dbForge Studio for Oracle:
Generate data using the Data Generator functionality
To generate data for the tables, execute the following command-line script:
"C:\Program Files\Devart\dbForge Studio for Oracle\dbforgeoracle.com" /generatedata /projectfile:"Data_Generation_template.dgen" /connection:"User Id=[username]; Password=[password]; Server=[server]; Unicode=True; Connection Timeout=0; Pooling=False; Direct=True; Service Name=[service_name]; Enlist=False; Transaction Scope Local=True"
Substitute the parameters with the actual values:
C:\Program Files\Devart\dbForge Studio for Oracle\dbforgeoracle.comis the default installation folder of dbForge Studio for Oracle. If the tool is installed in a different folder, specify its path.Data_Generation_template.dgenis the path to the previously configured data generator template file to populate the created tables with random test data.[username]is the username to connect to the database.[password]is the password for the specified username.[server]is the server name or IP address of the Oracle database server on which tables will be created.[service_name]is the service name of the Oracle server to connect.
In the example, the script populates the DEPT, EMP, BONUS, and SALGRADE tables with data in the SCOTT_USER schema on the DBFORCL server.
Generate data using the Data Import/Export functionality
Another way to insert data into the tables is to import it from existing tables. To do this, run the following command-line scripts, each of which will populate the corresponding table.
"C:\Program Files\Devart\dbForge Studio for Oracle\dbforgeoracle.com" /dataimport /connection:"User Id=[username];Password=[password];Server=[server];Unicode=True;Connection Timeout=0;Pooling=False;Direct=True;Service Name=[service_name];Enlist=False;Transaction Scope Local=True" /templatefile:table1_template.dit

"C:\Program Files\Devart\dbForge Studio for Oracle\dbforgeoracle.com" /dataimport /connection:"User Id=[username];Password=[password];Server=[server];Unicode=True;Connection Timeout=0;Pooling=False;Direct=True;Service Name=[service_name];Enlist=False;Transaction Scope Local=True" /templatefile:table2_template.dit

"C:\Program Files\Devart\dbForge Studio for Oracle\dbforgeoracle.com" /dataimport /connection:"User Id=[username];Password=[password];Server=[server];Unicode=True;Connection Timeout=0;Pooling=False;Direct=True;Service Name=[service_name];Enlist=False;Transaction Scope Local=True" /templatefile:table3_template.dit

"C:\Program Files\Devart\dbForge Studio for Oracle\dbforgeoracle.com" /dataimport /connection:"User Id=[username];Password=[password];Server=[server];Unicode=True;Connection Timeout=0;Pooling=False;Direct=True;Service Name=[service_name];Enlist=False;Transaction Scope Local=True" /templatefile:table4_template.dit
Substitute the parameters with the actual values:
C:\Program Files\Devart\dbForge Studio for Oracle\dbforgeoracle.comis the default installation folder of dbForge Studio for Oracle. If the tool is installed in a different folder, specify its path.table1_template.dit,table2_template.dit,table3_template.dit, andtable4_template.ditare template files to insert data into tables.[username]is the username to connect to the database.[password]is the password for the specified username.[server]is the server name or IP address of the Oracle database server on which the tables to be populated are located.[service_name]is the service name of the Oracle server to connect.
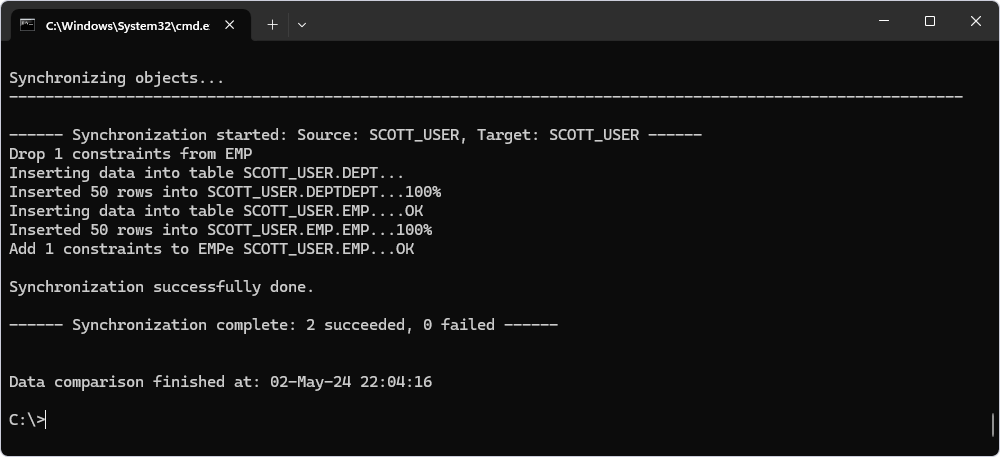
Step 4: Synchronize schemas on different servers
To copy the database objects of the SCOTT_USER schema located on the source DBFORCL server and transfer them to the empty SCOTT_USER schema on the target dbforacle18 server, execute the following command:
"C:\Program Files\Devart\dbForge Studio for Oracle\dbforgeoracle.com" /schemacompare /compfile:"sync_settings_template.scomp" /source connection:"User Id=[source_username];Password=[source_passowrd];Server=[source_server];Unicode=True;Connection Timeout=0;Pooling=False;Direct=True;Service Name=[source_service_name];Enlist=False;Transaction Scope Local=True" /target connection:"User Id=[target_username];Password=[target_password];Server=[target_server];Unicode=True;Pooling=False;Direct=True;Service Name=[target_service_name];Enlist=False;Transaction Scope Local=True" /schemas:source_schema,target_schema /sync
Substitute the parameters with the actual values:
C:\Program Files\Devart\dbForge Studio for Oracle\dbforgeoracle.comis the default installation folder of dbForge Studio for Oracle. If the tool is installed in a different folder, specify its path.sync_settings_template.scompis the template file that stores settings for the schema synchronization.[source_username]is the username to connect to the source database.[source_password]is the password for the specified username.[source_server]is the source server name or IP address of the Oracle database server on which the source schema to be synchronized is located.[source_service_name]is the service name of the source Oracle server to connect.[target_username]is the username to connect to the target database.[target_password]is the password for the specified username.[target_server]is the target server name or IP address of the Oracle database server on which the target schema to be synchronized is located.[target_service_name]is the service name of the target Oracle server to connect.[source_schema]is the name of the source schema to be synchronized.[target_schema]is the name of the target schema to be synchronized.
In the example, the script synchronizes the source and target SCOTT_USER schemas located on the source DBFORCL and target dbforacle18 servers. It adds tables, views, procedures, functions, and triggers according to the settings stored in the SCOTT_USER_Schema_Compare_template.scomp template file.

Step 5: Populate the database with test data
After restoring the structure of the SCOTT_USER schema on the dbforacle18 server, fill test and random data in the database using the Data Compare tool. It allows migrating test data from one database or scripts folder to another.
To insert data into the database objects, execute the following command-line script:
"C:\Program Files\Devart\dbForge Studio for Oracle\dbforgeoracle.com" /datacompare /compfile:"Data_Compare_template.dcomp" /source connection:"User Id=[source_username];Password=[source_password];Server=[source_server];Unicode=True;Connection Timeout=0;Pooling=False;Direct=True;Service Name=[source_service_name];Enlist=False;Transaction Scope Local=True" /target connection:"User Id=[target_username];Password=[target_password];Server=[target_server];Unicode=True;Pooling=False;Direct=True;Service Name=[target_service_name];Enlist=False;Transaction Scope Local=True" /schemas:source_schema,target_schema /sync
Substitute the parameters with the actual values:
C:\Program Files\Devart\dbForge Studio for Oracle\dbforgeoracle.comis the default installation folder of dbForge Studio for Oracle. If the tool is installed in a different folder, specify its path.Data_Compare_template.dcompis the template file to populate the database with test and realistic data.[source_username]is the username to connect to the source database.[source_password]is the password for the specified username.[source_server]is the source server name or IP address of the Oracle database server on which the source schema to be synchronized is located.[source_service_name]is the service name of the source Oracle server to connect.[target_username]is the username to connect to the target database.[target_password]is the password for the specified username.[target_server]is the target server name or IP address of the Oracle database server on which the target schema to be synchronized is located.[target_service_name]is the service name of the target Oracle server to connect.[source_schema]is the name of the source schema to be populated with data.[target_schema]is the name of the target schema to be populated with data.
In the example, the script synchronizes the source and target SCOTT_USER schemas located on the source DBFORCL and target dbforacle18 servers. It populates tables with data according to the settings stored in the SCOTT_USER_Data_Compare_template.scomp template file.
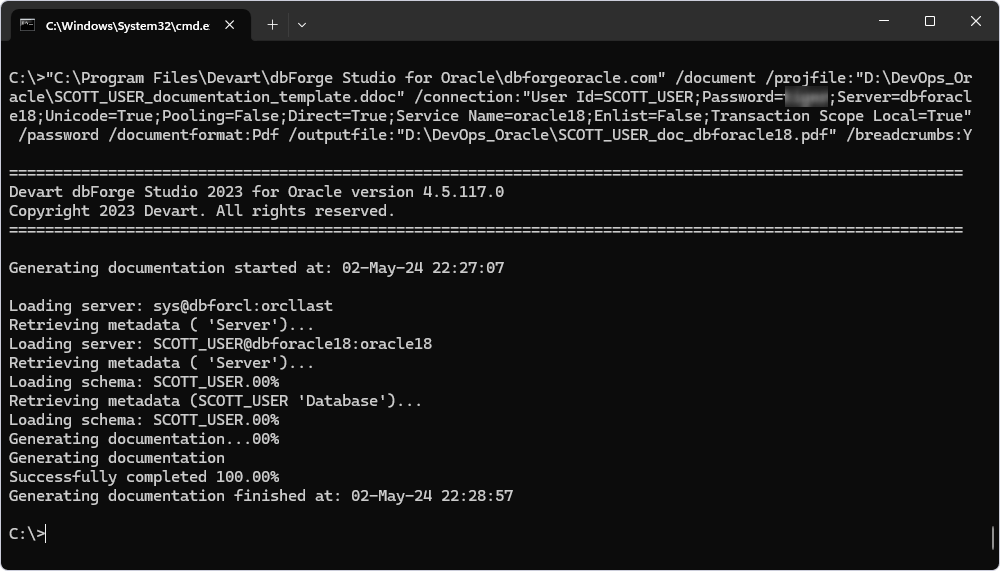
Step 6: Generate the documentation
The final step will be to generate PDF documentation of the SCOTT_USER schema located on the dbforacle18 server. The Studio can also create documentation in HTML or Markdown file formats.
To generate documentation in a PDF file format, execute the following command-line script:
"C:\Program Files\Devart\dbForge Studio for Oracle\dbforgeoracle.com" /document /projfile:"documentation_template.ddoc" /connection:"User Id=SCOTT;Password=[password];Server=dbforacle18;Unicode=True;Pooling=False;Direct=True;Service Name=oracle18;Enlist=False;Transaction Scope Local=True" /password /documentformat:Pdf /outputfile:"output_file.pdf" /breadcrumbs:Y
Substitute the parameters with the actual values:
C:\Program Files\Devart\dbForge Studio for Oracle\dbforgeoracle.comis the default installation folder of dbForge Studio for Oracle. If the tool is installed in a different folder, specify its path.documentation_template.ddocis the template file configured previously with the Documenter tool built into dbForge Studio for Oracle.[username]is the username to connect to the database.[password]is the password for the specified username.[server]is the server name or IP address of the Oracle database server on which the tables to be documented are located.[service_name]is the service name of the Oracle server to connect.output_file.pdfis the result PDF file that will store the generated documentation.
In the example, the script generates PDF documentation for the SCOTT_USER schema located on the dbforacle18 server according to the options configured in the documentation_template.ddoc template file.
To conclude, the guide explained how dbForge Studio is involved in the DevOps process through deployment scripts and template files. The tools available in the Studio help automate tasks such as schema creation, populating test data, comparing and synchronizing schema structures and data, and generating documentation in the .pdf file format.