Managing Database Connections
dbForge Studio for Oracle offers you a visual, quick, and simple way to manage database connections using Database Explorer.
Open Database Explorer
By default, Database Explorer opens when you start dbForge Studio. If it is closed, you can open it by using one of the following methods:
- On the View menu, select Database Explorer.
- Press Ctrl+W, L.
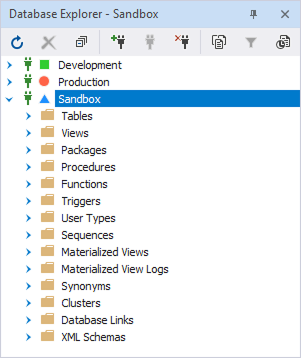
Database Explorer displays recently used database connections. When opening Database Explorer for the first time, no connections are shown.
In Database Explorer, you can:
- Create a database connection.
- Manage coloring for connections.
- Open and close a database connection.
- View, edit, duplicate or delete a database connection.
- Perform database-related tasks.
Create a database connection
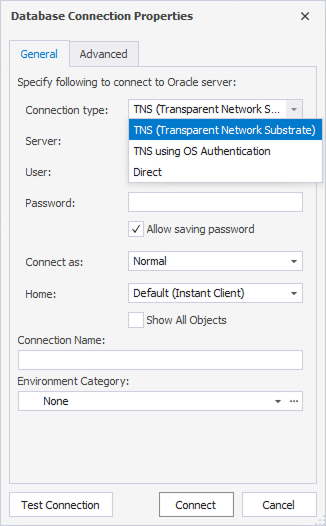
1. Open the Database Connection Properties dialog by doing one of the following:
- On the Database Explorer toolbar, select
 New Connection.
 - Right-click anywhere in Database Explorer or a specific connection and select New Connection.
- On the Database menu, select New Connection.
2. Configure connection parameters and select Connect.
Note
The connection parameters you need to enter vary based on the selected connection type.
The connection marked with the ![]() icon appears in Database Explorer.
icon appears in Database Explorer.
For more information about how to connect to the server, see Connecting to a Database.
Windows connection coloring
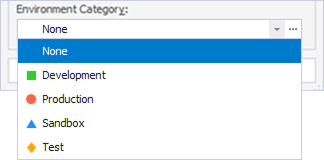
Window connection coloring immediately lets you know which server you’re connected to. When setting the database connection properties, you can add coloring for each server connection in the Environment Category list of the Database Connection Properties dialog.
To add connection coloring, select an arrow in the Environment Category and then select the required coloring.
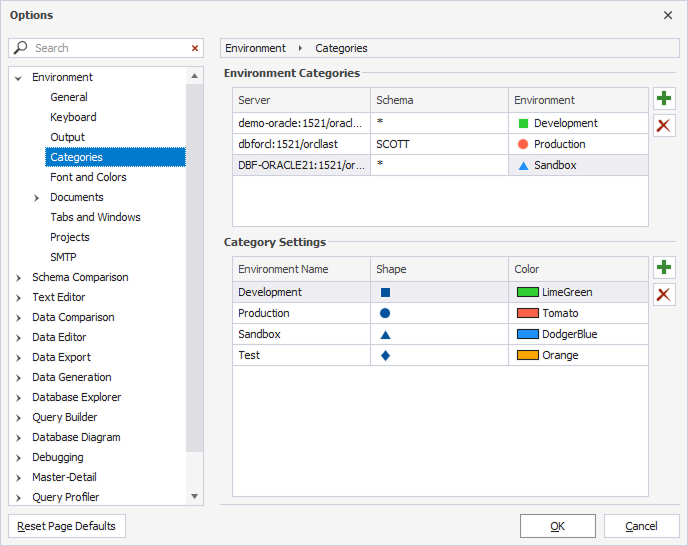
In the Environment Category, select ![]() to open the Options dialog. Here, you can customize category settings by choosing colors, editing, adding, or deleting categories. You can also assign colors to all schemas or specific schemas within a connection.
to open the Options dialog. Here, you can customize category settings by choosing colors, editing, adding, or deleting categories. You can also assign colors to all schemas or specific schemas within a connection.
Assign coloring to an environment category
1. Next to the Environment Categories grid, select  New Color Match.
2. In a new row, specify a server and/or a schema name and environment.
3. To save the changes, select OK.
Note
Categories are not associated with a specific connection. They are determined by rules configured through connection attributes, such as a host or IP address of the database server, a port, and a database name. When you use specific protocols, the following additional attributes are also evaluated:
- Direct connection:
Host(a name or IP address of the server),Port/'ServiceNameorSid- TNS connection:
Host(a name of TNS alias of the Oracle database to which to connect)If two connections share identical values for these attributes, they are assigned the same category.
Alternatively, you can create a DNS alias for the connection to assign a unique environment category.
Remove coloring from an environment category
1. Select the color match you want to remove.
2. Next to the Environment Categories grid, select  Delete Color Match.
3. To save the changes, select OK.
Add a new category
1. Next to the Category Settings grid, select New Category.
2. In a new row, specify an environment name and choose a shape and a color.
3. To save the changes, select OK.
Delete a category
1. Select the category you want to delete.
2. Next to the Category Settings grid, select Delete Category.
3. To save the changes, select OK.
Open a database connection
To open a database connection, do one of the following:
- In Database Explorer, double-click a connection that was closed.
- In the Database Explorer, select the connection you want to open and on the Database Explorer toolbar, select Open Connection.
The connection icon is changed to ![]() , and the connection node displays a list of databases assigned to the connection.
, and the connection node displays a list of databases assigned to the connection.
Close a database connection
To close a database connection, do one of the following:
- In Database Explorer, right-click a connection and select Close.
- In the Database Explorer, select the connection you want to close and on the Database Explorer toolbar, select Close Connection.
The connection icon is changed to ![]() .
.
Edit a database connection
In Database Explorer, right-click a connection you want to edit and select Modify Connection. The Database Connection Properties dialog opens where you can edit the parameters.
Delete a database connection
In Database Explorer, right-click a connection and select Delete. The message appears asking Are you sure you want to remove database connection *name?*:
- Select Yes to confirm the deletion.
- Select No to cancel dropping.
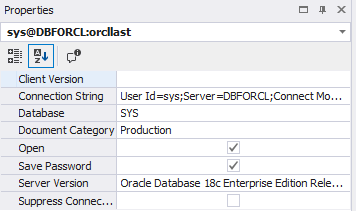
View database connection information
In Database Explorer, right-click a connection and select Properties. The Properties window opens, displaying the connection properties.