Generate an SSL certificate for PostgreSQL server and client
The guide provides a procedure for generating an SSL certificate for a PostgreSQL server and client, as well as enabling SSL connection to a PostgreSQL database. For testing purposes, a self-signed certificate can be used, while in a production environment, a certificate signed by a Certificate Authority (CA) should be used.
Prerequisite
- Before proceeding, ensure that OpenSSL, a tool for creating SSL certificates, is installed on your machine. To confirm whether OpenSSL is installed, open the Command Prompt and execute the following OpenSSL command:
openssl version -a
If OpenSSL is installed, you will see a version number, a release date, and the directory where the certificate and private keys can be located.
If OpenSSL is not installed, you can download it from the official website.
To enable SSL for your database, you need to create the following files:
- server.key: a private key that will be used to encrypt communication between the server and the client
- server.crt: a server certificate
- root.crt: a trusted root certificate
Step 1: Generate the private key, server and root certificates
1. To generate a private key and a self-signed SSL certificate, open the OpenSSL command prompt and run the following command:
openssl req -new -x509 -days 365 -nodes -out server.crt -keyout server.key
In this command, 365 is the number of days that a self-signed SSL certificate will be valid for. You can change the number of days by modifying the -days parameter.
2. Next, you will be prompted to enter the following parameters:
| Parameter | Description |
|---|---|
| -days | Number of days the current certificate will be valid |
| /C= | Country Note that you should specify two letters for the country, for example, AU for Australia. |
| /ST= | State |
| /L= | Location |
| /O= | Organization |
| /OU= (optional) | Organizational Unit |
| /CN= | Common Name |
| /emailAddress= |
Note
If the certificate is used in a production environment, use your personal data.
2. Since we are creating and signing certificates by ourselves, the server certificate will also be used as a trusted root certificate. Therefore, create a copy of the server certificate as follows:
cp server.crt root.crt
Note
If the server certificate is the only certificate being used, this step is not necessary.
3. To enable SSL for PostgreSQL, copy the server and root certificate and key files and paste them into the PostgreSQL data directory.
Depending on the operating system and installation method of PostgreSQL you used, select the following directory to copy files to.
- On Linux installed with the PostgreSQL package manager: “/etc/ssl/private” directory.
- On Linux installed using the PostgreSQL source code: “data” directory of the PostgreSQL installation folder.
- On Windows installed using the EnterpriseDB installer: “C:\Program Files\PostgreSQL<postgresql_version>\data” directory of the PostgreSQL installation folder.
So, all three required certificates have been created and moved to the PostgreSQL data directory. Now, it is time to restart the PostgreSQL server.
Step 2: Configure PostgreSQL to use SSL
The next step is to configure PostgreSQL server to enable and use SSL.
1. Open the postgresql.conf file located in the PostgreSQL data directory using any text editor.
2. Uncomment the lines that enable SSL and modify them as shown:
ssl = on
ssl_ca_file = 'root.crt'
ssl_cert_file = 'server.crt'
ssl_crl_file = ''
ssl_key_file = 'server.key'
Then, save the file.
3. Modify the client PostgreSQL configuration file. For this, open the pg_hba.conf file located in the PostgreSQL data directory using any text editor.
4. Add the following line to the file:
hostssl all all 0.0.0.0/0 md5 clientcert=1
This line allows SSL connections from any IP address using the md5 authentication method and requires the client to provide a valid SSL certificate.
Then, save the file.
6. Restart the PostgreSQL server to apply the changes.
Now, ensure that SSL has been enabled by opening dbForge Studio for PostgreSQL, clicking New SQL, and executing the following command:
SHOW ssl;
If enabled, ssl will be set to on.

Step 3: Generate an SSL certificate for the client
1. Create a client SSL certificate using the following command:
openssl req -new -nodes -out client.csr -keyout client.key
You will be prompted to enter the following parameters:
Note
The Common Name (CN) must be the same as the database username that you set during the first certificate generation in the server configuration file. In our case, it is all.
| Parameter | Description |
|---|---|
| -days | Number of days the current certificate will be valid |
| /C= | Country Note that you should specify two letters for the country, for example, AU for Australia. |
| /ST= | State |
| /L= | Location |
| /O= | Organization |
| /OU= (optional) | Organizational Unit |
| /CN= | Common Name |
| /emailAddress= |
This command will generate a client certificate signing request (CSR) and a private key.
2. Sign the client certificate using the following command:
openssl x509 -req -in client.csr -CA server.crt -CAkey server.key -CAcreateserial -out client.crt -days 365
This command will sign the client CSR using the server’s SSL certificate and key, and generate a client SSL certificate that is valid for 365 days.
3. Restart the PostgreSQL server.
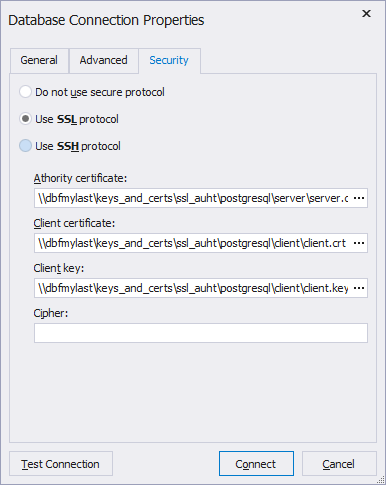
4. When connecting to the Studio, you need to specify the directory to the created client SSL certificate in Database Connection Properties > Security > Use SSL Protocol: