Connect to a database
Before you can connect to a database, you must create a server connection.
To create a connection:
1. On the Database menu, click New Connection. The Database Connection Properties dialog box opens.
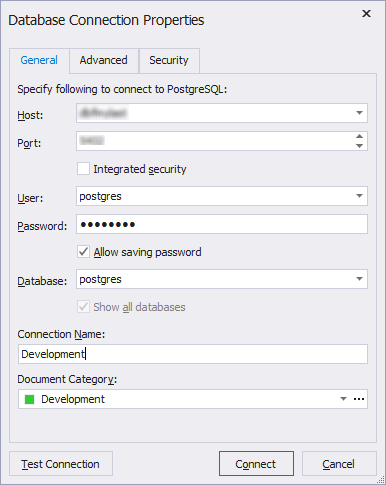
2. In the Host box, enter the host name.
3. In the Port box, enter the port information. The default port number is 5432.
4. Enter the login credentials in the User and Password text boxes.
5. Select an existing database from the Database drop-down menu.
6. In the Connection Name text box, the connection name should be generated automatically from the host name. You can create a distinctive name for your new connection.
7. Optional: You can assign a document category to a new connection.
Note
Categories are not associated with a specific connection. They are determined by rules configured through connection attributes, such as a host, a port, and a database name. When you use specific protocols, the following additional attributes are also evaluated:
- HTTP tunneling protocol:
Host(a name or IP address of the host of the PostgreSQL database to which to connect),Port,HttpUrl,HttpHost,HttpPortIf two connections share identical values for these attributes, they are assigned the same category.
Alternatively, you can create a DNS alias for the connection to assign a unique environment category.
8. Optional: You can click Advanced to configure advanced connection properties.
9. Optional: Click Test Connection to verify the connection.
10. Click OK to create the connection.
Helpful materials
Connect to PostgreSQL Database Using psql, pgAdmin, and PostgreSQL Client Tool
Learn how to establish connections to a PostgreSQL database using various tools such as psql, pgAdmin, and dbForge Studio for PostgreSQL.
How to Configure PostgreSQL for Remote Connections: A Beginner’s Guide
Explore step-by-step instructions on how to set up PostgreSQL for remote connections, providing essential tips for secure and efficient configuration.