Populating Database
After configuring the data generation project, you can use the Data Population Wizard to insert random test data into tables and manage the data population script.
To open the Data Population Wizard, select Populate data to the target schemas at the top of the data generation project.

To populate a database:
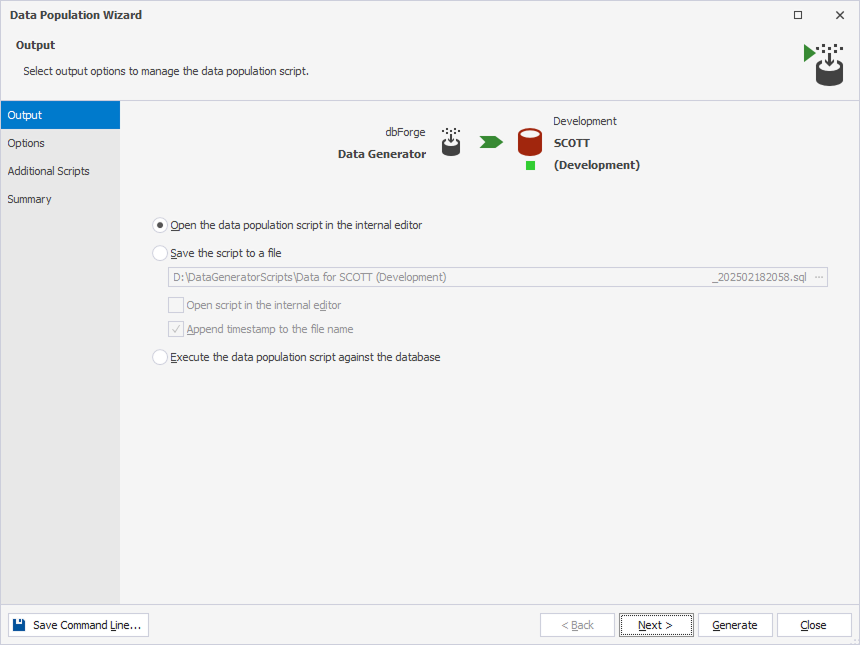
1. On the Output page of the Data Population Wizard, select output options to manage the data population script:
-
Open data population script in the internal editor (default) - Select this option to view and edit the data population script before populating the database. The script opens in the internal editor. To run the script, select Execute on the SQL toolbar or press F5.
- Save the script to a file - Select this option to save the script locally on your computer. Enter the full path to the folder where you want to save the script.
- To open the script in the internal editor after saving, select the Open script in the internal editor checkbox.
- By default, the file name includes the date and time. To save the script without a timestamp, clear the Append timestamp to the file name checkbox.
- Execute the data population script against the database - Select this option to run the script immediately without reviewing it.
2. Optional: On the Options page, select general data population options to customize the default behavior of the data population process. To proceed, select Next.
Note
If you don’t select any options, the data population will run using the default settings.
Hovering over the option shows the option description in the Description box.

To save the current settings as the default options for future use, select Save As My Defaults. These options will be used for all new projects.
To reset all the options to their original settings, select Devart Defaults.
To restore your default settings after making changes, select My Defaults.
The following table provides available general data population options and their descriptions.
| Option Name | Default State | Description |
|---|---|---|
| Exclude comments | Off | Prevents comments generation in the data population script. |
| Rollback changes on synchronization error | Off | Automatically restores the database to the state preceding the synchronization if any error occurs. This includes rolling back a transaction and re-enabling disabled indexes and triggers. |
| Disable foreign keys | Off | Drops foreign keys at the beginning of the data population and restores them afterward. |
| Disable indexes | Off | Disables non-unique indexes at the beginning of data population and re-enables them afterward. |
| Disable check constraints | Off | Disables the CHECK and NOT NULL constraints at the beginning of the data population and tries to restore them afterward. |
| Disable DML triggers | On | Disables DML triggers at the beginning of the data population and re-enables them afterward. The option applies to tables. |
| Restore session parameters | Off | Restores session parameters, such as NLS_DATE_FORMAT, NLS_TIMESTAMP_TZ_FORMAT, NLS_TIMESTAMP_FORMAT, NLS_NUMERIC_CHARACTERS, NLS_NCHAR_CONV_EXCP, and TIME_ZONE after the script is generated. |
| Generate fully qualified object names | On | Generates fully qualified object names in the synchronization script, including the schema name for each object. |
| Use SQL *Plus Commands | On | Uses SQL *Plus commands, such as SET SQLBLANKLINES and SET DEFINE in the synchronization script. |
| Include print comments | Off | Includes print comments in the output during script execution. |
3. Optional: On the Additional Scripts page, specify the script you want to execute before and/or after the data population:
- Select Scripts to execute before to run the script before or select Scripts to execute after to run the script after the data population and do one of the following:
- Under Use embedded script, enter the script.
- Under Use external script, select
 Browse to specify a full path to the file with a .sql script.
To proceed, select Next.
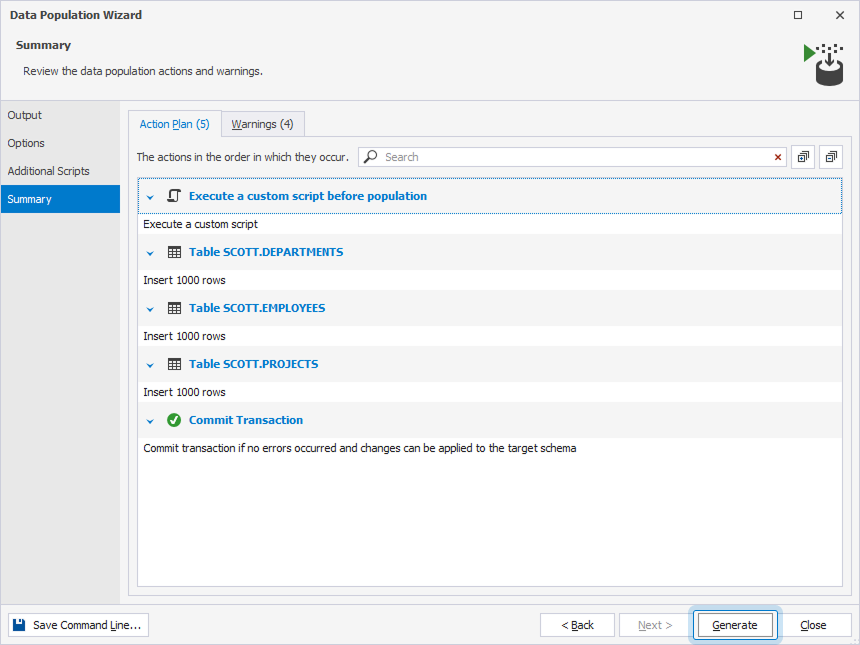
4. On the Summary page, review the data population action plan and warnings that Data Generator provides to alert you to potential issues with data generation.
5. To run the data population, select Generate.