Configure synchronization options
After you have selected the objects for synchronization, you can use the Schema Synchronization Wizard to set synchronization options.
How to configure the synchronization options
1. To open the synchronization wizard, click  .
.
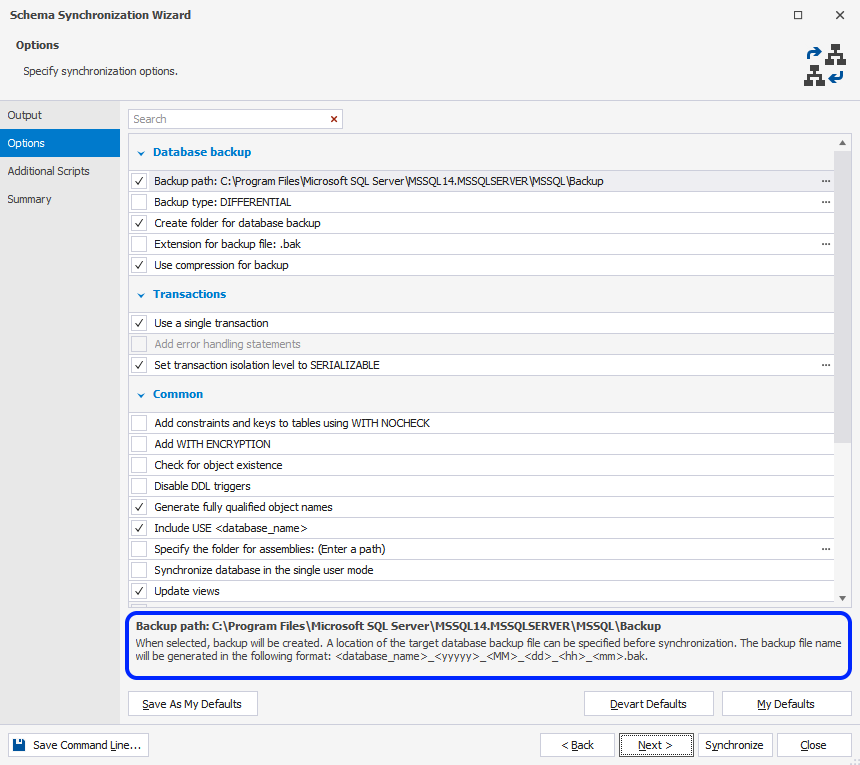
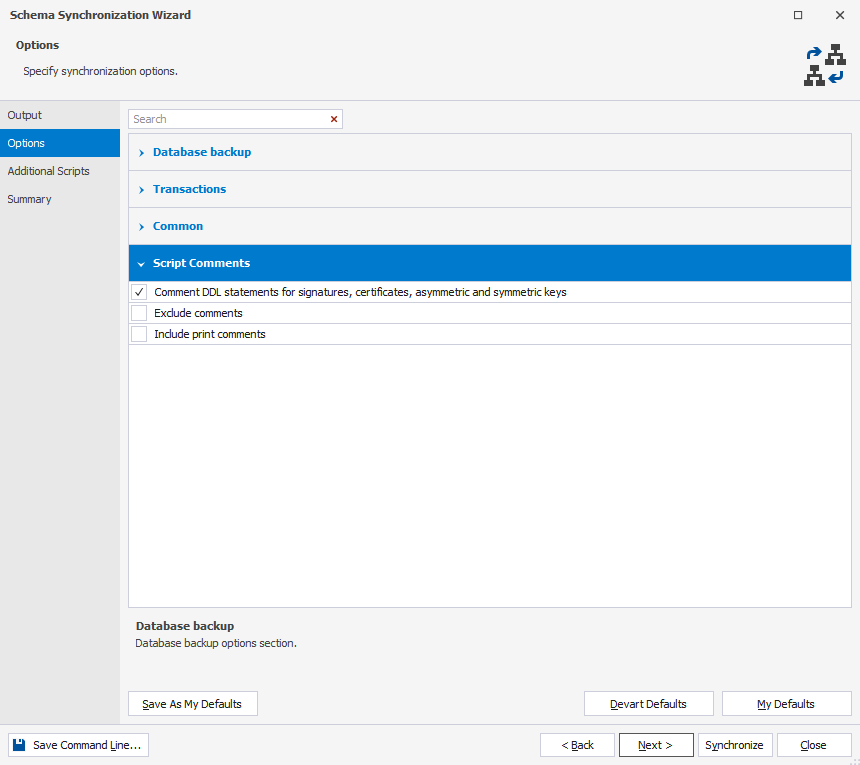
2. Click Options tab to view all the synchronization options. Each option has a detailed description.

For convenience, options are grouped:

Search for options
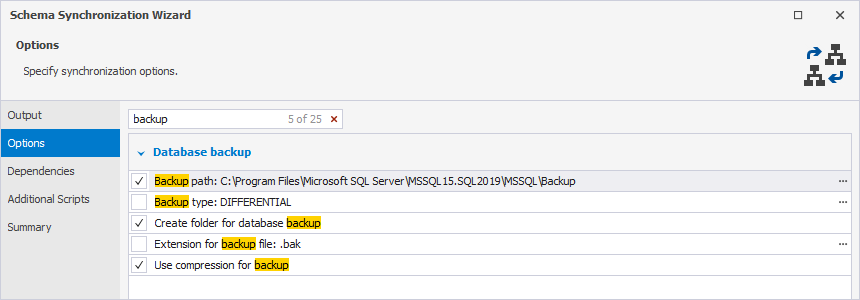
On the Options page, you can search for specific synchronization options by typing the search text or symbol, such as an underscore, in the Search box. The list is filtered to display only those options that contain the searched text.
The default search mode is case-insensitive. It means that searching for a term such as backup will highlight all options containing the text whether it is capitalized (Backup) or lowercase (backup). As you type, the text that matches your search criteria will be highlighted in the grid. The number of matching options will be displayed in the search box.

If you write the text divided by spacebars, each subsequent input will highlight new results.

To remove the search input, click ![]() in the search box.
in the search box.
In the Search box, you can use the following keyboard shortcuts:
- Ctrl+A to select all.
- Ctrl+Left Arrow (←) to move the caret to the beginning of the word.
- Ctrl+Right Arrow (→) to move the caret to the end of the word.
- Ctrl+Shift+Left Arrow (←) to select text from the current caret position to the beginning of the current word and move the caret to the beginning of the word.
- Ctrl+Shift+Right Arrow (→) to select text from the current caret position to the end of the current word and move the caret to the end of the word.
- Ctrl+Backspace to delete the word to the left of the cursor.
Note
If you want to use the options you have set later, click Save As My Defaults.
If you want to apply the options you have saved earlier, click My Defaults.
It is also possible to return to the default settings of the tool. Click Devart Defaults if you want to do it.
3. After you have configured the synchronization options, click Synchronize.
How to save the synchronization options
Schema Compare for SQL Server allows saving synchronization options as a .scomp file for further use, for example for automating and/or scheduling database synchronization tasks.
To save the synchronization settings (the .scomp file), you need to close the Schema Synchronization Wizard after configuring all the necessary options (prior to clicking Synchronize). Then, in the Schema Comparison document, click the Save icon or press Ctrl+S.
The asterisk near the .scomp file name means that the project has not yet been saved.

Note
If you save the .scomp file before configuring the synchronization settings, it will contain the custom settings you configured in the Schema Comparison wizard and the default synchronization settings.
Schema Compare synchronization options
| Option Name | Option Group | Default State | Option Description |
|---|---|---|---|
| Backup path | Database backup | Enabled | Creates a backup and allows specifying the location of the target database backup file. The backup file name will be generated in the following format: <database_name>_yyyy_MM_dd_hh_mm.bak |
| Backup type | Database backup | Disabled | Creates a backup in the selected mode. Please, note that creating a differential database backup requires a previous full database backup. If your database has never been backed up, a full database backup will be created. Copy-only mode option is available for SQL Server 2008 or later versions. |
| Create folder for database backup | Database backup | Enabled | Creates a folder for a database backup. |
| Extension for backup file | Database backup | Disabled | Specifies the extension for a backup file. When the option is disabled, the default extension (.bak) will be used for a backup file. |
| Use compression for backup | Database backup | Enabled | Performs the backup compression. This option is available for SQL Server 2008 or later versions. |
| Use a single transaction | Transactions | Enabled | Executes a synchronization script as a single transaction. All the changes to the databases will be rolled back in case of any error when executing the synchronization script. The option should be disabled when working with the memory-optimized tables, since the execution of the ALTER, DROP, and CREATE DDL is not supported within user transactions. |
| Add error handling statements | Transactions | Disabled | Stops executing a script when encountering an error. |
| Set transaction isolation level to | Transactions | Enabled | Sets the transaction isolation level. This option is enabled when the Use a single transaction option is selected. You can specify the following transaction isolation levels: SERIALIZABLE, SNAPSHOT, REPEATABLE READ, READ UNCOMMITTED, READ COMMITTED. |
| Add constraints and keys to tables using WITH NOCHECK | Common | Disabled | Adds the WITH NOCHECK clause to foreign keys and constraints created during synchronization. |
| Add WITH ENCRYPTION | Common | Disabled | Adds WITH ENCRYPTION when stored procedures, functions, views, and triggers are included to the synchronization script. |
| Check for object existence | Common | Disabled | Adds an additional check into the synchronization script (before each object DDL) to verify object existence in the target database. |
| Disable DDL triggers | Common | Disabled | Disables DDL triggers before the synchronization. After the synchronization, the triggers will be enabled. |
| Generate fully qualified object names | Common | Enabled | Generates fully qualified object names in the synchronization script. If the option is enabled, the names of objects in the synchronization script will include a schema name. |
| Include USE <database_name> | Common | Enabled | Adds the USE <database_name> clause to the script. |
| Specify the folder for assemblies | Common | Disabled | Performs assembly synchronization by copying the files to the specified folder. The option allows specifying a local path or network location tp copy the target assemblies to. |
| Synchronize a database in the single user mode | Common | Disabled | Synchronizes a database in the single user mode. |
| Update views | Common | Enabled | Updates the metadata for the specified views that are not schema bound. |
| Use ALTER SCHEMA TRANSFER statement | Common | Disabled | Transfers tables between schemas using the ALTER SCHEMA TRANSFER statement. This option can be enabled if the same database is compared. |
| Use DROP and CREATE instead of ALTER for assembles | Common | Disabled | Replaces ALTER statements with DROP and CREATE statements for assemblies in the synchronization script. |
| Use DROP and CREATE instead of ALTER for tables | Common | Disabled | Replaces ALTER statements with DROP and CREATE statements for tables in the synchronization script. Data will be transferred to the newly created tables. |
| Use DROP and CREATE instead of ALTER for views, procedures, functions, and triggers | Common | Disabled | Replaces ALTER statements with DROP and CREATE statements for views, procedures, functions, and triggers in the synchronization script. |
| Verify table data using checksum | Common | Disabled | Checks if any table data is lost after synchronization. If data is lost, the warning will appear in the Error list after synchronization. |
| Comment DDL statements for signatures, symmetric and asymmetric keys as well as certificates | Script Comments | Disabled | Adds comments to the DDL statements for signatures, symmetric and asymmetric keys as well as certificates. |
| Exclude comments | Script Comments | Disabled | Prevents comments generation in the synchronization script. |
| Include print comments | Script Comments | Disabled | Adds comments to the output when executing the synchronization script. If the print comments are included in the synchronization script, it is easier to locate the items in the output. |
You can find the list of the available comparison options in the Configure comparison options topic. Additionally, the topic outlines the process of generating a command-line arguments file, which may include not only comparison options but also synchronization options.