How to create subqueries visually
dbForge Query Builder for SQL Server supports subqueries for all SELECT statement clauses. With the tool, you can create a sequence of complex queries - each subquery can have its own subqueries. When you create a new subquery or open it for editing, a separate tab with a subquery appears. A subquery is a SELECT statement that can be inserted into SELECT, INSERT INTO, and UPDATE statements allowing expressions inside another subquery.
A subquery must have the SELECT and FROM clauses, as well as may contain the WHERE, GROUP BY, HAVING, and ORDER BY clauses. Subqueries in the SELECT, WHERE, and HAVING clauses are highlighted like hyperlinks. You can add subqueries to these clauses by typing them instead of columns.
Prerequisites
To begin with, we are going to create two tables (dept and emp) and populate them with data to use for creating queries and subqueries:
On the standard toolbar, click New SQL and then execute the following script by pressing F5. The tables are now displayed in Database Explorer.
-- Create the dept table
CREATE TABLE dept (
deptno decimal(2, 0) PRIMARY KEY -- "Department ID"
,dname VARCHAR (14) DEFAULT NULL -- "Name of the department"
,loc VARCHAR(13) DEFAULT NULL -- "City where the department is located"
)

-- Create the emp table
CREATE TABLE emp (
empno decimal(4, 0) PRIMARY KEY -- "Employee ID"
,ename varchar(10) DEFAULT NULL -- "Name"
,job varchar(9) DEFAULT NULL -- "Job title"
,mgr decimal(4, 0) DEFAULT NULL -- "Manager ID"
,hiredate date DEFAULT NULL -- "Hire date"
,sal decimal(7, 2) DEFAULT NULL -- "Salary"
,comm decimal(7, 2) DEFAULT NULL -- "Bonus"
,deptno decimal(2, 0) DEFAULT NULL -- "Department ID"
);

-- Create the foreign key for the emp table
ALTER TABLE emp
ADD CONSTRAINT FK_emp_deptno FOREIGN KEY (deptno)
REFERENCES dept (deptno);

-- Populate the dept table with data
INSERT INTO dept VALUES ('10','ACCOUNTING','NEW YORK');
INSERT INTO dept VALUES ('20','RESEARCH','DALLAS');
INSERT INTO dept VALUES ('30','SALES','CHICAGO');
INSERT INTO dept VALUES ('40','OPERATIONS','BOSTON');

-- Populate the emp table with data
INSERT INTO emp VALUES ('7369','SMITH','CLERK','7902','2020-12-17','800.00',NULL,'20');
INSERT INTO emp VALUES ('7499','ALLEN','SALESMAN','7698','2019-02-20','1600.00','300.00','30');
INSERT INTO emp VALUES ('7521','WARD','SALESMAN','7698','2020-02-22','1250.00','500.00','30');
INSERT INTO emp VALUES ('7566','JONES','MANAGER','7839','2021-04-02','2975.00',NULL,'20');
INSERT INTO emp VALUES ('7654','MARTIN','SALESMAN','7698','2018-09-28','1250.00','1400.00','30');
INSERT INTO emp VALUES ('7698','BLAKE','MANAGER','7839','2015-05-01','2850.00',NULL,'30');
INSERT INTO emp VALUES ('7782','CLARK','MANAGER','7839','2017-06-09','2450.00',NULL,'10');
INSERT INTO emp VALUES ('7788','SCOTT','ANALYST','7566','2020-12-09','3000.00',NULL,'20');
INSERT INTO emp VALUES ('7839','KING','PRESIDENT',NULL,'2014-11-17','5000.00',NULL,'10');
INSERT INTO emp VALUES ('7844','TURNER','SALESMAN','7698','2020-09-08','1500.00','0.00','30');
INSERT INTO emp VALUES ('7876','ADAMS','CLERK','7788','2018-01-12','1100.00',NULL,'20');
INSERT INTO emp VALUES ('7900','JAMES','CLERK','7698','2019-12-03','950.00',NULL,'30');
INSERT INTO emp VALUES ('7902','FORD','ANALYST','7566','2020-12-03','3000.00',NULL,'20');
INSERT INTO emp VALUES ('7934','MILLER','CLERK','7782','2021-01-23','1300.00',NULL,'10');
Create a subquery as an unnamed query in the WHERE clause
For example, we need to select the names of middle managers from the emp table. To do so, we are going to use a subquery in the WHERE clause that in turn will identify a subquery as an unnamed query in the Query Builder view.
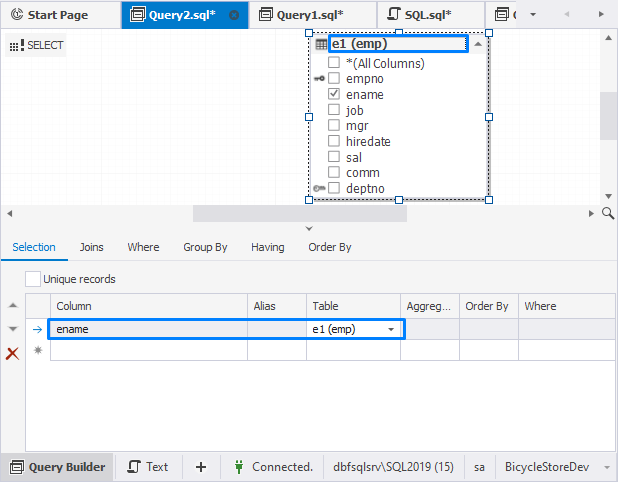
1. In Database Explorer, right-click the emp table and select Send to > Query Builder.
2. In the Query Builder view, do the following:
-
Rename the table. To do so, double-click its title and enter a required alias. In our case, it is e1.
-
Select the ename column.
As you can see, the selected column is also displayed on the Selection tab.
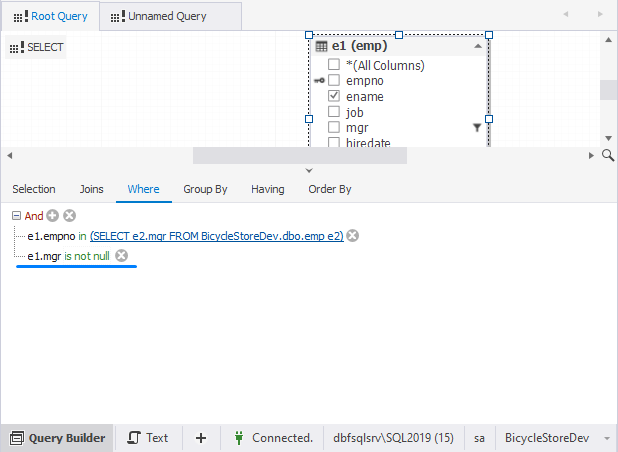
3. Switch to the Where tab to specify the condition.
4. In the Where editor, click ![]() Add a new condition and specify the condition:
Add a new condition and specify the condition:
- Click enter table name and select the column.
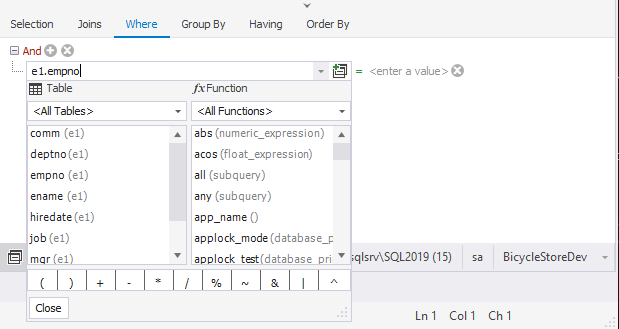
-
Click the operator to select the IN operator for the condition.
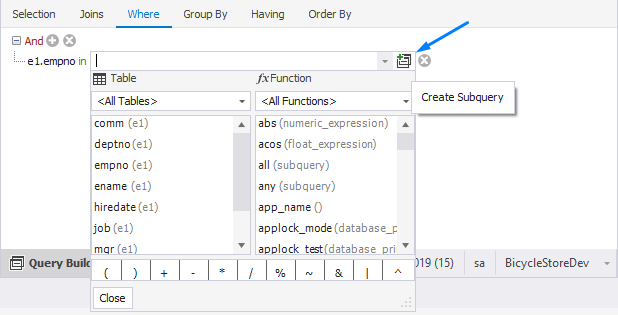
-
Click enter a value and then click
 Create Subquery to create a subquery in the WHERE clause.
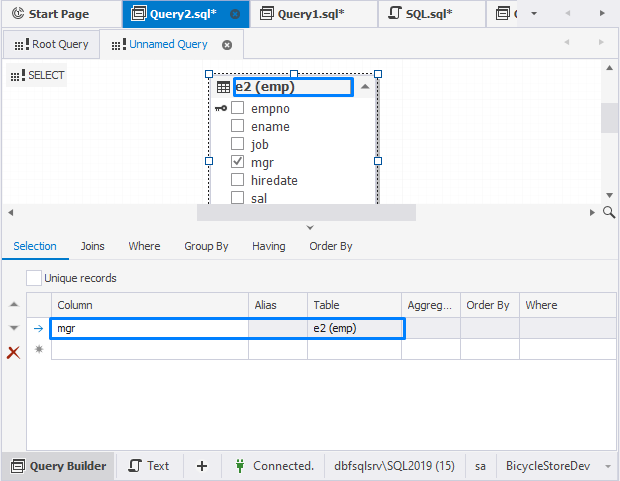
5. As you can see, the Query Builder view now contains two tabs: Root Query, which contains the main query, and Unnamed Query, which contains the subquery.
6. Switch to the Unnamed Query tab and drag the emp table from Database Explorer to the area.
7. On the Unnamed Query tab, do the following:
-
Rename the table. To do so, double-click its title and enter a required alias. In our case, it is e2.
-
Select the mgr column.
8. Switch to the Root Query > Where tab and add the following condition:
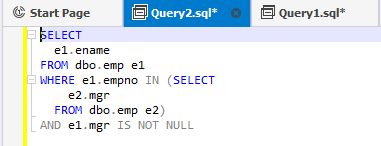
9. To preview the SQL statement, switch to the Text view.
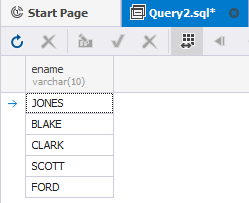
10. Click Execute or press F5 to execute the query. The Data view will output the grid with the Last Names of Middle Managers.
Create a subquery with the Wrap to Subquery functionality
If you want to include a table along with joins, conditions, and subqueries into a subquery, you have to set focus on the whole diagram area instead of the particular table and perform the Wrap to Subquery operation for your diagram.
Let’s consider a more complex example - we need to calculate the total salary for departments, which is greater than 8000 and sort it in descending order. Also, we need to retrieve the name of the department and the total salary.
For demo purposes, we will use a subquery in the FROM clause, which is identified as a SubQuery in the Query Builder tool, and JOIN, GROUP BY, HAVING, and ORDER BY clauses.
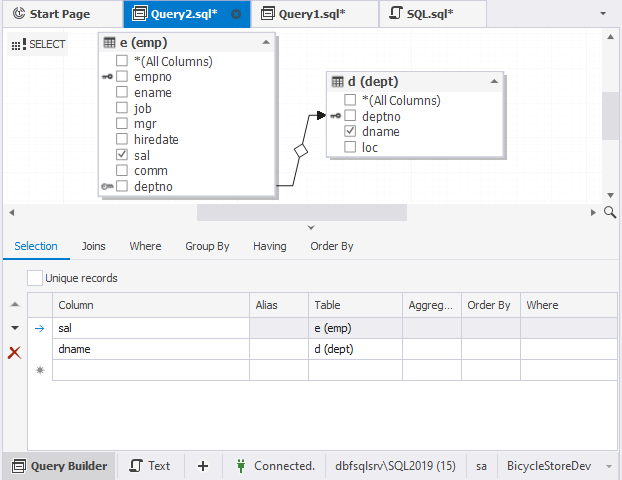
1. In Database Explorer, select the dept and emp tables, right-click them, and select Send to > Query Builder.
2. In the Query Builder view, do the following:
-
Rename the tables. To do so, double-click their titles and enter the required aliases. In our case, it is e for the emp table and d for the dept table.
-
Select the dname column in the dept table and sal column in the emp table.
The selected columns will be also displayed on the Selection tab.
3. On the Query Builder toolbar, click ![]() Wrap to Subquery to convert tables into a subquery.
Wrap to Subquery to convert tables into a subquery.
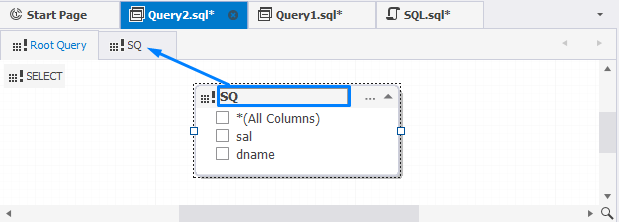
Now, the Query Builder view is split into two tabs: Root Query and SubQuery.
On the Root Query tab, the icon on the table header will change from ![]() to
to
![]() indicating that the subquery was added to the query. You can double-click the title to add an alias to your subquery.
indicating that the subquery was added to the query. You can double-click the title to add an alias to your subquery.
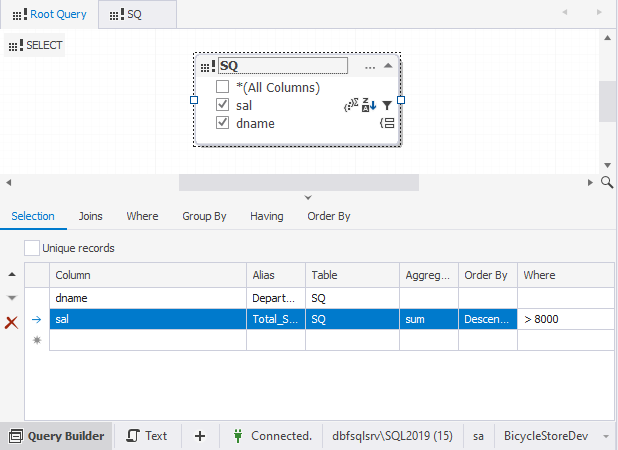
4. On the Root Query tab, select the sal and dname columns.
5. On the Selection tab, we will set the parameters to calculate the total salary for departments, which is greater than 8000, and sort it in descending order.
- For the dname column:
- In the Alias column, double-click the field and enter Department_Name as an alias.
- For the sal column:
- In the Alias column, double-click the field and enter Total_Salary as an alias.
- Double-click the Aggregate column and select the sum function from the dropdown list.
- Double-click the Order By column and select Descending from the dropdown list.
- In the Where column, enter >8000.
In addition, these conditions are displayed next to the column on the diagram and on the corresponding tabs (Group By, Having, and Order By) of the Tabbed Editor. Thus, these parameters can also be set on those tabs.
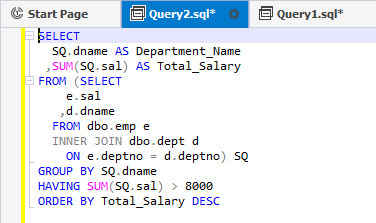
6. To preview the SQL statement, switch to the Text view.
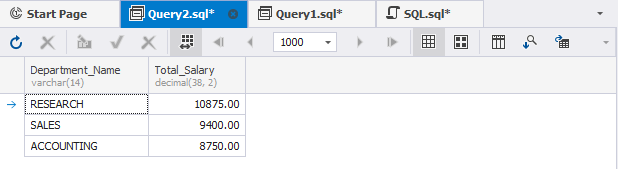
7. Click Execute or press F5 to execute the query. The Data view will output the grid with departments where the total salary is higher than 8000 and sort it in descending order.
As it was mentioned, you can set these conditions on the corresponding tabs of the Tabbed Editor. For more information about how to perform these operations, see the following topics: