View and manage comparison results
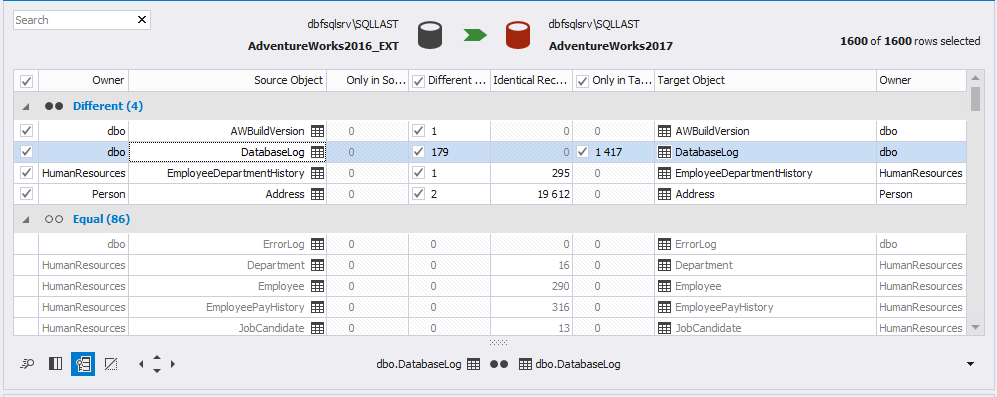
After you have compared the data sources, the results are displayed in the upper pane. The grid shows all the objects you can select for synchronization. When you first run the comparison, the objects in a grid are grouped by Type of difference.
If you want to compare the data sources again using the same configurations and update the comparison results, click Refresh  on the toolbar or press F5.
Expand or collapse object groups
You can either expand or collapse object groups on a grid by clicking the expander arrow next to the group name.

The grid displays source and target objects, a schema they belong to, and a number of different and identical records in an object. Use checkboxes to include or exclude objects and records for synchronization.
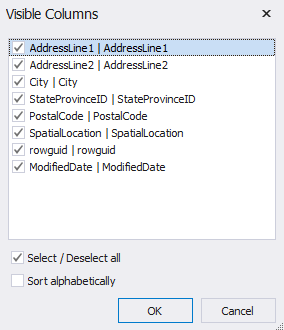
To view the visible columns, select an object on the grid and click Visible Columns ![]() below the grid.
below the grid.
The Visible Columns window is displayed where you can select columns to be included in the synchronization.
Filter object comparison results
Data Compare for SQL Server allows filtering objects on the grid when viewing the comparison results. You can display the following:
- All objects
- Objects with different rows
- Objects with identical rows only
- Included objects
- Excluded objects
- Correctly mapped objects
- Incorrectly mapped objects
To apply objects filtering, on the toolbar, click  WHERE Filter and
select the required option from the dropdown list. Note that several options can be selected at a time.
WHERE Filter and
select the required option from the dropdown list. Note that several options can be selected at a time.

To clear filtering, on the toolbar, click WHERE Filter and select All from the dropdown list.
Search for objects
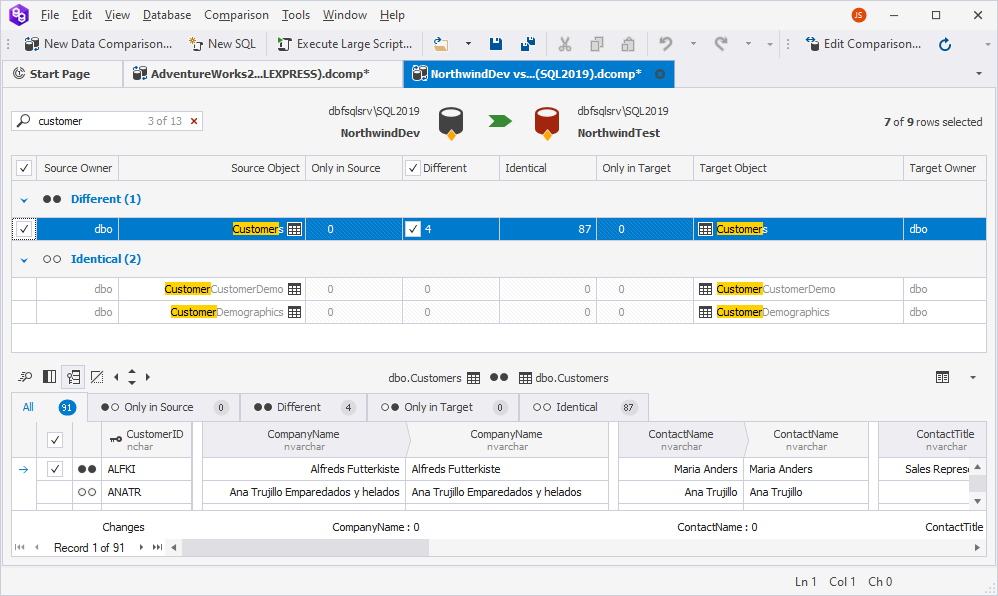
In the comparison results document, you can search for objects by typing the search text in the Search box. The list is filtered to display only those objects that contain the search text.
The default search mode is case-insensitive. It means that searching for an object that has customer in its name will highlight all objects containing the text whether it is capitalized (Customer) or lowercase (customer). As you type, objects that match the search text will be highlighted in the grid. The number of matching options will be displayed in the search box.
In the Search box, you can use the following keyboard shortcuts:
- Ctrl+A to select all.
- Ctrl+Left Arrow (←) to move the caret to the beginning of the word.
- Ctrl+Right Arrow (→) to move the caret to the end of the word.
- Ctrl+Shift+Left Arrow (←) to select text from the current caret position to the beginning of the current word and move the caret to the beginning of the word.
- Ctrl+Shift+Right Arrow (→) to select text from the current caret position to the end of the current word and move the caret to the end of the word.
- Ctrl+Backspace to delete the word to the left of the cursor.
Data Compare searches only for object names and cannot search schemas.
To clear the search results, click  Clear Filter in the Search box.
Save the comparison and synchronization options
Data Compare for SQL Server allows saving comparison and synchronization options for further use, for example for automating and/or scheduling database comparison and synchronization tasks. The settings are saved as a .dcomp file.
The asterisk near the .dcomp file name means that the project has not yet been saved.

To save the comparison settings, in the comparison results document, click the Save icon or press Ctrl+S.
Note
If you save the .dcomp file before configuring the synchronization settings, it will contain the custom comparison settings but the default synchronization settings.
To save the custom synchronization settings, you need to call the Data Synchronization wizard by clicking Synchronize on the toolbar, or clicking the green arrow button, or pressing F8. Then make all the necessary settings and close the wizard. Now if you save the project, it will contain both custom comparison and synchronization settings.