Select tables, views, and columns for comparison
After you have created a project and selected your data sources, you can specify tables, views, and columns to be compared. Please, note, that Data Compare for SQL Server automatically maps tables and views with the same name and schema (owner).
But keep in mind, that if there is any difference between the data sources, for example, if two views have different names, they may not be mapped automatically.
You can map such objects manually using the Mapping tab of the New Data Comparison wizard.

Auto-mapping options
The Mapping tab allows you to:
- Select a comparison key for each table or view
- Select the columns to be compared
- Map objects
- Unmap objects
- Map schemas
- Reset mapping options to default
- Design a custom query
- Configure filter options
Select a comparison key for each table or view
To match rows in the two data sources, Data Compare for SQL Server requires a comparison key for each table or view.
The tool automatically selects a comparison key if:
- Tables contain a matching primary key, unique index, or unique constraint
- Views contain a matching unique clustered index
To learn more, refer to What is a comparison key?
If Data Compare for SQL Server is unable to identify a suitable comparison key for a table or view, a corresponding warning will be displayed.
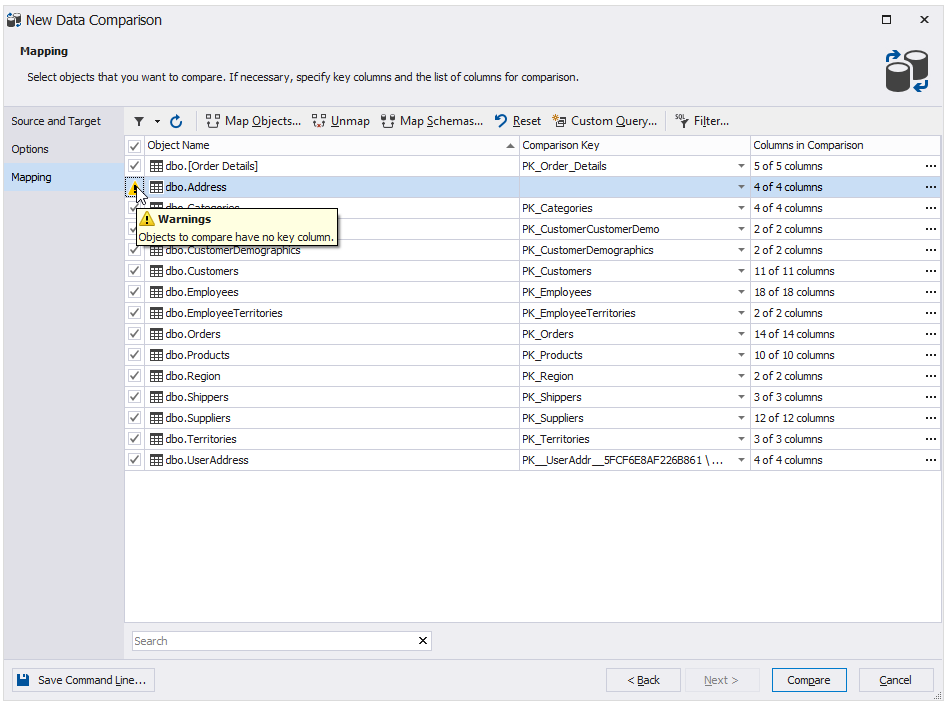
To set the comparison key for an object, click an arrowed button in the corresponding row of the Comparison Key column.

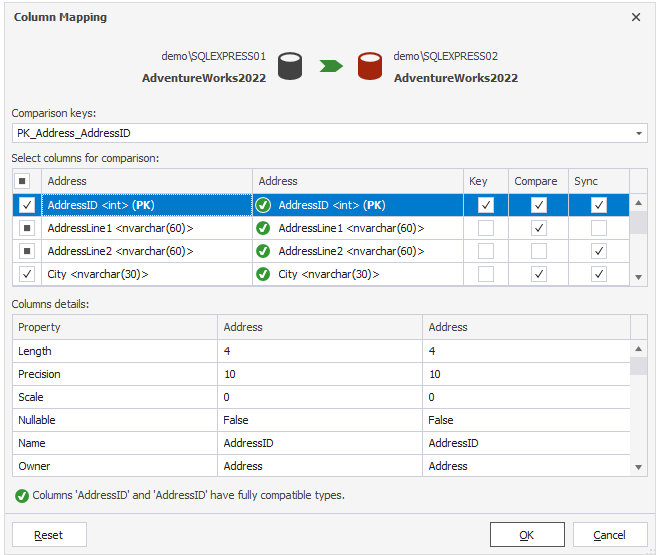
Select < Custom… > and the Column Mapping window opens where you can select the columns that will comprise the key. Make sure that you’ve selected at least one column to be used as a comparison key. The difference between the columns will be ignored during comparison if the checkboxes in the Compare column are clear. The column will be excluded from the UPDATE, INSERT, and/or DELETE statements and will not be synchronized if the checkboxes in the Sync column are clear.
Note
- You can not use as a comparison key those columns whose data type is image, ntext, nvarchar(max), sql_variant, text, varbinary(max), varchar(max), or xml.
- Data Compare doesn’t allow specifying a comparison key if a backup is used as a data source.
- In case Sync is selected but Compare is not, the differences will not be displayed after the comparison. However, the synchronization will take place since the changes will be included into the deployment script.
For more information about comparison keys, refer to What is a comparison key?
Select the columns to be compared
On the Mapping tab of Data Compare, the number of columns that will be compared for each table or view is displayed.
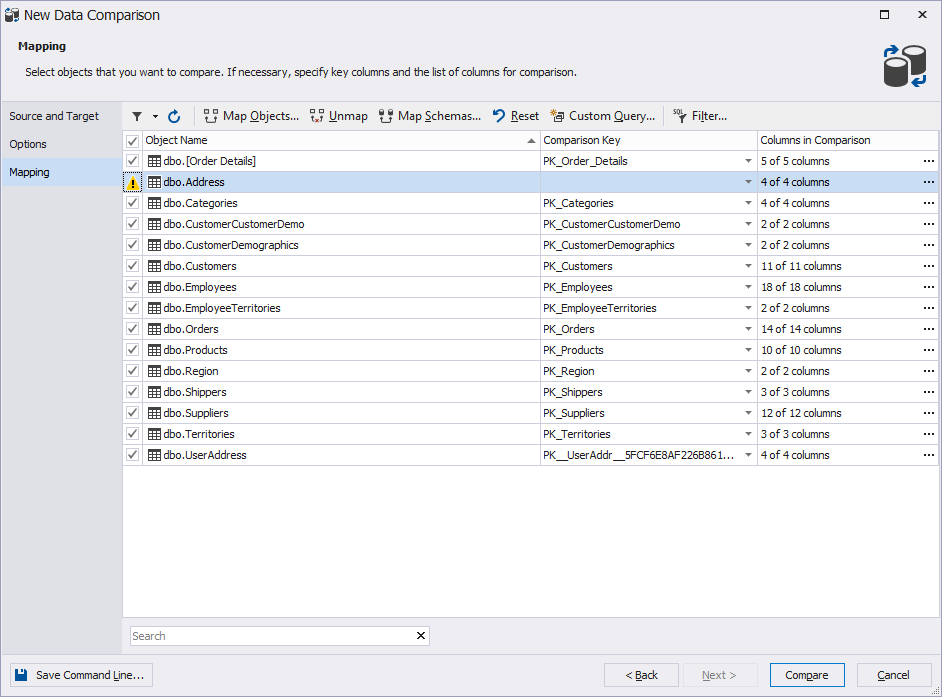
Data Compare allows customizing the comparison to consider only specific columns.
To select the columns to be compared, double-click the table or click … at the end of a row. A dialog box will be displayed with checkboxes to include or exclude the columns.
Note
You cannot exclude the columns that are used for the comparison key.
Map objects
By default, when you select that databases to be compared, configure comparison options and move to the Mapping tab of the New Data Comparison wizard, Data Compare for SQL Server automatically maps all the objects having the same names and data types in the selected databases.
To map objects that stay unmapped, on the Mapping tab, click Map Objects.
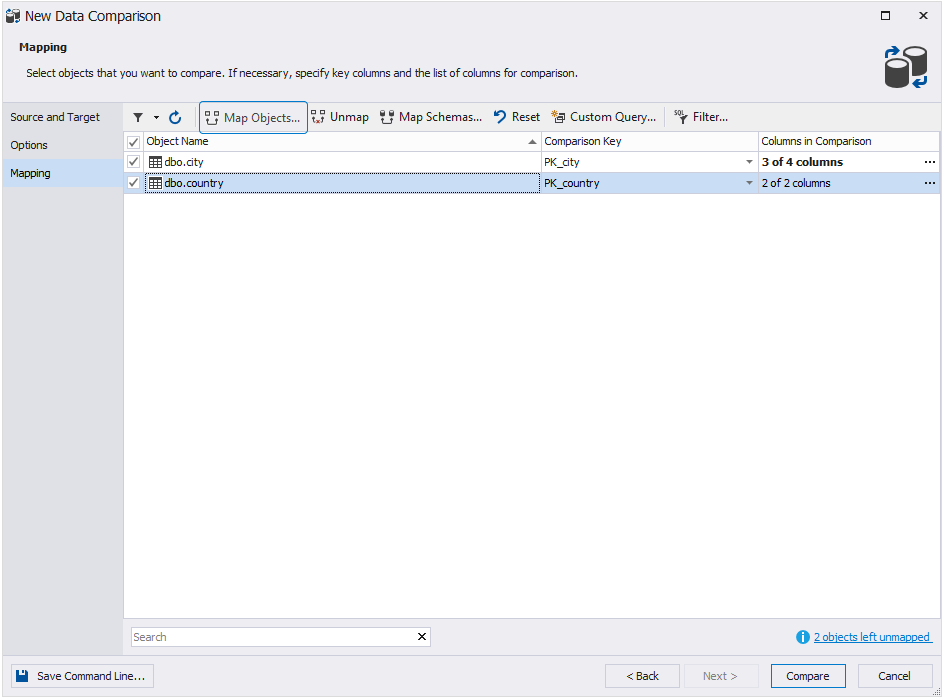
In the Objects Mapping window that opens, you can select a table or view you want to map.
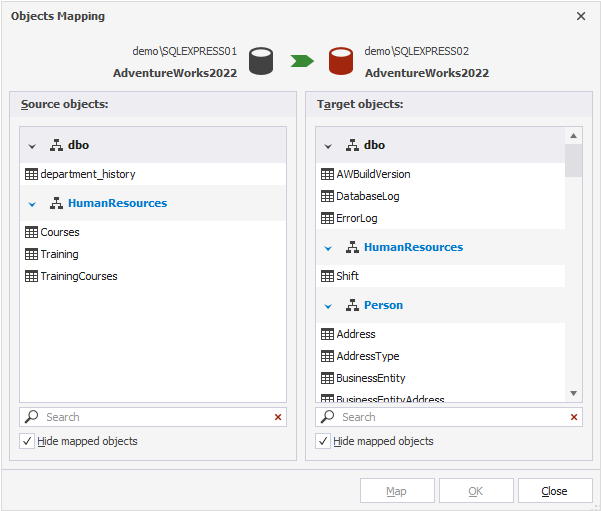
Having selected the required objects, click Map. The selected objects will appear in a list of mapped objects on the Mapping tab.
Note
If tables or views that you are mapping contain columns with incompatible data types, Data Compare for SQL Server cannot compare those columns and they will be excluded from the comparison. After the objects have been mapped for comparison and synchronization, you may encounter mapping warnings, displayed as Caution icons. We recommend study warnings thoroughly before moving on.
Unmap objects
You can unmap objects in several ways:
- Click Unmap in the upper menu bar. In this case, all the mapped objects will be unmapped.
- Select a required object from a list and click Unmap in the upper menu bar. In this case, only selected objects will be unmapped.
- Select a required object from a list, right-click it, and then select the Unmap option from the menu that appears.
Note
Other options available in the menu that appears after right-clicking the object from a list:
- Exclude all but this
- Unmap all but this
- Unmap all invalid
Map schemas
When you start a new data comparison project and you select your data sources, Data Compare for SQL Server automatically maps objects with the same schema.
However, the tool allows comparing objects having the same name, but belonging to different schemas. It can be useful if schemas were renamed and you want to synchronize data between a database with new schema names and a database with old schema names.
To achieve that, you need to map the schemas as required.
To map schemas:
1. Switch to the Mapping tab of the New Data Comparison wizard.
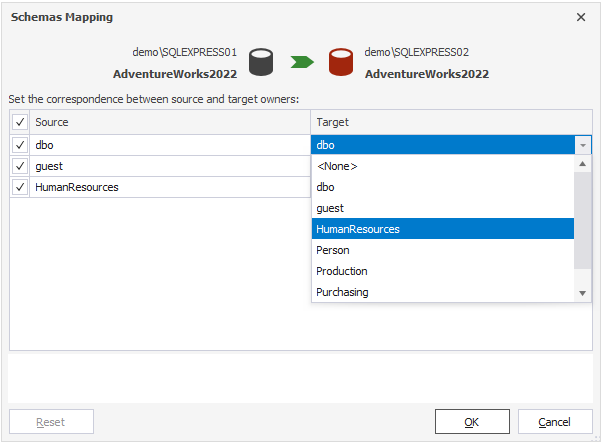
2. Click Map Schemas on the toolbar.
3. In the Map Schemas dialog window that will appear, map the source schema with the target schema as required. To do this, click the drop-down arrow button in the corresponding Target column cell and select the required schema from the drop-down list.
4. After you’ve mapped all schemas you need, click OK. If you want to restore original mapping, click Reset.
Note
Data Compare for SQL Server supports only one-to-one schema mapping. If you need to synchronize data between one source schema and several target schemas or vice versa, you need to perform several comparison and synchronization operaet mapping options to default</a>
Data Compare for SQL Server allows you to quickly and easily reset mapping options to default.
To do this, click Reset in the toolbar. The default mappings will be restored.

Design a custom query
You can use the Custom Query option to compare custom results received after query execution instead of comparing whole tables or views.
To do this:
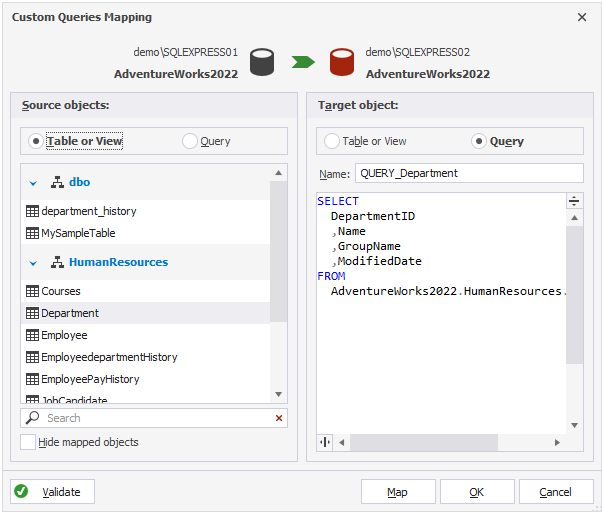
1. Click Custom Query on the Mapping tab of the wizard.
2. In the Custom Queries Mapping dialog window that opens, select the Query or Table or View radio buttons both for the Source and the Target.
3.
- If you select the Table or View option, you will be able to map tables or views from the list.
- If you select the Query option for the Source, the Target or both, write query name in the field near Name (if the name assigned by default is not appropriate).
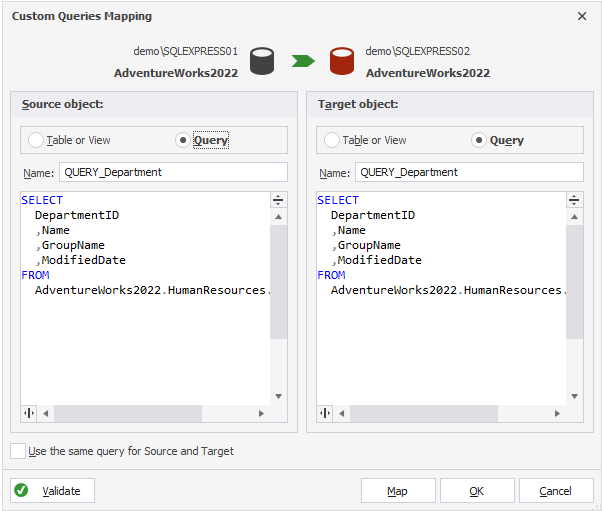
4. Type the needed query in the SQL field.
5. Click Validate to validate your queries, if necessary.
6. Click Map.
7. Click OK to close the dialog window.
Tip
Click Cancel to close the dialog window and discard mappings.
Click Reset to restore the default mapping of objects.
Configure data filter options
By default, Data Compare for SQL Server compares all rows in the selected tables or views. If they contain a large amount of data, the comparison can take a lot of time and even result in running out of disk space. You can simply avoid those by filtering the rows to be compared by applying a WHERE clause to the comparison.
Note
You can only filter rows if a database is selected as the data source. You can not use WHERE clauses for backups and Scripts folders.
To filter the comparison with a WHERE clause:
1. On the Mapping tab, select the object to apply the filter to.
2. Click Filter from the toolbar.
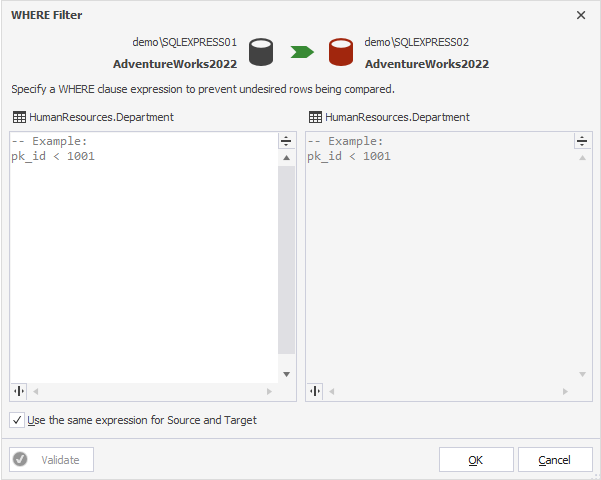
3. In the WHERE Filter window, that opens, type a valid Transact-SQL WHERE clause.
You can easily get a list of columns by calling the context menu. For this, right-click a left field and hover over Insert Column:
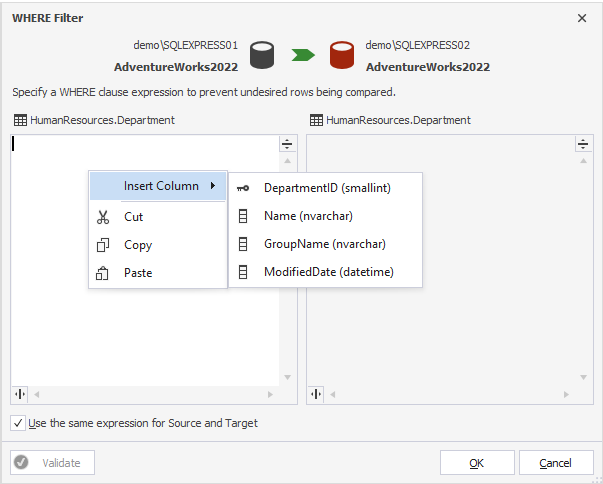
In this case, you don’t need to recollect columns names.
4. If you want to apply the expression to both the Source and the Target, select the Use the same expression for Source and Target checkbox.
5. Click OK to apply the filtering options.
6. The filtered object will be marked with a filter icon in the grid on the Mapping tab.
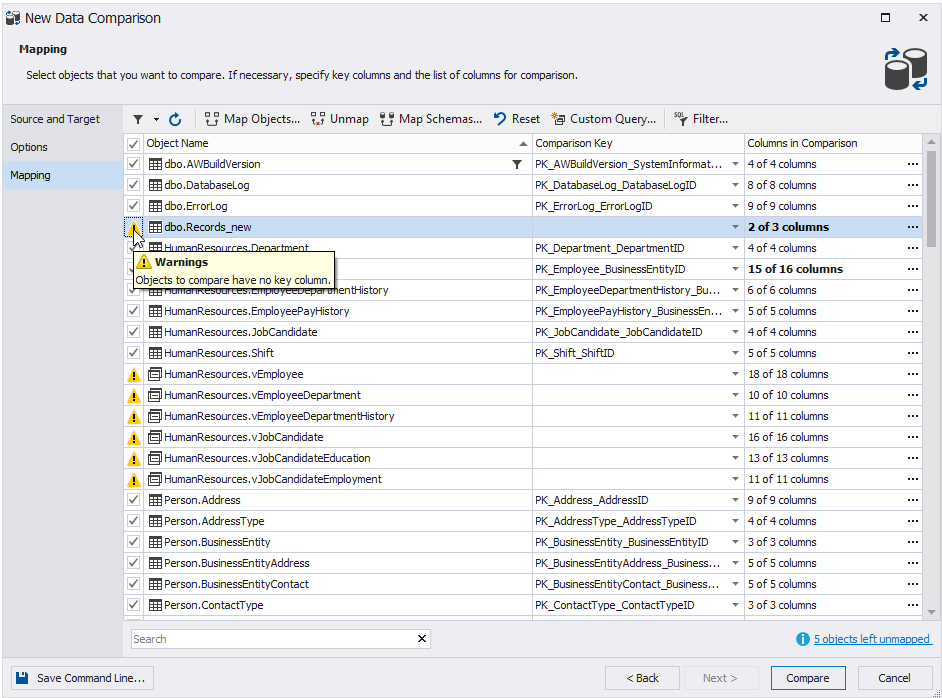
Mapping warnings
After objects are mapped for comparison and synchronization, you may encounter warnings on the Mapping tab of the New Data Comparison wizard. They are displayed with the Caution icon instead of a checkbox in the grid.
To read the warning messages, point to the warning icon. All warnings for this object will appear as a hint.
We recommend looking through the warnings before moving to the comparison.
The list of possible warnings:
| Warning | Description |
| Objects to compare have no key column | It means that the custom comparison key is used but is not set. You should mark at least one column pair as a comparison key. For more information see: Selecting the comparison key for each table or view. |
| No columns to compare | It means, there are no columns with the same name in this pair of tables (views). To compare them you should map the columns manually. |
The following table contains information about column-level warnings.
| Warning | Description |
| Decimal columns have different precisions or scales, migrating the data may cause rounding or overflows. | This warning appears when Decimal columns in source have larger precision and/or scale than target columns. If the source column contains larger values than the target column can contain, such records cannot be synchronized. If the source records contain numbers with fractional part longer than target scale, such numbers will be rounded during synchronization. |
| Columns have different sizes, migrating the data may cause truncation. | This warning appears when comparing binary or text columns and source column has larger size than target column. If source contains records with longer data than target can contain, the data will be truncated in the target when synchronizing. |
| Columns have incompatible types. | These columns cannot be compared. Appears when data of the source column cannot be converted to the data type of the target column, for example TEXT and BINARY. |
| Source column allows Nulls which can not be stored in Target. | This warning appears when source column is nullable and target column is not. If source table contains data with nulls in this column, such data cannot be synchronized. |
| Data in timestamp columns cannot be synchronized. | This warning appears when target column has a timestamp data type. Such columns cannot be updated, so their values will not be synchronized. |
LEARN MORE
In dbForge Data Compare for SQL Server, you can filter objects and data to be compared and synchronized to learn more, refer to How to filter objects and data.