Data comparison algorithm
dbForge Data Compare for SQL Server is a powerful database comparison and synchronization tool designed for efficient data management. With its intuitive interface and robust functionality, it allows users to quickly identify and synchronize differences between database contents, making it an essential tool for database administrators and developers seeking accurate data synchronization and analysis.
In this topic, we will explore the data comparison algorithm on which the dbForge Data Compare tool is built.
How dbForge Data Compare for SQL Server works
The data comparison process in dbForge Data Compare involves the following steps:
Step 1. Retrieving database metadata: At the beginning, the tool analyzes the database structure to identify tables, columns, indexes, and constraints.
Step 2. Mapping database objects: A mapping is established between the tables and columns in the source and target databases, determining which data will be compared.
Step 3. Selecting the comparison key: A key is chosen to uniquely identify data rows, ensuring accurate data matching between databases.
Step 4. Running SELECT queries: The tool executes SELECT queries on both databases to retrieve the relevant data for comparison.
Step 5. Column-by-column data comparison: After the data retrieval, the tool compares the values in each data row, rather than relying on checksums, to identify differences.
Step 6. Caching the comparison results: The comparison results are cached for future reference.
Step 7. Generating a comparison document (*.dcomp) Based on the data obtained in Step 6, Data Compare generates a comparison document that displays the comparison results in a visually comprehensive format to facilitate the analysis.
Step 8. Generating the data synchronization script: Based on the comparison results, the tool generates a script to synchronize the data between the source and target databases.
Now, let’s examine each of the algorithm steps in greater detail.
Step 1. Retrieving database metadata
Before performing the actual data comparison, dbForge Data Compare retrieves the metadata of the databases involved. This includes information about tables, columns, indexes, and constraints. By analyzing the database structure beforehand, the tool gains a comprehensive understanding of the data, enabling it to accurately and efficiently compare and synchronize the databases.
Step 2. Mapping database objects
By default, Data Compare for SQL Server automatically maps tables and views with matching names and schemas (owners). However, if there are any naming differences between the data sources, such as varying names for tables, views, or columns, automatic mapping may not occur. In such cases, you have the following options:
-
You can manually map these objects while configuring the comparison options.
-
When setting up the comparison options, you can configure Data Compare to ignore case, underscores, and/or spaces in object names.
-
You can configure the tool to compare the results of custom queries instead of comparing entire tables or views.
Step 3. Selecting the comparison key
To uniquely identify rows in tables or views for both the Source and Target, Data Compare for SQL Server requires a comparison key. By default, the tool uses a matching primary key or other unique identifiers from each data source as the comparison key. This ensures that rows are correctly identified as matching and can be compared.
If the tables being compared lack identical unique identifiers, they will not be automatically mapped and compared. To include them in the database comparison, you will need to manually map them.
Data Compare allows configuring the comparison key selection strategy. For this, navigate to Tools -> Options -> Data Comparison -> General in the main menu.
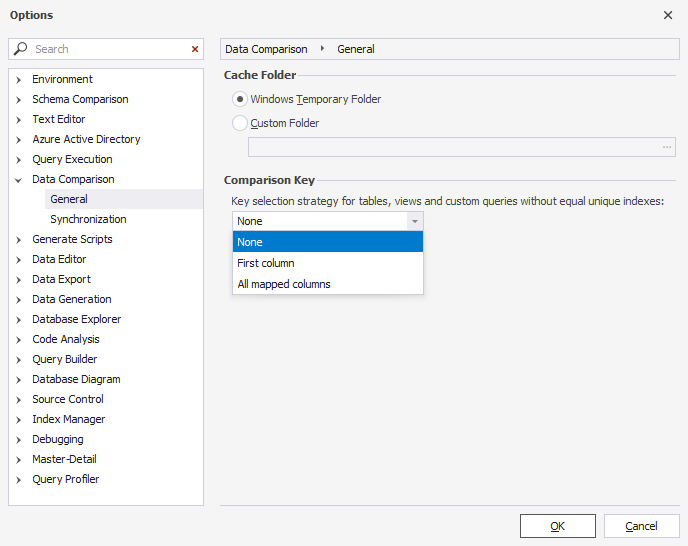
In the Comparison Key dropdown, you have three options to configure the tool’s behavior when selecting the comparison key:
-
None (default): If tables do not have identical unique identifiers, they will not be mapped.
-
First column: If tables do not have identical unique identifiers, the first column will be selected as the comparison key.
-
All mapped columns: The tool will use all mapped columns in a table or view to identify each row individually.
Step 4. Running SELECT queries
Next, Data Compare executes SELECT queries from both the Source and Target databases to retrieve the data for comparison. The retrieved data is sorted based on the selected comparison key. SELECT queries are executed using the WITH (NOLOCK) hint to ensure that the tables are not locked in the process.
Step 5. Column-by-column data comparison
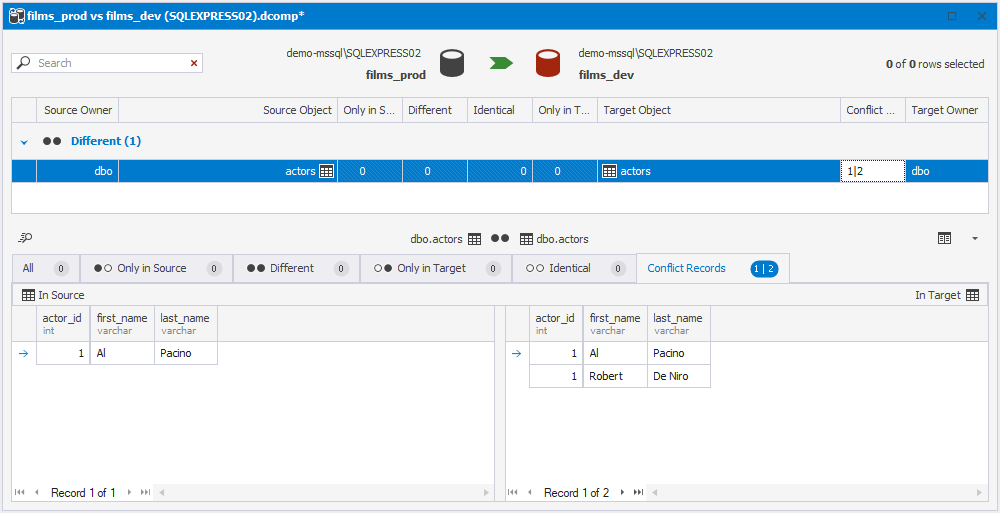
At this stage, the tool categorizes each record into one of the following groups: Only in Source, Only in Target, Equal, Different, or Conflict records. This categorization is determined using a specialized algorithm.
The tool begins by juxtaposing the values in key columns. This correlation analysis allows for the immediate identification of data records falling into two categories: Only in Source (when the key record exists only in source) and Only in Target (when the key record exists only in target). Next, the tool proceeds to compare records whose keys have been identified as matching. This comparison results in data records being categorized as either Equal or Different. Records that have non-unique key fields, leading to the inability to unambiguously match data based on these key fields, are identified as Conflict records.
Below is a schematic representation of the data comparison algorithm.

Note
If the record is not unique, it is identified as a Conflict Record and excluded from the synchronization script. That is why it is crucial for the data sets to be unique in terms of a comparison key.
Step 6. Caching the comparison results
To ensure efficient performance, the comparison engine of the tool requires loading data from selected tables in the source and target databases into the computer’s disk cache. The data gets into cache already organized into groups: Only in Source, Only in Target, Equal, or Different. Additionally, a separate cache is utilized by the script generation engine.
When dealing with large data sets, it is possible to encounter the Out of Memory exception due to the tool utilizing the hard drive cache.
Note
To accommodate these caching requirements, it is essential to have 2-4 times more free hard drive space than the size of the database. For more information, refer to How much free hard disk space is required?
If you experience any performance issues, refer to the Improve comparison performance topic for guidance on optimizing the comparison process.
Step 7. Generating a comparison document (*.dcomp)
During this stage, an interactive comparison results document is generated, allowing the user to examine the differences between the source and target. The document containing the comparison results is generated by taking into account the comparison and mapping settings configured when customizing the comparison options in the New Data Comparison wizard. For user convenience, all database records are categorized into five distinct groups: Only in Source, Only in Target, Different, Equal, and Conflict records. The user can then select the objects they wish to synchronize and filter the object comparison results based on specific criteria.
Step 8. Generating the data synchronization script
The data synchronization script is generated, taking into account the comparison key, and consists of INSERT, UPDATE, and DELETE statements. The comparison key is used in the WHERE conditions of the UPDATE statements.
To speed up data synchronization, the tool allows disabling triggers, foreign keys, constraints, and indexes, thereby reducing server load and enhancing script efficiency. After script execution, the disabled triggers, foreign keys, constraints, and indexes can be re-enabled as needed.