Exporting Data
This topic describes the data exporting process and how Data Import/Export Tools for PostgreSQL can be an ultimate solution for the database management routine.
Export data to other formats
To export data, perform the following steps:
-
Open the Data Export wizard by doing either of these actions:
- On the Data Pump tab of the Start page, click Export Data.
- In Database Explorer, right-click a table or a view (or CTRL+click several tables and/or views) you want to export data from and select Export Data on the shortcut menu.
- Right-click data grid and choose Export Data on the shortcut menu, or click
 Export Data on the Data Editor window toolbar.
 - On the Database menu, click Export Data.
Note
dbForge Studio for PostgreSQL comes with Paginal Mode enabled by default, limiting data selection to the first 1000 records. To export more records, disable the Paginal Mode and press Ctrl+End to fetch all the selected data at once. Then, click
Export Data at the top of the grid to open the Data Export Wizard. - In the Export format tab, select an export format or load export options from a template file, if you saved them previously, and click Next.
-
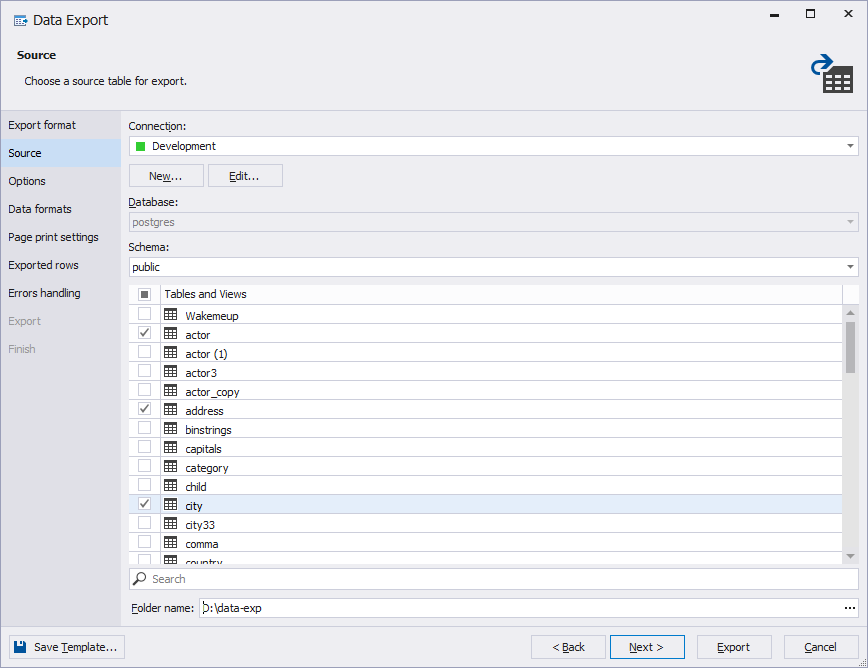
In the Source tab, select a required PostgreSQL server connection, a database, a schema, table(s) and view(s) you want to export and then click Next.
Note
If you opened the wizard from the data grid, the Source tab would allow you to specify only a name and a path of the destination file (the one where the exported data will be saved).
- In the Options tab, set additional settings for the selected export format and click Next.
-
In the Data formats tab, select exported columns and click Next.
Note
For CSV, HTML, PDF, RTF, and Text export formats, select formats of data representation, for example, integer, date, time, etc. from the drop-down list For Excel and Excel 2007 formats, the field is editable only for binary columns and includes only two data types (HexString and String) in the drop-down list.
- In the Exported rows tab, select exported rows. You can export all rows, only selected in the grid ones, or a specified range.
- Specify how the application should behave when an error is encountered.
- (Optional) To export options to a template file for future usage, click Save Template and specify a path and a name of the template file.
- Define how dbForge Studio for postgresql should handle errors during export and whether to write a log file.
- Click Export and see the result of export process.
- Select whether to open the exported file or result folder, and click Finish. Data export is finished.
Filtered data export
There is a filter in the Data Export wizard window.
If you want to filter data, use the required column filter. To do this:
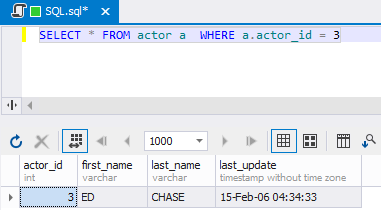
- Write a whole data query using the SELECT * FROM statement.
- Click Execute to implement the query.
- On the required column name, click the filter icon.
- In the drop-down list, choose the item to filter by.
- Right-click the filtered grid and select Export Data to call the Data Export wizard.
Another and the most reliable way to export filtered data is to filter it directly in the query. To do this, execute the SELECT * FROM statement with the WHERE condition, where you can specify the required filter. Then, implement already filtered data export with the Data Export wizard, calling it from the filtered grid shortcut menu.
Follow the Data Export wizard steps and then click Export. If the data export is finished successfully, the Data export complete message appears.