Use object filter
Object Filter allows filtering objects right in the Schema Comparison document. The application of advanced object filters makes the analysis of comparison results more effective, informative, and bespoke. The feature also allows applying multiple filters and creating custom filters with Filter Editor, which can be saved and used for further comparisons.
To open the Object Filter, click  on the Schema Comparison toolbar, or press Ctrl+L.
You can use filters to define the objects to be displayed in the Schema Comparison document. To include or exclude objects, click to select or clear the checkbox next to them.
The default filter is Nothing Excluded. If you edit this filter, Custom* is shown in the filter box. An asterisk is displayed next to the name of any filter you edit, to show that there are unsaved changes.
To open the Filter Editor, click the filter icon next to the required object.
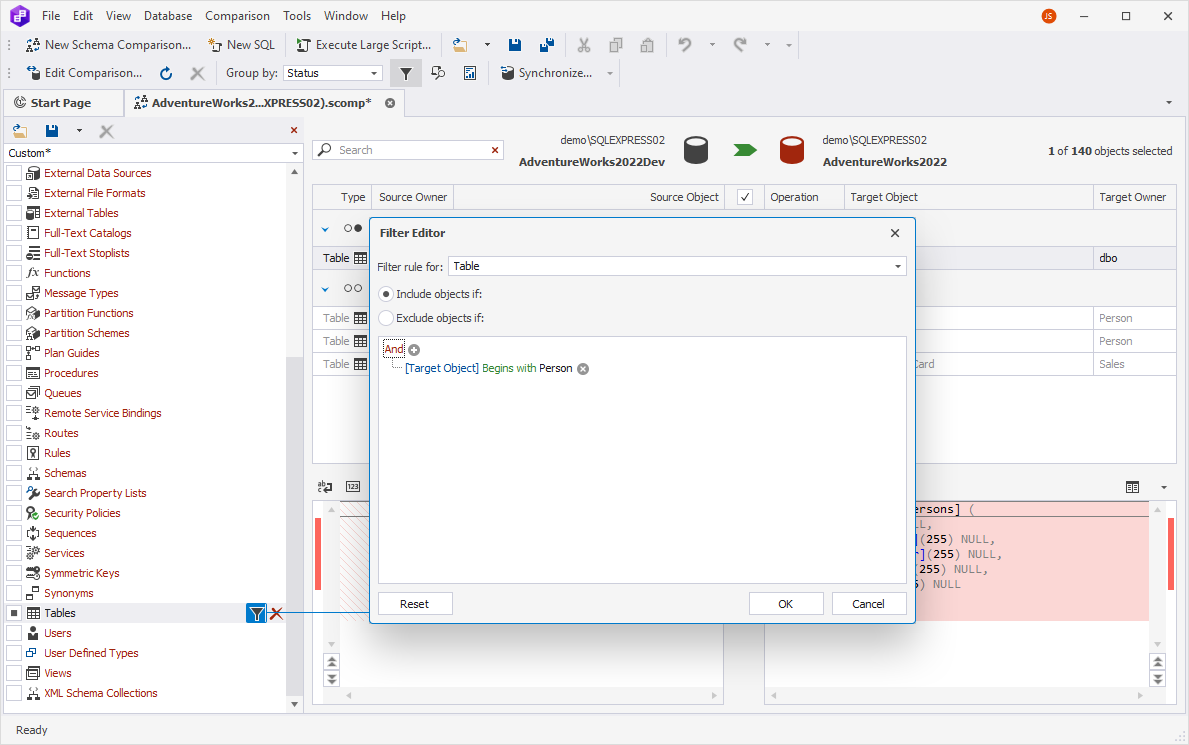
Filter rules
With Filter Editor, you can create rules to control the specific objects that a filter includes or excludes by selecting either Include objects if or Exclude objects if, respectively.
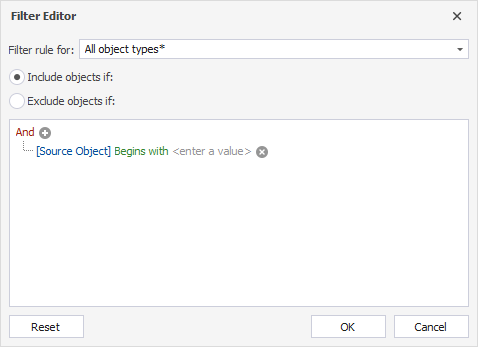
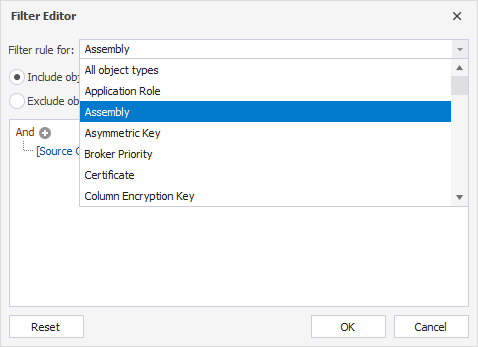
In the Filter rule for box, you can select individual object types or All object types. The further specified filter rules will be applied to selected object types.
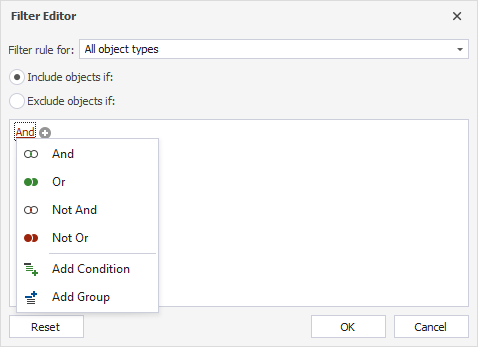
When you create a filter rule, its conditions can be selected from a drop-down list.
| Condition | Description |
|---|---|
| And | Objects will be included/excluded if both conditions are true |
| Or | Objects will be included/excluded if at least one condition is true |
| Not And | Objects will be included/excluded if at least one condition is false |
| Not Or | Objects will be included/excluded if both conditions are false |
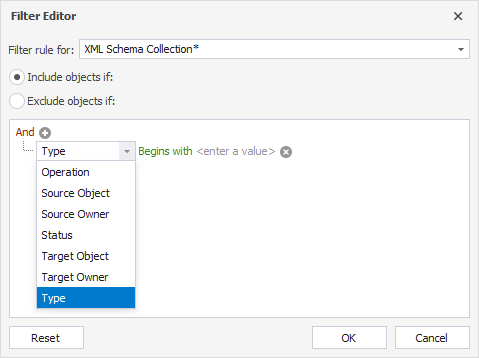
You can also select from a list of different properties when building a filter rule.
| Property | Description |
|---|---|
| Operation | Indicates the operation undergone by the source object in the synchronization process; it can be one of the following: None, Drop, Create, or Update |
| Source Object / Target Object | Refer to an object in either Source or Target for schema comparison and synchronization |
| Source Owner / Target Owner | Indicate the owner (or schema) of an object in Source or Target |
| Status | Indicates the status of an object as a result of schema comparison; it can be one the following: Identical, Different, Only in Source, Only in Target, Unknown, Inconsistent |
| Type | Indicates the object type |
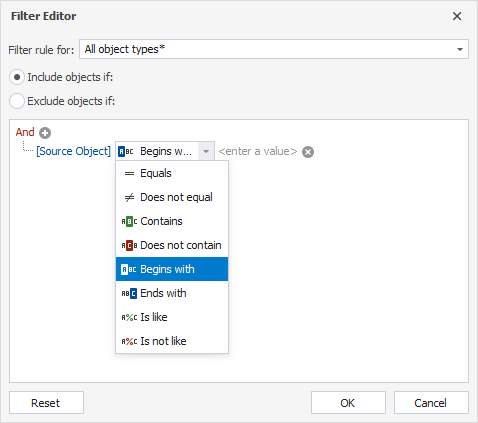
After you select the required property, you can move on to setting up futher conditions.
| Condition | Description |
|---|---|
| Equals | Equals a specified value |
| Does not equal | Does not equal a specified value |
| Contains | Contains a specified value |
| Does not contain | Does not contain a specified value |
| Begins with | Begins with a specified value |
| Ends with | Ends with a specified value |
| Is like | Contains a specified case-sensitive character string |
| Is not like | Does not contain a specified case-sensitive character string |
To add a new condition, click the plus icon. To remove a condition, click the cross icon correspondingly.
You can clear all current filter rules just by selecting the Nothing Excluded filter from the filter box.
To learn how to eliminate objects that have the Only in Target status with the help of Object Filter, see Exclude all objects with the Only in Target status.
Save filters
You can save your filter and later use it across multiple projects. To save a filter, click the diskette icon next to the filter box and type the name of the filter.
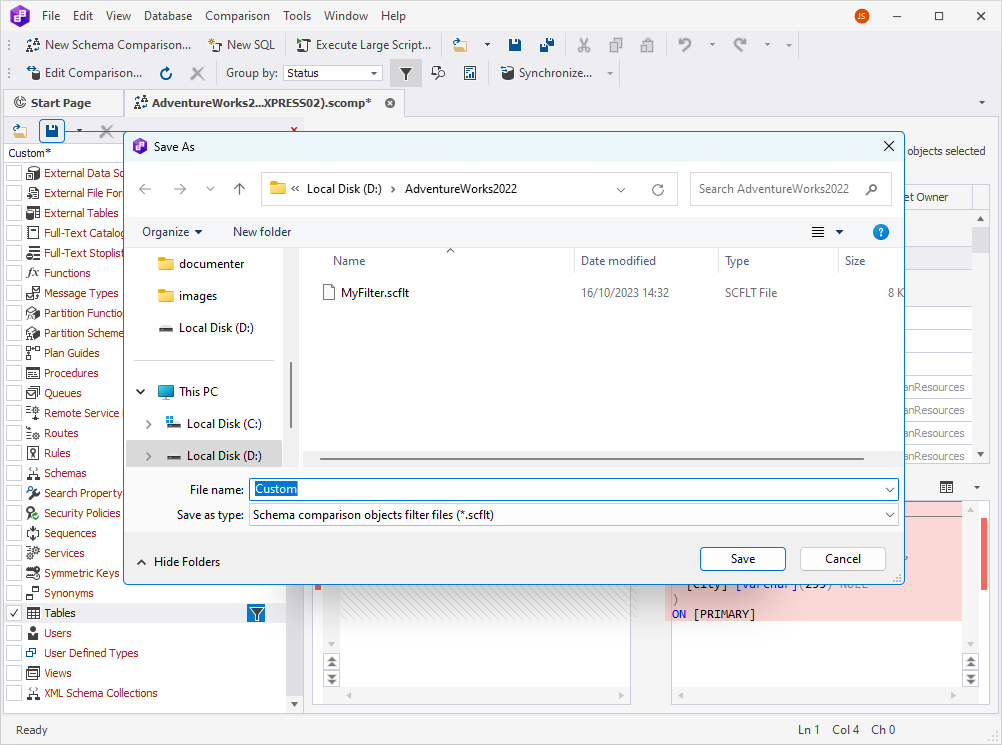
Saved filters have the .scflt file extension. To apply a different filter, select it from the Filter dropdown; if the desired filter is not listed, click the folder icon to browse and select from your previously saved filters.
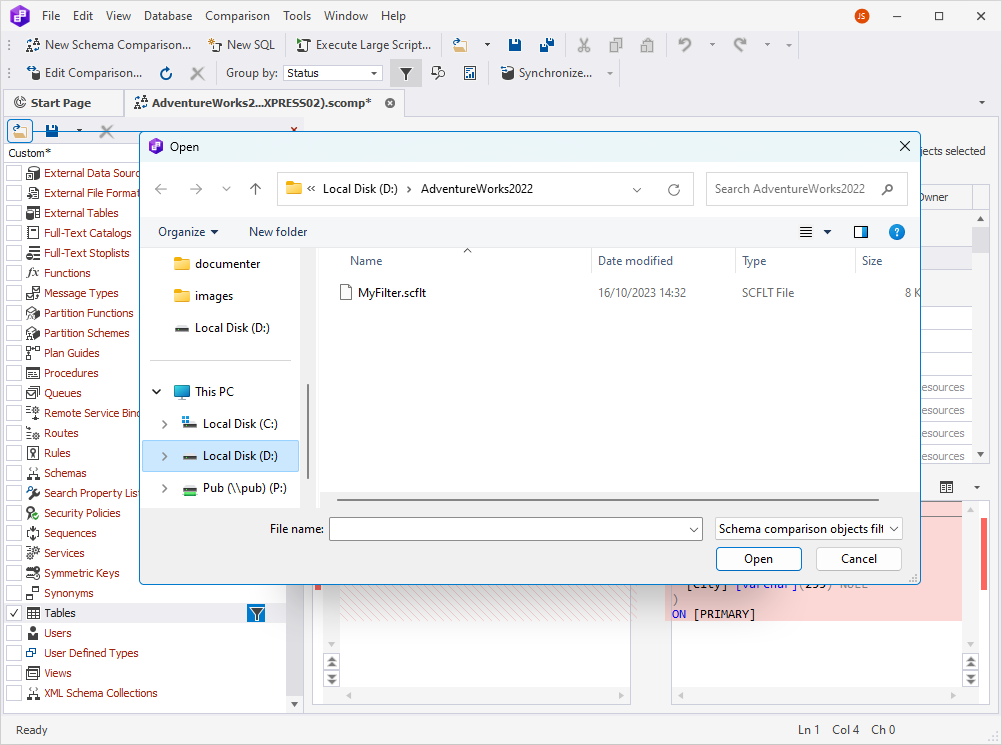
When saving an edited filter, you can either overwrite it with the same name or change the name to create a new filter.
Note
All unsaved changes to a Custom* filter will be lost when you select another filter.
If you modify an existing filter, make sure you have saved the changes before closing the tool.
Filters and synchronization
A filter defines which objects will be displayed in the comparison results window and which, consequently, can be selected for synchronization.
When you use a filter to exclude an object or object type, it is removed from the comparison results and cannot be selected for synchronization.
If an excluded object is referenced by an object that you selected for synchronization, you will be notified of this dependency, and you can choose to synchronize the affected object on the Dependencies tab of the Schema Synchronization wizard.
Filters and search
A filter defines which objects are displayed in the comparison results window. If an object matches the term in the search box and is excluded by filter, it is not displayed in the comparison results.
Apply filters from the command line
To apply a filter from the command line, use the /filter switch and specify the path to the filter you want to use. For example:
/filter:<filepath>
To read more about the command-line switches with examples, refer to Switches used in the command line.
Real-world example: How to compare two database schemas while ignoring differences in users and permissions
Let’s illustrate Object Filter with the following case where Schema Compare serves as part of a CI/CD cycle. We have a newly upgraded database, and we need to make sure the upgrade went well. To do that, we need to compare its schema with a schema of a reference database. However, the reference database has different users, so we want to compare the two schemas while ignoring all differences in users and permissions.
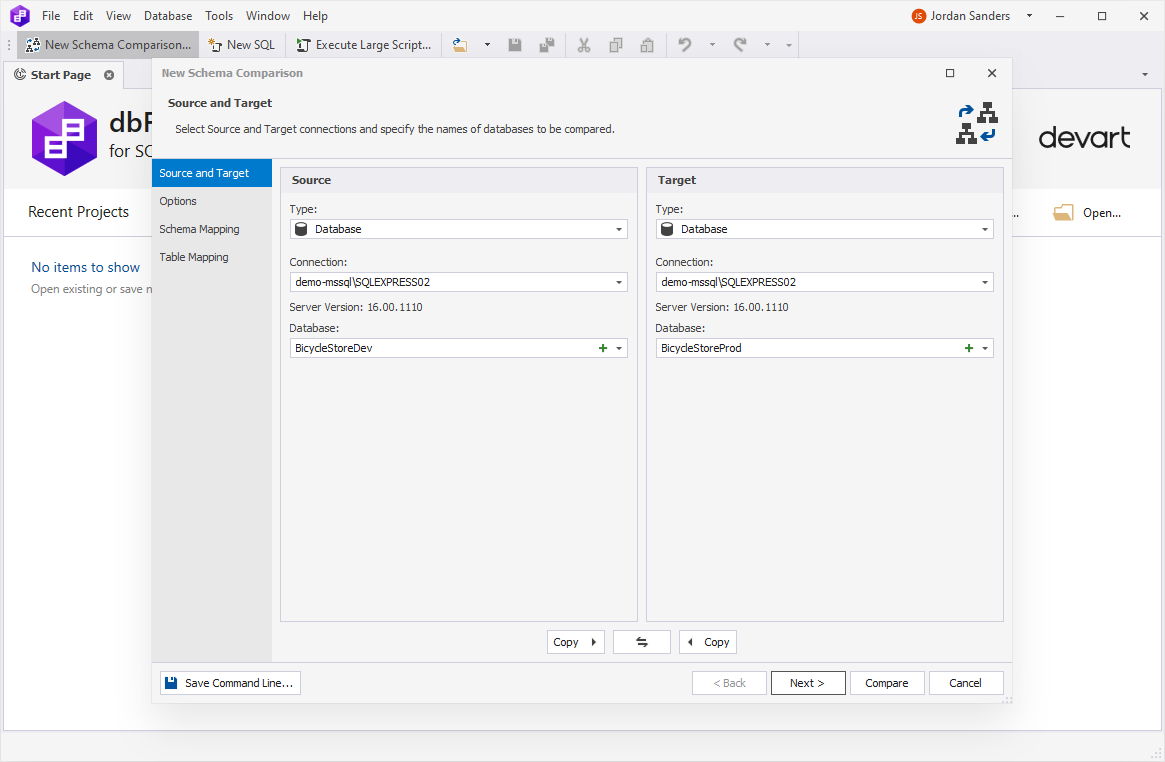
1. We click New Schema Comarison on the toolbar. On the Source and Target page, we select the databases to be compared and click Compare.
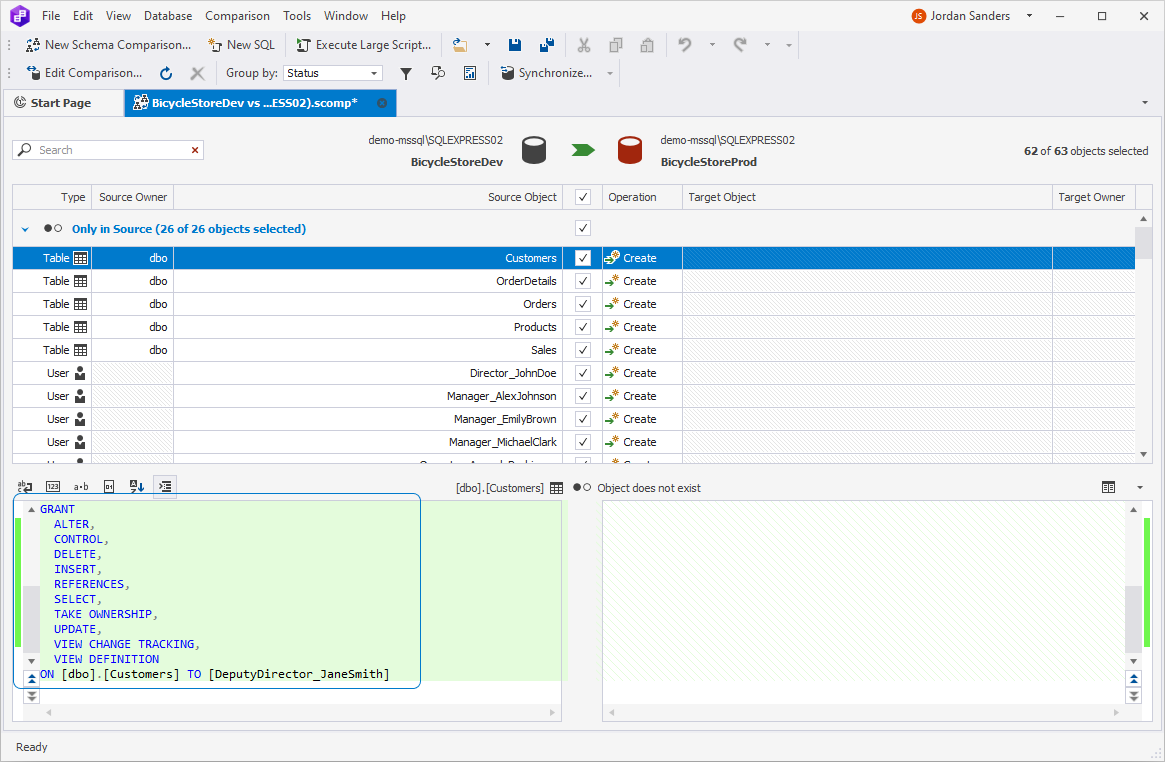
2. In the resulting schema comparison document, we can see that there are users included in the comparison, and there are permissions granted on certain tables (e.g., user DeputyDirector_JaneSmith has certain privileges to manage the Customers table).
3. Now, our task is to set up the comparison so that the users and permissions would be excluded from both comparison and synchronization.
For that purpose, let’s start a new, reconfigured comparison. But this time, we will not click Compare immediately. We will click Next.

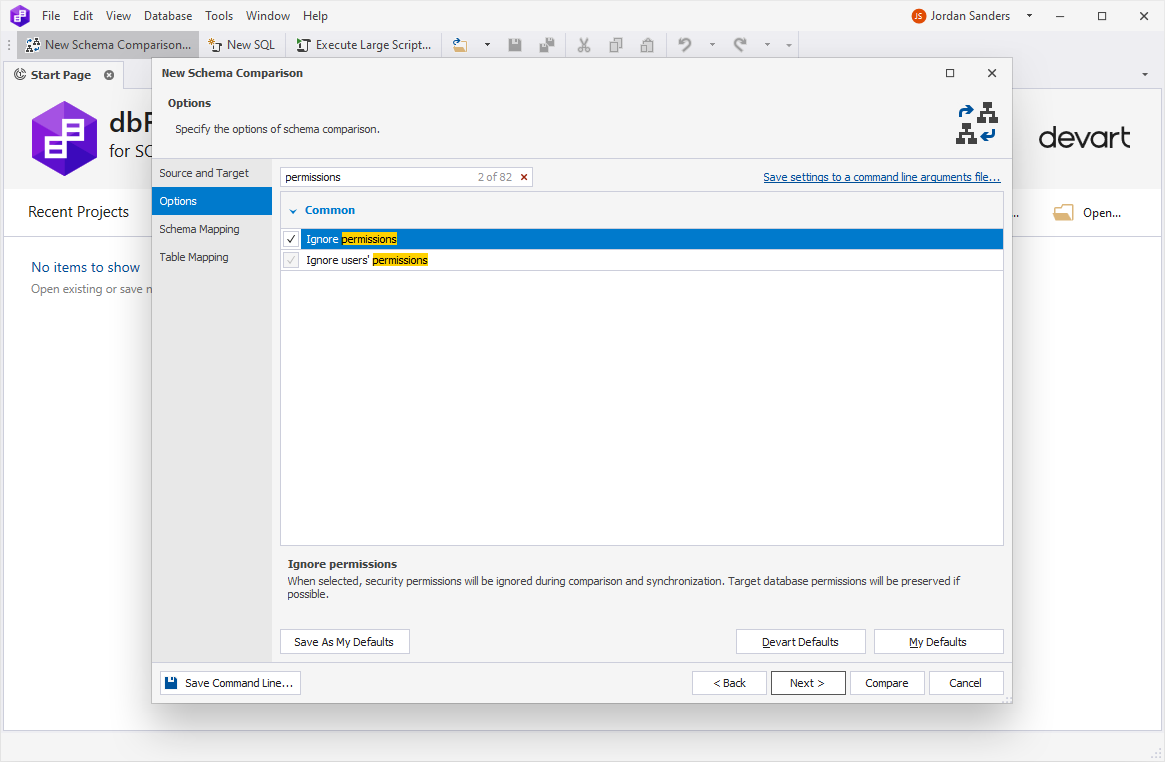
4. We move on to the Options page, where we start entering permissions into the search box. The search results give us two checkboxes, Ignore permissions and Ignore users’ permissions, and we select them. After we do that, we can click Compare.
Note
In the Search box, you can use the following keyboard shortcuts:
- Ctrl+A to select all.
- Ctrl+Left Arrow (←) to move the caret to the beginning of the word.
- Ctrl+Right Arrow (→) to move the caret to the end of the word.
- Ctrl+Shift+Left Arrow (←) to select text from the current caret position to the beginning of the current word and move the caret to the beginning of the word.
- Ctrl+Shift+Right Arrow (→) to select text from the current caret position to the end of the current word and move the caret to the end of the word.
- Ctrl+Backspace to delete the word to the left of the cursor.
Note
We can use the command line to run automated comparison and synchronization with ignored permissions by setting the corresponding options:
/IgnorePermissions:Yes /IgnoreUserPermissions:Yes.The full command, in our case, will look as follows:
"C:\Program Files\Devart\dbForge Studio for SQL Server\dbforgesql.com" /schemacompare /source connection:"Data Source=demo-mssql\SQLEXPRESS02;Initial Catalog=BicycleStoreDev;Integrated Security=False;User ID=sa" /target connection:"Data Source=demo-mssql\SQLEXPRESS02;Initial Catalog=BicycleStoreProd;Integrated Security=False;User ID=sa" /IgnorePermissions:Yes /IgnoreUserPermissions:Yes /syncAlso, if we save a comparison file at this point, it will be saved with ignored permissions. Thus we will be able to reuse it for automated comparison and synchronization from the command line. For instance, if we save it as Comparison.scomp in the jordansanders folder, we will be able to run the process using the following command:
"C:\Program Files\Devart\dbForge Studio for SQL Server\dbforgesql.com" /schemacompare /compfile:"C:\jordansanders\Comparison.scomp" /sync
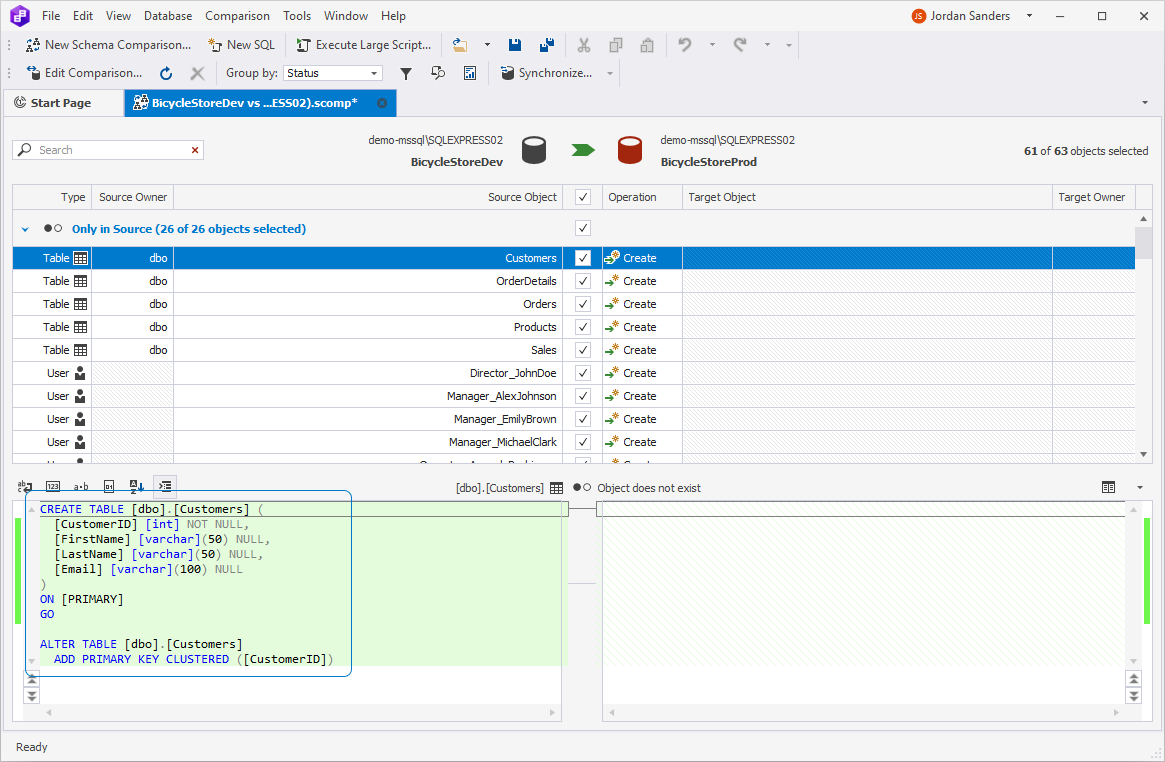
5. The comparison commences. After it is completed, we can see that the permissions on the Customers table have been ignored during the comparison.
6. Now we need to ignore users as well. For that purpose, we open the Object Filter by either clicking  Apply a custom filter to the results on the Schema Comparison toolbar, or pressing Ctrl+L.
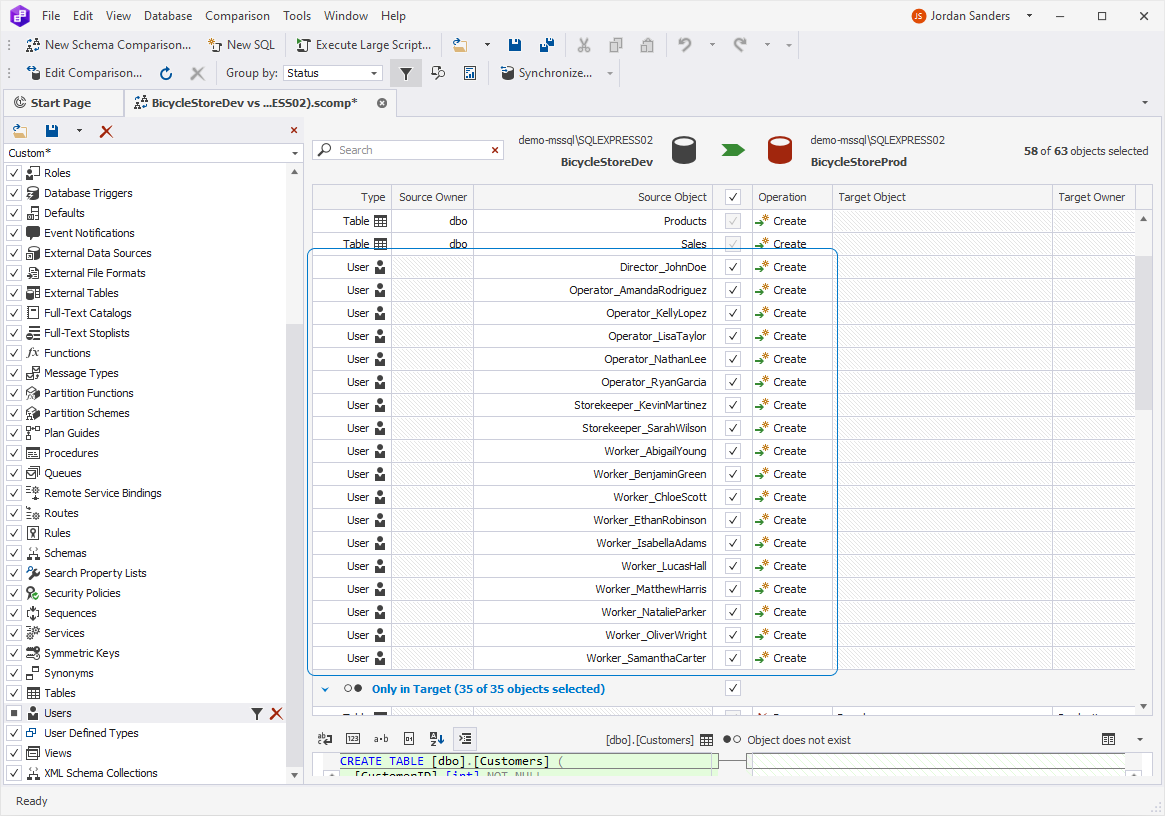
We can also see that there are users in Only in Source.
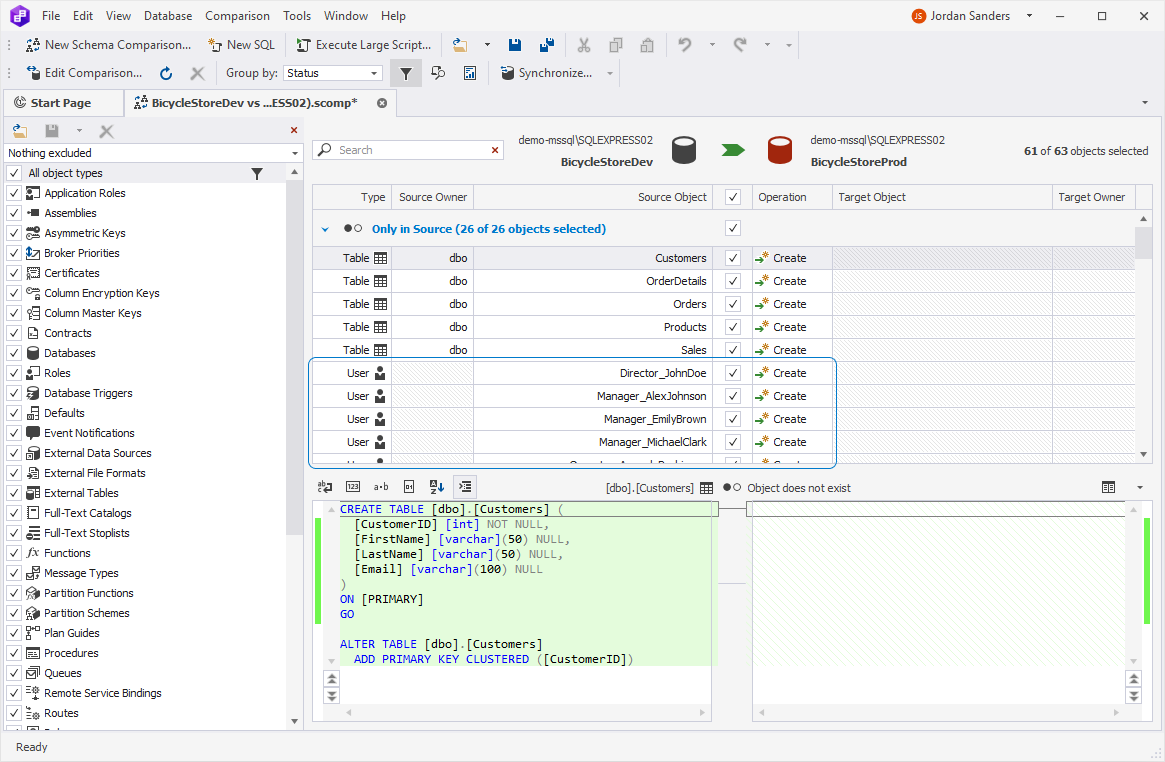
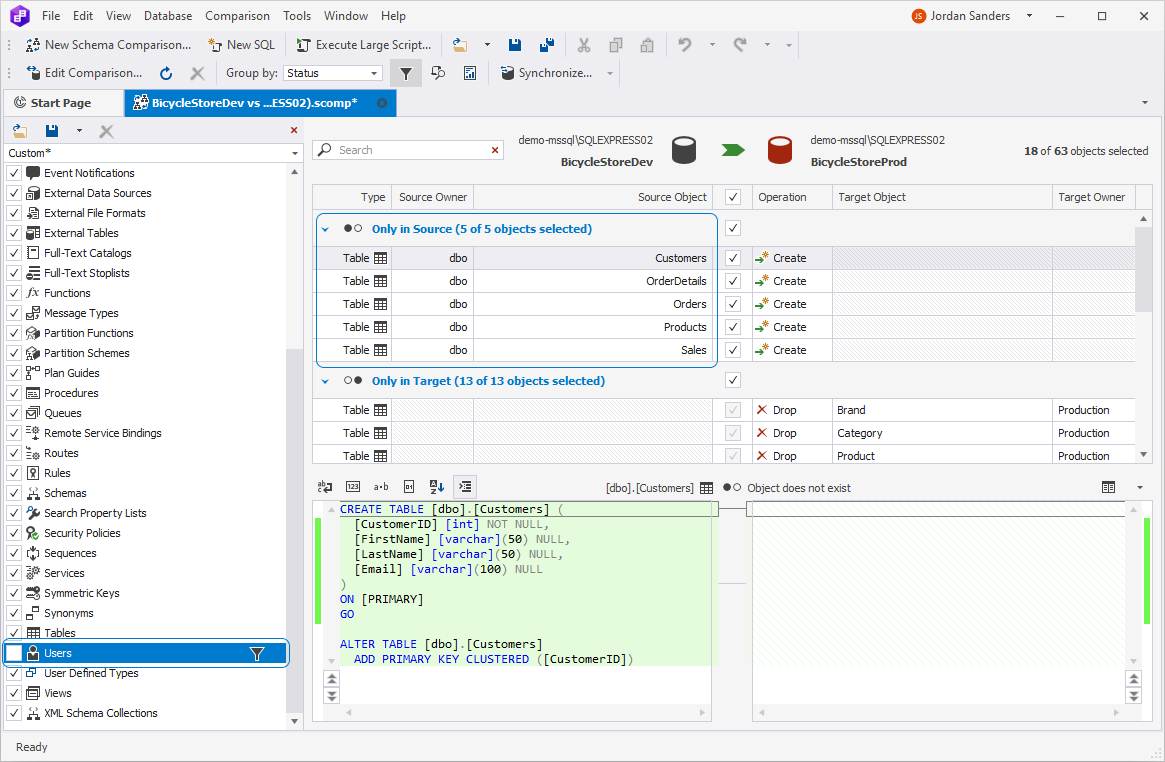
7. We find Users on the list of object types and clear the corresponding checkbox to ignore them. The results are immediately updated in the Schema Comparison document. Now you can see that Only in Source does not contain users anymore.
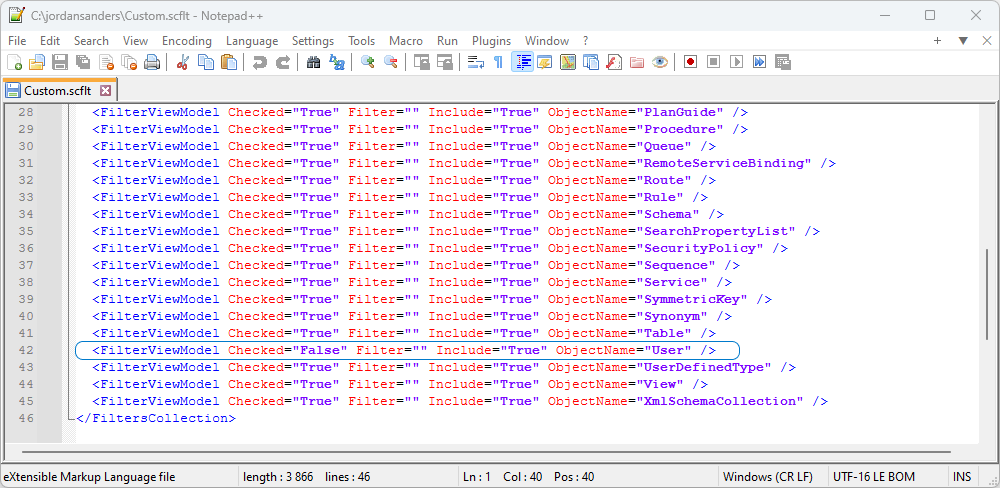
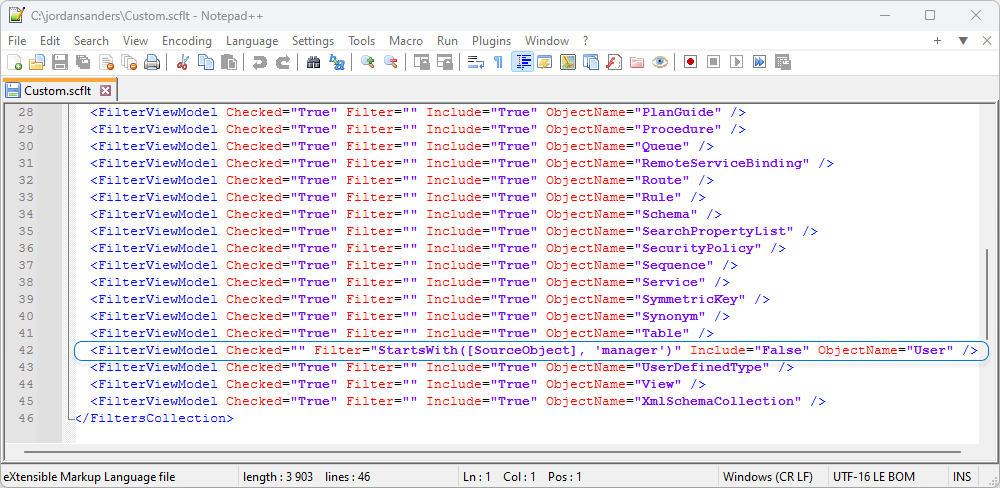
Now let’s save our filter to a .scflt file and open it to inspect its contents. Basically, it is a regular XML file that can be edited with a regular text editor.
The entire collection of filter settings is located under a FiltersCollection tag. Each of the available filters is located under a FilterViewModel tag and includes the following:
| Parameter | Description |
|---|---|
| Checked | Shows whether the database object type is included in the comparison; set to True when included; set to False when excluded; left empty when included but modified with a certain filter rule |
| Filter | Contains an object name mask to filter objects by; empty by default |
| Include | Indicates whether the filter rule includes or excludes objects; set to True when objects are included; set to False when objects are excluded |
| ObjectName | The name of the database object type that the filter refers to |
This is what it looks like. Note that for User, Checked is set to False, since we excluded all users from our comparison.
8. Now what if we want to exclude all users in Source Objects that begin with Manager? We go to the filter settings and configure that.
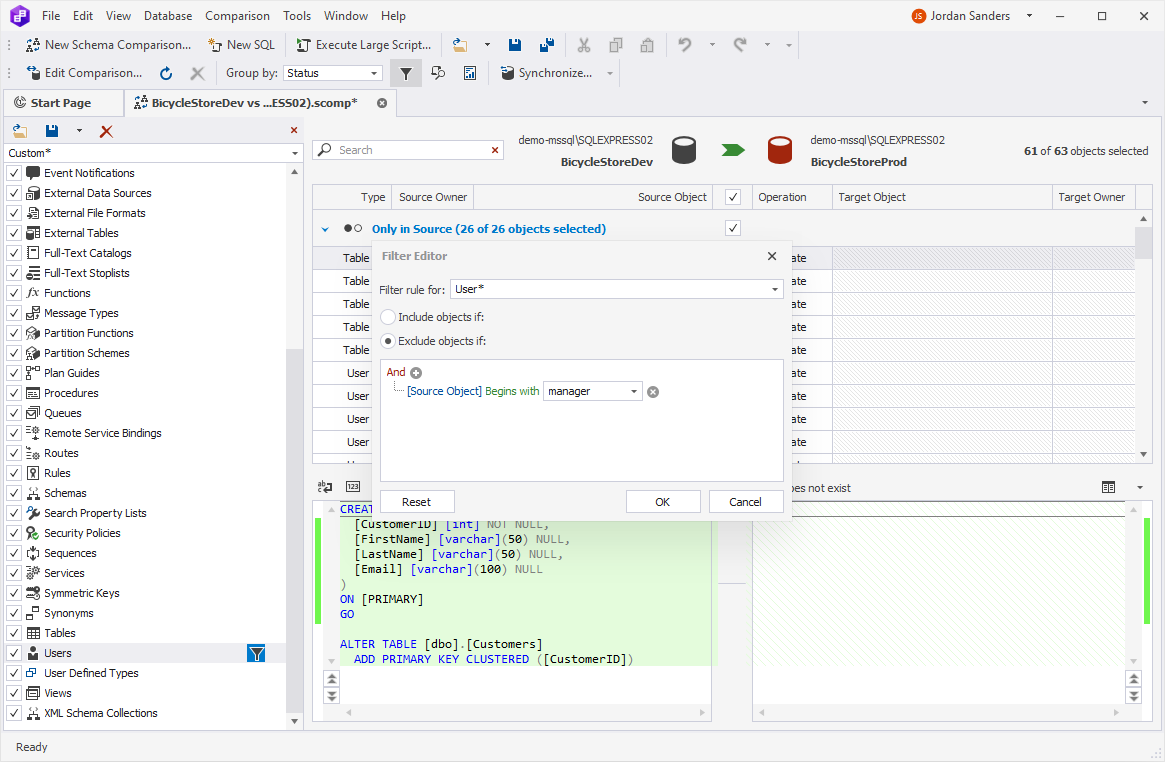
9. After we click OK, the schema comparison document is immediately updated. As you can see, there are no Managers in Only in Source at all; they have been excluded from the comparison and will be excluded from synchronization.
Finally, this is what the exclusion of Managers looks like in the .scflt file.
Note
If we need to compare and synchronize our databases with the filter applied, we can do it from the command line using the .scflt file:
"C:\Program Files\Devart\dbForge Studio for SQL Server\dbforgesql.com" /schemacompare /source connection:"Data Source=demo-mssql\SQLEXPRESS02;Initial Catalog=BicycleStoreDev;Integrated Security=False;User ID=sa" /target connection:"Data Source=demo-mssql\SQLEXPRESS02;Initial Catalog=BicycleStoreProd;Integrated Security=False;User ID=sa" /IgnorePermissions:Yes /IgnoreUserPermissions:Yes /filter:"C:\jordansanders\Custom.scflt"/syncAlternatively, we can simply use both the .scomp and .scflt files for this purpose:
"C:\Program Files\Devart\dbForge Studio for SQL Server\dbforgesql.com" /schemacompare /compfile:"C:\jordansanders\Comparison.scomp" /filter:"C:\jordansanders\Custom.scflt"/sync