Connecting to a Database
dbForge Schema Compare for Oracle allows you to connect a database and a server using the Database Connection Properties dialog.
Creating a connection
To create a connection to the server:
1. On the Database menu, select New Connection to open the Database Connection Properties dialog.
2. On the General tab of the dialog, select the connection type that defines how the database connection is established and specify the general connection details.
Note
The connection details you need to enter vary based on the selected connection type.
The following table describes connection parameters for the Direct connection type.
| Parameter | Description |
|---|---|
| Host | Server or host name where the Oracle database is running. |
| Port | Port number. The default port number is 1521. |
| Service Name/SID | Logical database service to connect to an Oracle database. |
| User and Password | User credential details. By default, the password is saved automatically. If you don’t want to save the password, clear the Allow saving password checkbox. |
The following table describes connection parameters for the TNS (Transparent Network Substrate) connection type.
| Parameter | Description |
|---|---|
| Server | Server name where the Oracle database is running. |
| User and Password | User credential details. By default, the password is saved automatically. If you don’t want to save the password, clear the Allow saving password checkbox. |
| Home | Oracle client home directory. The default option is Instant Client. |
The following table describes connection parameters for the TNS (using OS Authentication) connection type.
| Parameter | Description |
|---|---|
| Server | Server name where the Oracle database is running. |
| User and Password | User and password are inherited from the current OS user. |
| Home | Oracle client home directory. The default option is Instant Client. |
3. In the Connect as list, select a role with which you want to connect to the server. The available roles include Normal (default), SYSDBA, SYSOPER, SYSBACKUP, SYSDG, and SYSKM. To show all schema objects, select the Show all objects checkbox.
4. In the Connection Name box, enter a name for the server you want to connect to. By default, the host name is used. If you want to specify a different name, enter it here. This setting is optional.
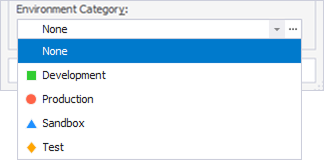
5. In the Environment Category list, select the environment category from the list, such as Development, Production, Sandbox, and Test. This setting is optional. To customize a connection category, see Windows connection coloring.

6. Optional: Switch to the Advanced tab to configure advanced connection properties:
- DBMS output options
- Enable DBMS output - Control whether to capture and display output messages generated by the DBMS_OUTPUT package. By default, this option is turned on. If you don’t want to display output messages, clear the checkbox.
- Buffer size - Specify the buffer size in bytes. The default value is 20000 bytes.
- Timeouts
- Connection timeout - Set the time (in seconds) when the server should wait to establish a connection. The default value is 0 seconds.
- Execute timeout - Set the time (in seconds) when the task should be completed. The default value is 0 seconds.
- Show PL/SQL compilation warnings - Select the checkbox to display warnings about potential PL/SQL code issues, such as performance concerns or syntax issues, during compilation.
- Use Unicode - Handle multilingual and unique character data correctly. By default, the option is turned on. To turn off it, clear the checkbox.
7. Optional: To verify the connection, select Test Connection. The window with the message informing about a successful connection appears. Select OK to close the window.
8. To create the connection to the server, select Connect.
Manage connections
You can create, edit, and delete connections using Connection Manager. To open it, do one of the following:
- On the Database menu, select Connection Manager.
- On the Start page, select Essentials > Connection Manager.
Connection Manager allows you to do the following:
- Select New to create a connection.
- Select Edit to modify the connection. Alternatively, double-click the required connection.
- Select Delete to delete the connection. Alternatively, press DELETE.
Windows connection coloring
Window connection coloring immediately lets you know which server you’re connected to. When setting the database connection properties, you can add coloring for each server connection in the Environment Category list of the Database Connection Properties dialog.
To add connection coloring, select an arrow in the Environment Category and then select the required coloring.
In the Environment Category, select ![]() to open the Options dialog. Here, you can customize category settings by choosing colors, editing, adding, or deleting categories. You can also assign colors to all schemas or specific schemas within a connection.
to open the Options dialog. Here, you can customize category settings by choosing colors, editing, adding, or deleting categories. You can also assign colors to all schemas or specific schemas within a connection.
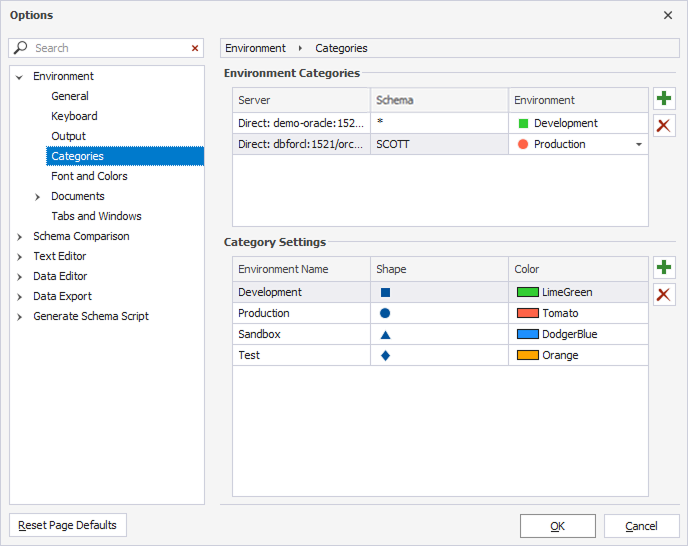
To assign coloring to an environment category
1. Next to the Environment Categories grid, select  New Color Match.
2. In a new row, specify a server and/or a schema name and environment.
3. To save the changes, select OK.
To remove coloring from an environment category
1. Select the color match you want to remove.
2. Next to the Environment Categories grid, select  Delete Color Match.
3. To save the changes, select OK.
To add a new category
1. Next to the Category Settings grid, select New Category.
2. In a new row, specify an environment name and choose a shape and a color.
3. To save the changes, select OK.
To delete a category
1. Select the category you want to delete.
2. Next to the Category Settings grid, select Delete Category.
3. To save the changes, select OK.
Connection Types
Direct Connection
Direct mode does not require an Oracle Client to be installed on your workstation. dbForge Schema Compare for Oracle talks to the Oracle server directly; no third-party libraries are required.
You can connect to a multi-threaded server using Direct mode. The server must be configured to use a specific port and TTC protocol. This can help you avoid firewall conflicts.
Direct mode advantages:
- Installation and administration of an Oracle Client are not required.
- System requirements are reduced.
Direct mode restrictions:
- Database export and import operations with Export and Import Utility wizards are not supported.
- Oracle RAC (Real Application Clusters) is not supported.
- OS authentication feature is not available.
- TCP/IP protocol connection only.
Note
You can return to a connection via a TNS at any time if the restrictions become critical for you.
Connection via the TNS
The TNS connection type is an appropriate option in any of the following circumstances:
- You have an Oracle client installed on your machine.
- You have access to many Oracle Database instances.
- You do not know the machine details of the system hosting the Oracle Database instance you want to connect to.
A TNS connection uses an alias entry from a tnsnames.ora file. dbForge Schema Compare for Oracle uses only one tnsnames.ora file. You may have more than one on your local machine or want to use the tnsnames.ora file on a remote machine, so note that dbForge Schema Compare for Oracle looks sequentially for the tnsnames.ora file in the following locations:
- $HOME/.tnsnames.ora
- $TNS_ADMIN/tnsnames.ora
- /etc/tnsnames.ora (non-Windows systems)
- $ORACLE_HOME/network/admin/tnsnames.ora
- Registry key
You need to create the TNS_ADMIN environment variable in the case when the tnsnames.ora file exists, but dbForge Schema Compare for Oracle doesn’t use it.
Note
dbForge Schema Compare for Oracle uses connection via a TNS by default.
Connection via TNS Using OS Authentication
With OS authentication, Oracle Database uses a database user’s OS login credentials to authenticate that user. The user doesn’t provide a username or password to access the database, and Oracle Database doesn’t store and manage the account password. Local OS authentication can be used when the client and the database server are on the same machine. Remote OS authentication is possible but is not considered secure.