


Synchronizing Data
Last modified: June 26, 2023
Note
Data synchronization can not be rolled back! It may change or delete data in your target database. It is highly recommended to backup target database before synchronizing data.
Synchronizing databases
To start synchronizing data of two databases:
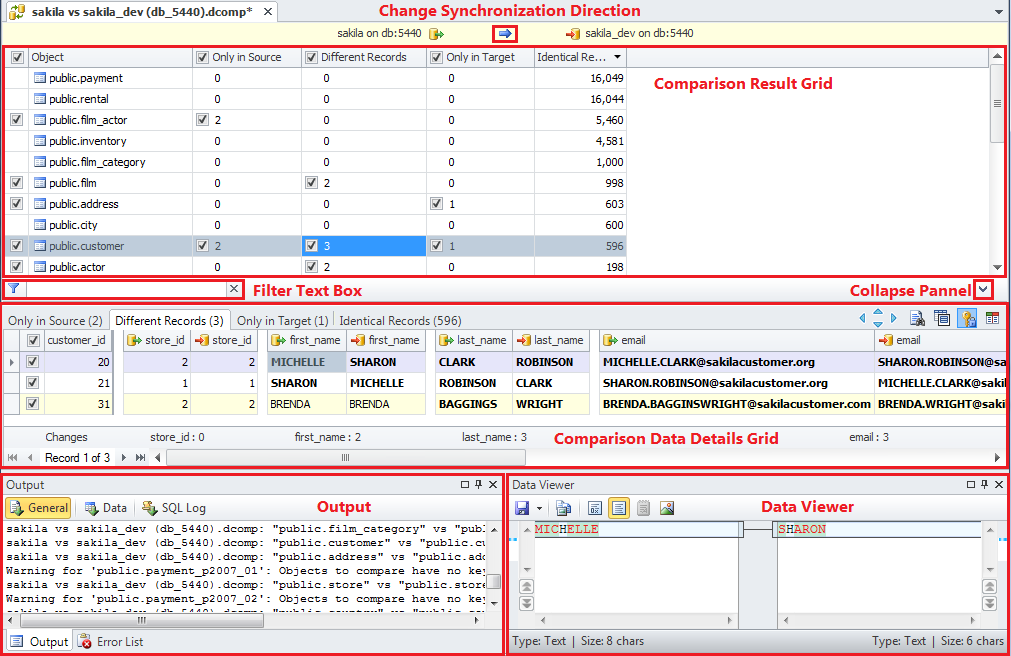
1. Select the data to synchronize. To do this, select checkboxes in the column with checkboxes for the tables (or views) you want to synchronize. You may also click a separate table and select check boxes in the column with checkboxes on the Only in source, Only in target, and Different tabs for individual records to determine which records to synchronize. Use the checkbox in the header of the grid to apply settings to all the grid rows.
Note
Incorrectly mapped objects are displayed with
icon instead of checkbox in the Data Comparison document. Objects with no data to synchronize (with only identical records or with no records at all) are displayed without checkboxes. You cannot select them for synchronization.
2. On the Devart - Comparison toolbar, click  Synchronize. The Data Synchronization Wizard will be opened.
3. Select whether to back up target database and back up files location. Then, select whether to execute a script as a single transaction. You may click the Synchronize button and skip next steps to open the synchronization script in the editor, but this is not recommended if the script is too large. See the Executing Large Scripts topic to know ho to execute script without opening it in the editor. Click the Next button.
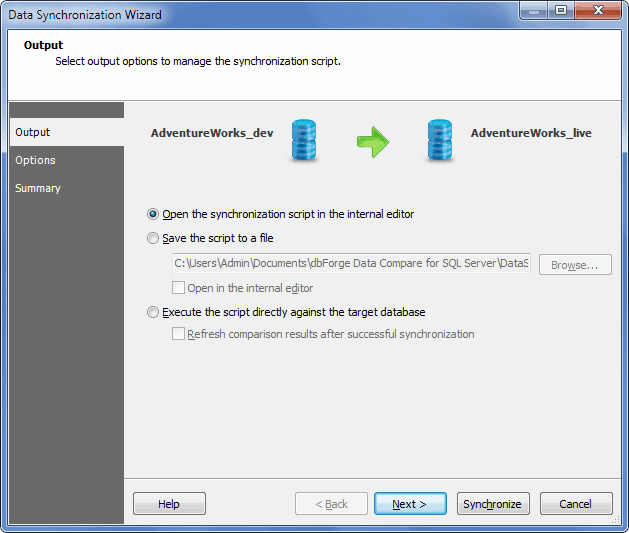
4. Select where to output synchronization script - open in the editor, save for the future execution, or immediately execute it.
5. You may either click the Synchronize button to generate the update script or click the Next button to set synchronization options and view the synchronization action plan and synchronization warnings if any exist, and then click the Synchronize button.
'%3e%3cpath%20id='thumb_up_2'%20d='M15%2017H5.5V7L11.5%201L12.1667%201.45833C12.4028%201.625%2012.5833%201.83681%2012.7083%202.09375C12.8333%202.35069%2012.8681%202.61806%2012.8125%202.89583L12.7917%203L12%207H17.5C17.9167%207%2018.2708%207.14583%2018.5625%207.4375C18.8542%207.72917%2019%208.08333%2019%208.5V9.6875C19%209.79861%2018.9896%209.89931%2018.9688%209.98958C18.9479%2010.0799%2018.9167%2010.1736%2018.875%2010.2708L16.3944%2016.0875C16.2703%2016.3625%2016.0833%2016.5833%2015.8333%2016.75C15.5833%2016.9167%2015.3056%2017%2015%2017ZM7%2015.5H15L17.5%209.6875V8.5H10.1667L11.1875%203.4375L7%207.625V15.5ZM5.5%207V8.5H2.5V15.5H5.5V17H1V7H5.5Z'%20fill='%2327282C'/%3e%3c/g%3e%3c/g%3e%3c/svg%3e) Yes
Yes'%3e%3cpath%20id='thumb_down_2'%20d='M5%203H14.5V13L8.5%2019L7.83333%2018.5417C7.59722%2018.375%207.41667%2018.1632%207.29167%2017.9062C7.16667%2017.6493%207.13194%2017.3819%207.1875%2017.1042L7.20833%2017L8%2013H2.5C2.08333%2013%201.72917%2012.8542%201.4375%2012.5625C1.14583%2012.2708%201%2011.9167%201%2011.5V10.3125C1%2010.2014%201.01042%2010.1007%201.03125%2010.0104C1.05208%209.92014%201.08333%209.82639%201.125%209.72917L3.60417%203.91667C3.71528%203.63889%203.89931%203.41667%204.15625%203.25C4.41319%203.08333%204.69444%203%205%203ZM13%204.5H5L2.5%2010.3125V11.5H9.83333L8.8125%2016.5625L13%2012.375V4.5ZM14.5%2013V11.5H17.5V4.5H14.5V3H19V13H14.5Z'%20fill='%2327282C'/%3e%3c/g%3e%3c/g%3e%3c/svg%3e) No
No
