Build CI/CD pipelines with TeamCity
dbForge DevOps Automation for SQL Server is a solution designed for the management and deployment of changes to a SQL Server database. With it you can automate the deployment of database changes and build a full-cycle database CI/CD pipeline using any continuous integration or continuous deployment server that supports running PowerShell. To make getting set up easier, dbForge DevOps Automation includes plugins for Azure DevOps, TeamCity, Bamboo, and Jenkins automation servers.
dbForge DevOps Automation comes as part of the SQL Tools suite and is used in conjunction with other dbForge tools such as Unit Test, Data Generator, Data and Schema Compare, etc. dbForge DevOps Automation allows organizing a comprehensive continuous delivery pipeline for your database.
How to build a CI/CD pipeline with TeamCity
TeamCity Server is a continuous integration (CI) server, a solution that automates and manages the main team development processes (including test execution), analyzes the source code and the code changes integration, manages builds, generates reports and much more. TeamCity accelerates the database development process and ensures effective interaction between team members.
TeamCity allows you to set up an efficient workflow to organize the CI process. You can integrate DevOps Automation into TeamCity servers from v.2019.1.3.
The guide provides step-by-step procedures to create the TeamCity project using the dbForge DevOps Automation TeamCity plugin for SQL Server.
Preparing the environment
To configure the CI process on the TeamCity server using the dbForge DevOps Automation for SQL Server toolset, you must first install the dbForge tools (according to your needs in the CI process) on the machine that will act as a build agent. This is usually the following set of tools:
You can install all the tools mentioned above and some more in one pack, dbForge SQL Tools.
Additionally, to organize the CI process, you will need the dbForge DevOps Automation for SQL Server PowerShell module. It is a set of PowerShell cmdlets to coordinate dbForge Tools. You can install it with the same pack of dbForge SQL Tools.
As soon as everything is installed and ready, you can create a new project on the TeamCity server. First, let's install the dbForge DevOps Automation for SQL Server plugin.
Installing DevOps Automation for SQL Server TeamCity plugin
1. Click the Administration button in the upper right corner.
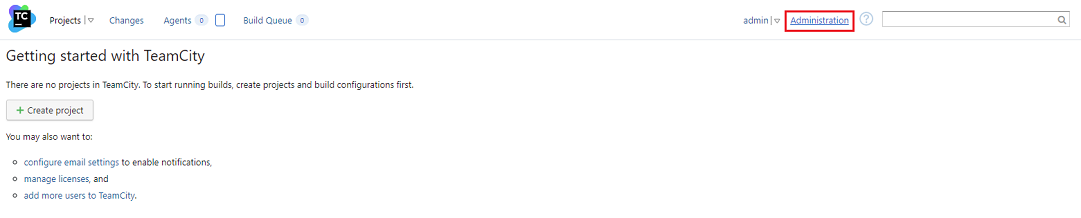
2. In the left pane, under Server Administration, select Plugins List.
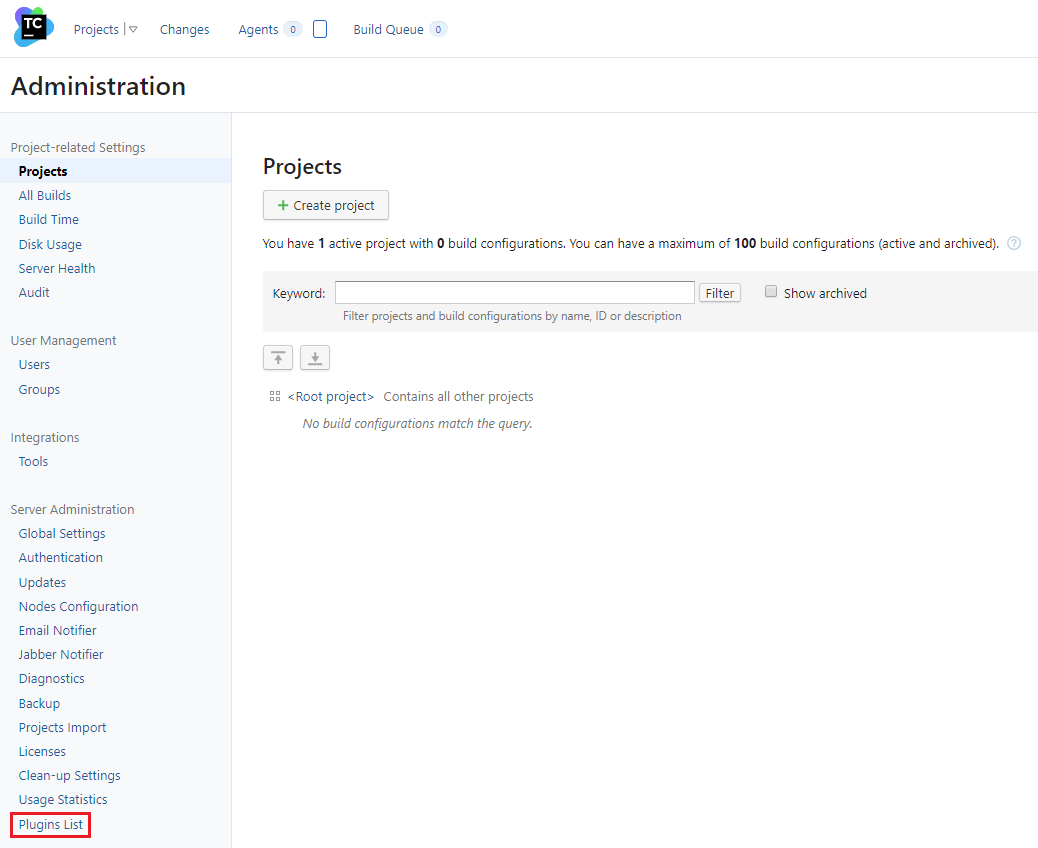
3. Click the Browse plugins repository button to install the plugin directly from the plugin repository.

4. Next, on the JetBrains Plugins Repository, type dbForge DevOps Automation for SQL Server in the search box for plugins.
5. Go to the plugin page, click the Get button in the upper right corner and then select Install to [your TeamCity server url] in the drop-down menu.
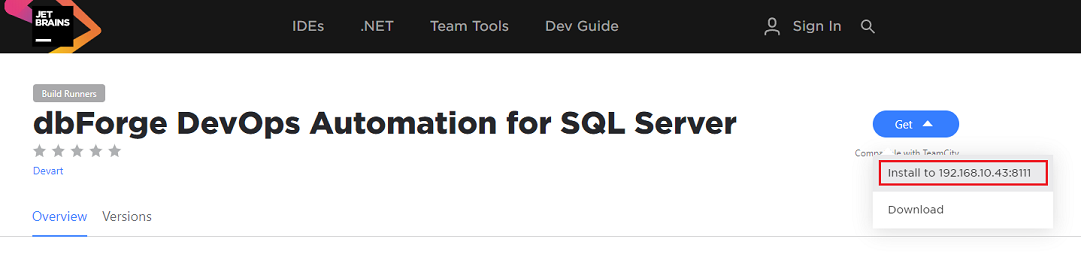
6. After that, the plugin will be installed on your TeamCity server.
Note
You can also install the plugin manually from a zip file. The plugin zip file can be downloaded at JetBrains Plugins Repository, or from the plugin page on our website.
Creating a project with dbForge DevOps Automation for SQL Server
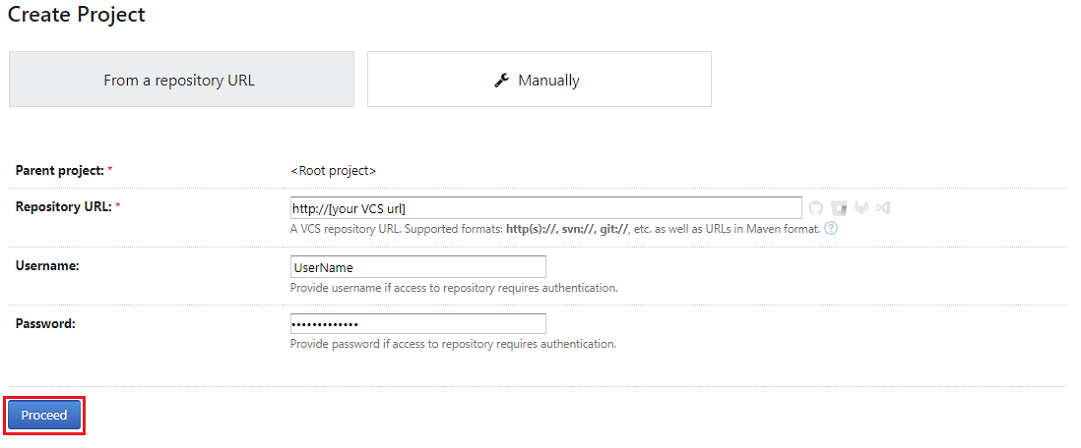
1. Click the Create project button on the start page of TeamCity server.

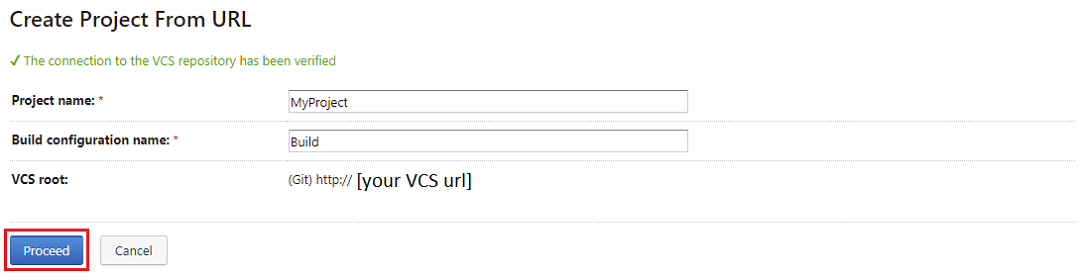
2. Configure VCS settings and click the Proceed button.
3. Next, TeamCity will check the VCS settings you've entered. After that, you'll need to set the basic configurations for your project in the window that will open. Enter a Project name and a Build configuration name and then click the Proceed button.
After that, a page with the settings for the created project will open. On the left, you can see the panel with the configuration sections, while the user interface for setting the configurations for the selected section are shown on the right.

Let's look closer at some sections for project configuration:
-
General Settings allows configuring the basic project settings (name, ID, description), as well as the settings for working with build artifacts.
-
Version Control Settings allows configuring the settings for VCS that will be linked to the project.
-
Build Steps allows configuring the build steps on this tab.
-
Triggers contains settings for configuring triggers to initiate the start of the project build process.
-
Suggestions displays informational recommendations on setting up a project with TeamCity.
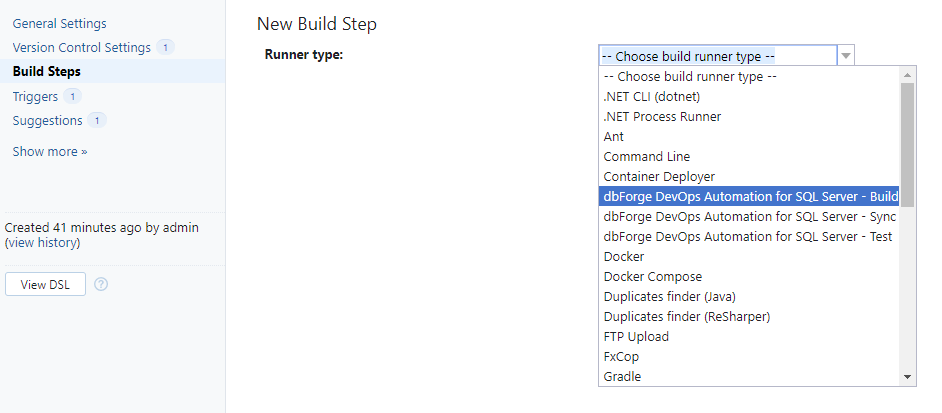
The basic logic of the CI process is configured in the Build Steps section by adding various build steps. Below is a simple example of how to configure a CI process using dbForge DevOps Automation for SQL Server.
Build a database package configuration
The first step in our CI process example is the Build a database package step. This step is meant for validating SQL scripts that are located in VCS by deploying them on a given server.
To add this step to your project settings, go to the Build Steps section and click the Add build step button.

In the drop-down list that appears, select dbForge DevOps Automation for SQL Server – Build.
Next, the Build step user interface will be displayed. It consists of several main sections and optional advanced settings. Let's consider the purpose of each section:
-
Source-controlled database specifies the location of the source folder with database deployment scripts relative to the VCS root.
-
Package ID specifies the name of the NuGet package that will be generated through this step (it comprises a build artifact).
-
Temporary database server sets the connection parameters to the server that will be used to validate scripts from the source folder by means of deployment.
It is recommended to use SQL LocalDB as the Temporary database server. In this case, the LocalDB instance will be deployed and a temporary database will be created on it. Then the SQL scripts will be deployed on it, following which the temporary database will be deleted and the LocalDB instance closed. If you want to deploy scripts on a specific server, you can select SQL Server mode and configure the settings in the corresponding user controls.

Below is an example of configuring the dbForge DevOps Automation for SQL Server - Build step:
Test a database using tSQLt configuration
The second step in our CI process example is the Test step. It is meant for validating SQL scripts by running tSQLt unit test on a given server.
To add this step, go to the Build Steps section in the settings of your project and click the Add build step button. Then in the drop-down list that appears, select dbForge DevOps Automation for SQL Server – Test. After that, the user interface for the Test step will be displayed.
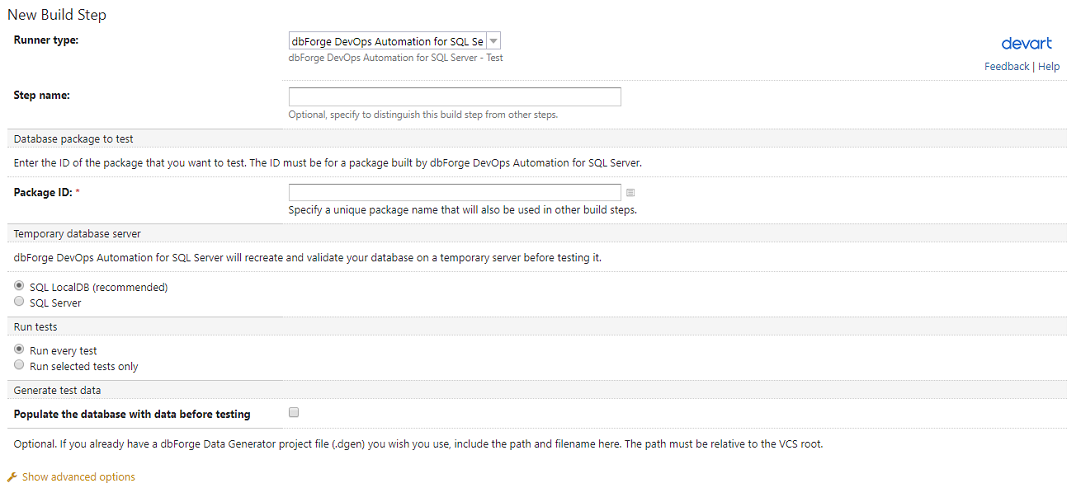
This step contains the following functional sections:
-
Database package to test specifies the name of the NuGet package (generated in the Build step). SQL scripts from this NuGet package will be used for deployment on a temporary server to perform tSQLt unit tests.
-
Temporary database server specifies the connection parameters for the server that will be used to perform tSQLt unit tests.
-
Run tests sets the test run mode (run every test, or run selected tests only).
-
Generate test data enables test data generation mode before running tSQLt unit tests.
To generate test data before completing the step, you must first create the dbForge Data Generator for SQL Server project file (.dgen). This file contains settings and rules for generating test data. It should be located in VCS, so the path to it is formed relative to the checkout directory.
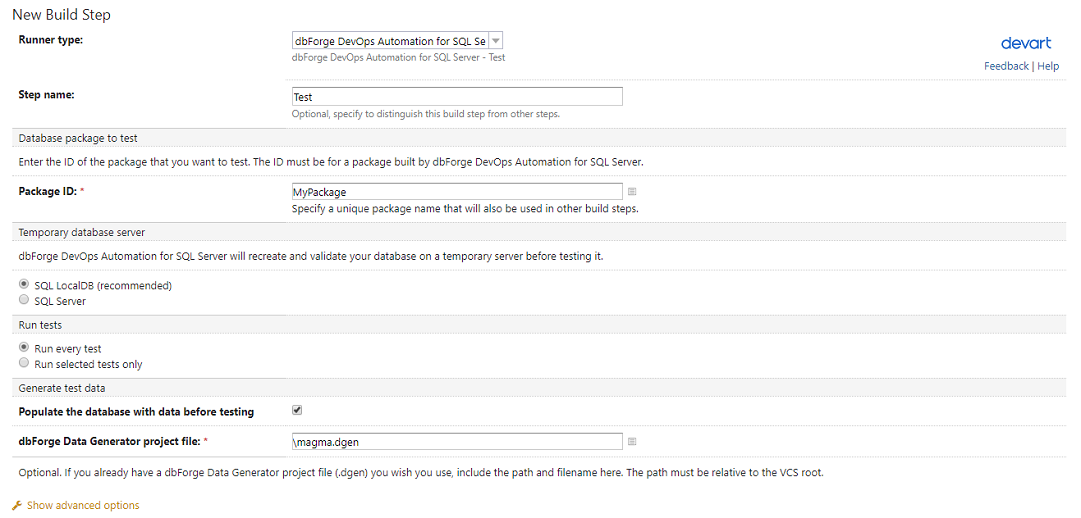
Below is an example of configuring the dbForge DevOps Automation for SQL Server - Test step.
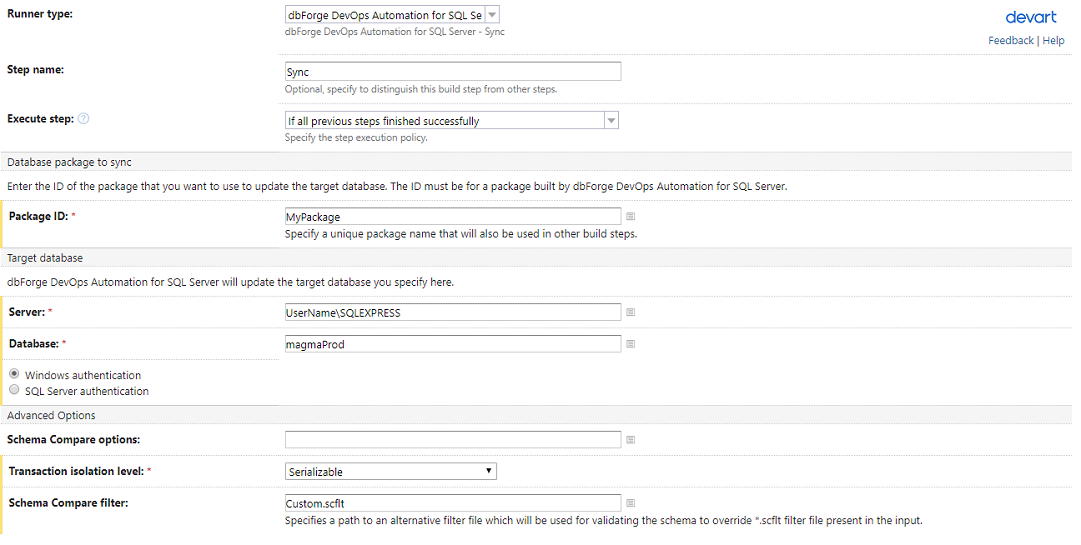
Sync a database project configuration
The next step in our CI process is Sync. This step is meant for synchronizing the generated and tested NuGet package with the specified server.
To add the step, go to the Build Steps section in the settings of your project and click the Add build step button. Then in the drop-down list that appears, select dbForge DevOps Automation for SQL Server – Sync. After that, the user interface for the Sync step will be displayed.
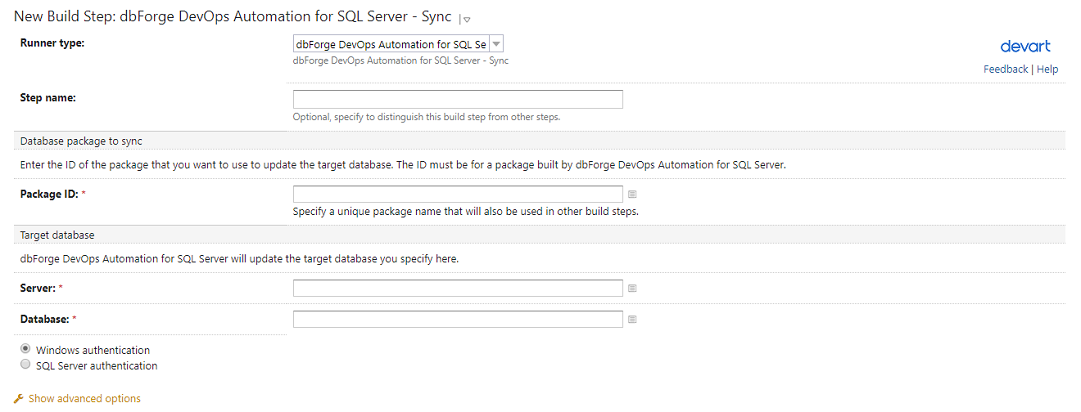
This step contains the following functional sections:
-
Database package to sync defines the name of the NuGet package (generated in the Build step). SQL scripts from this NuGet package will be used for deployment on the specified server.
-
Target database specifies the connection parameters for the database it is necessary to synchronize with.
In the advanced options for this step, you can configure many other user settings for synchronization (for example, filtering objects for synchronization, or using the features for comparison and synchronization of the dbForge Schema Compare for SQL Server tool).
Special mention must be made about the possibility to filter objects during synchronization since this feature can be useful in many cases. Filtering is carried out through the filter file (.scflt) in which the filtering rules are set directly. This file can be generated in dbForge Schema Compare for SQL Server and must be located in VCS so that it can be used in the CI process.
Below is an example of configuring the dbForge DevOps Automation for SQL Server – Sync step.
Project start and output results
After the project is configured, you can see the output results. By default, the project will automatically be placed into the build queue as soon as TeamCity detects new changes in the repository that is mapped to the project. But you can also start the project manually. To do this, click the Run button in the upper right corner.

After that, the project will be placed into the build queue and as soon as the free compatible build agent is found, the build process will start.

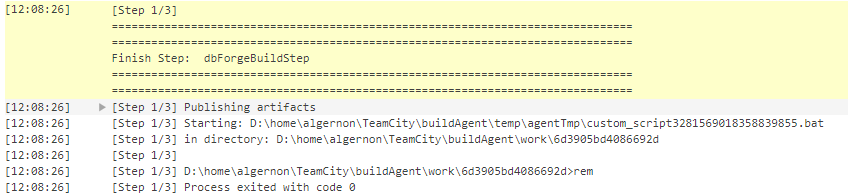
On the Build Log tab, you can real-time monitor the build process.
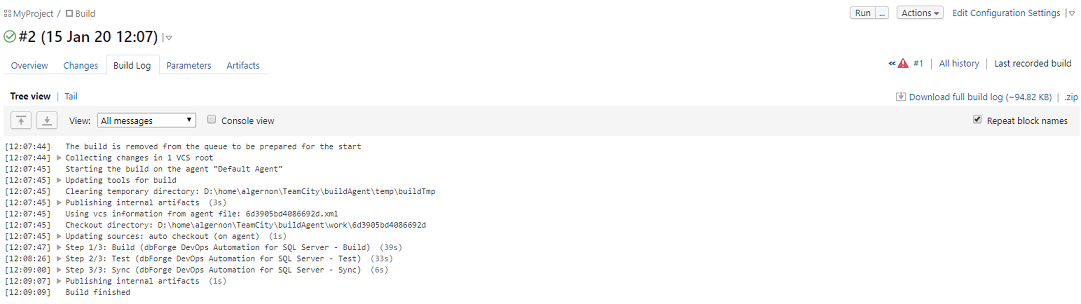
The log displays the following information: updating source codes from VCS, forming a temporary directory, details about the implementation of each build step, and publishing artifacts. You can also see a detailed log for each build step, which includes:
- Information about the working directory where the step is being executed.

- Parameters of the step.
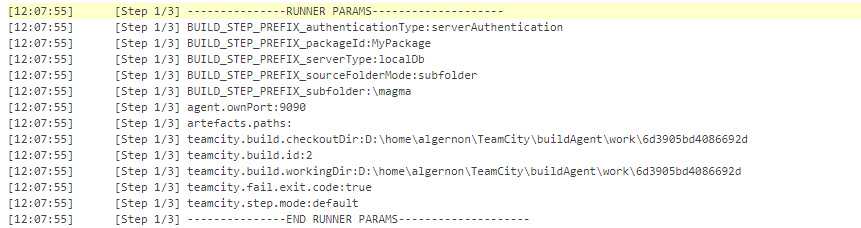
- Information about parameters validation.

- Output of the step's business logic implementation.

- The result of completion, information about errors (if any) and information about the publication of artifacts (if they are formed according to the results of the current step).
The artifact itself can be seen and, if necessary, downloaded on the Artifacts tab.

Conclusion
Apart from the aforesaid, you can use TeamCity to configure further publication of artifacts to a remote server, email notification at the end of the project's build, a flexible trigger system for launching the current project and post-build initiating the build of dependent projects, and much more.
We have observed a simple example of the CI process organization with the dbForge DevOps Automation TeamCity plugin for SQL Server.
However, this plugin along with dbForge SQL Tools solutions allows you to organize your own flexible CI process of any complexity.
Additionally, watch these videos to discover how dbForge products can boost database development.
- How dbForge SQL Complete is involved in the Database DevOps process
- How to import data to SQL Server database with dbForge Data Pump during the DevOps process
- Creating database documentation during the Continuous Integration workflow
- How to automate database schema changes for the CI process during database deployment
- dbForge Source Control in the DevOps pipeline
- How dbForge SQL Complete is involved in the Database DevOps process
- Unit Testing for SQL Server Database in DevOps process