Build CI/CD pipelines with Bamboo
dbForge DevOps Automation for SQL Server is a solution designed for the management and deployment of changes to a SQL Server database. With it you can automate the deployment of database changes and build a full-cycle database CI/CD pipeline using any continuous integration or continuous deployment server that supports running PowerShell. To make getting set up easier, dbForge DevOps Automation includes plugins for Azure DevOps, TeamCity, Bamboo, and Jenkins automation servers.
dbForge DevOps Automation comes as part of the SQL Tools suite and is used in conjunction with other dbForge tools such as Unit Test, Data Generator, Data and Schema Compare, etc. dbForge DevOps Automation allows organizing a comprehensive continuous delivery pipeline for your database.
How to build a CI/CD pipeline with Bamboo
Atlassian Bamboo is a continuous integration server (CI) that can be used for implementing your own CI process. Bamboo enables you to simultaneously run parallel builds in different environments, keep track of all builds, make reports on builds, and a lot more.
Bamboo helps manage any flow for a CI process implementation.
The guide provides step-by-step procedures to create the Bamboo job using the dbForge DevOps Automation for SQL Server plugin for Bamboo.
Prepare the environment
To set up the CI process with the help of the dbForge DevOps Automation for SQL Server toolkit using Bamboo server, first, you need to install all dbForge tools, according to your needs in CI process, on the machine which will serve as a build agent. Usually, the tool kit includes the following tools:
You can get the tools listed above altogether by downloading dbForge SQL Tools that also includes other tools for SQL Server development, administration, and management.
To implement your CI process, you will also need dbForge DevOps Automation for SQL Server PowerShell module, a set of cmdlets to interconnect with dbForge tools using PowerShell. The module is also included in dbForge SQL Tools.
As soon as everything is set up and ready, you can proceed with creating a project on the Bamboo server. First, we need to install the dbForge DevOps Automation for SQL Server plug-in for Bamboo.
Install dbForge DevOps Automation for SQL Server plugin for Bamboo
To install the dbForge DevOps Automation for SQL Server plugin on the Bamboo server, you need to follow these simple installation steps:
1. On the start page of your Bamboo server, navigate to the Bamboo administration settings, and click Manage apps in the drop-down list:

2. Select the Upload app option:
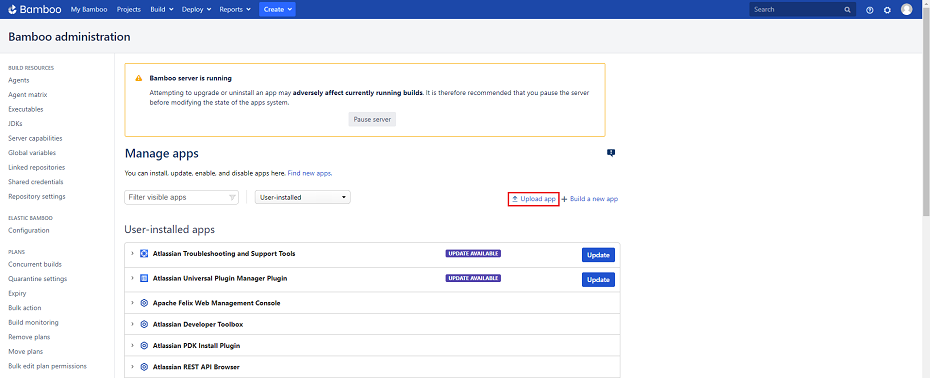
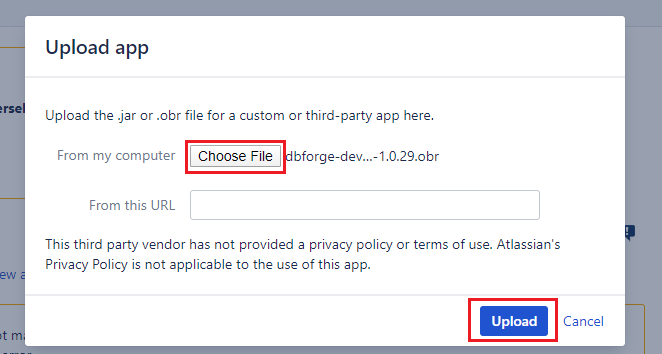
3. In the Upload app window, click the Choose file button, find the dbForge DevOps Automation for SQL Server plug-in setup file and open it:
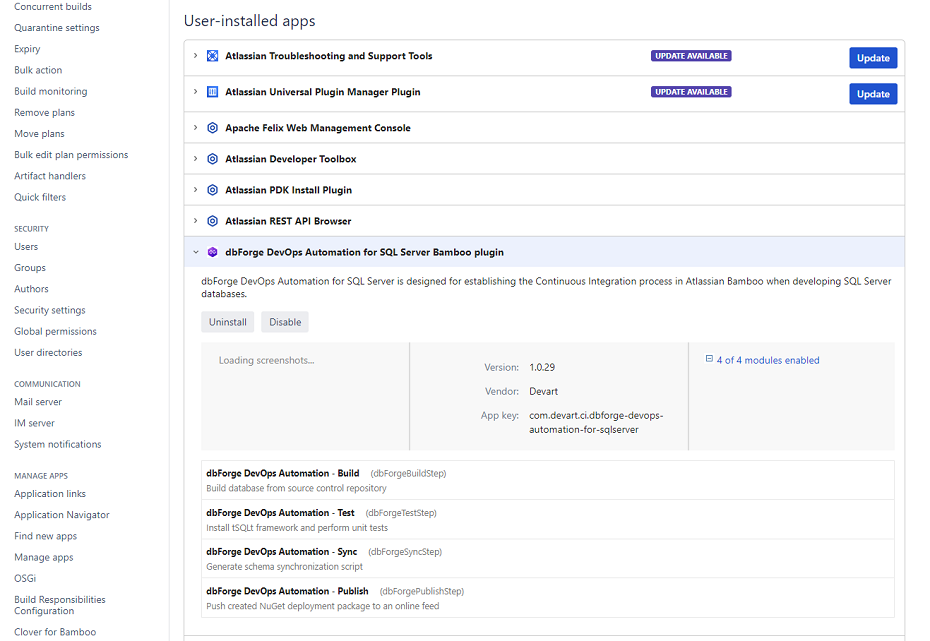
4. After the installation process is complete, you will see the installed plug-in listed under User-installed apps:
5. Proceed to configuring Continuous Integration process with dbForge DevOps Automation for SQL Server.
Create project with dbForge DevOps Automation for SQL Server
1. Go back to the Bamboo start page and click Create your first build plan:

2. After that, you will be prompted to configure your CI plan:
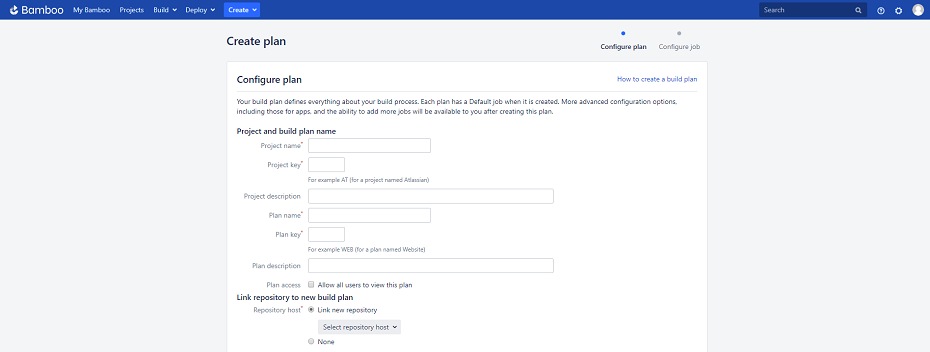
3. You need to set a unique name and a key to your project and CI plan. With the help of the Allow all users to view this plan option, you will be able to manage access to the created plan for other users:

4. You also need to configure the source control settings. For this, navigate to the Link repository to new build plan section, and select a VCS that is suitable for you e.g. Git) in Repository host drop-down list box. Once done, you will be prompted to set up the selected VCS connection:
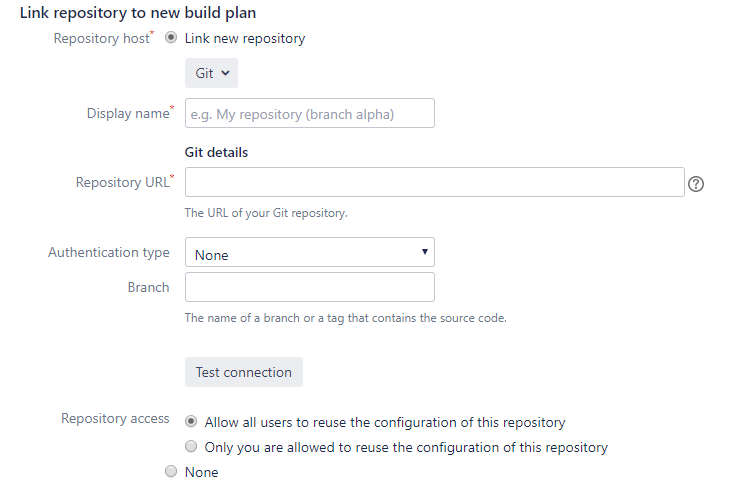
Let's consider the sections for VCS configuration:
-
Display name is a link repository name which you will see in your CI plan configuration.
- Repository URL is where you set a URL to a remote VCS repository.
- Authentication type is for setting authentication method for the repository connection (SSH private key or Username/Password authentication type). Depending on the authentication method that you choose, specific access configuration controls are loaded dynamically.
- Branch is where you specify a branch or a tag used for the build.
- Repository access is where you define if other Bamboo users will have access to the described repository.
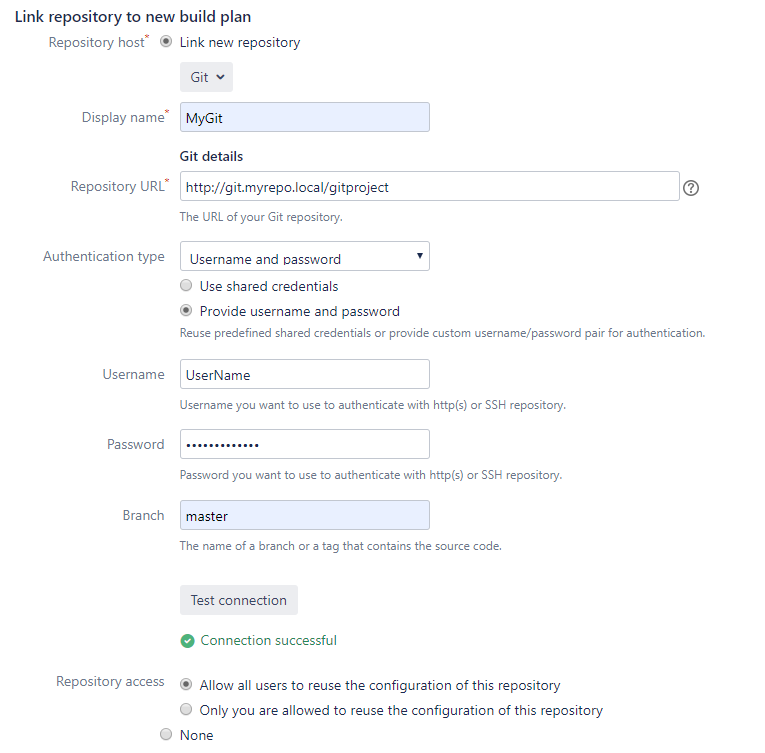
After the configuration of the VCS repository access is completed, you can test the correctness of the preset settings by clicking Test connection:
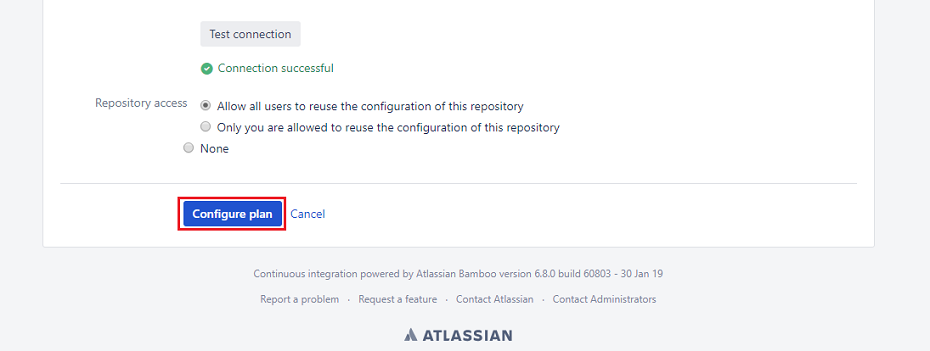
To finish configuring all CI plan settings, click Configure plan the view of the plan settings:
Configure Bamboo continuous integration job with dbForge DevOps Automation for SQL Server
After we have created our CI plan, Bamboo will display a view to configure the default Job:
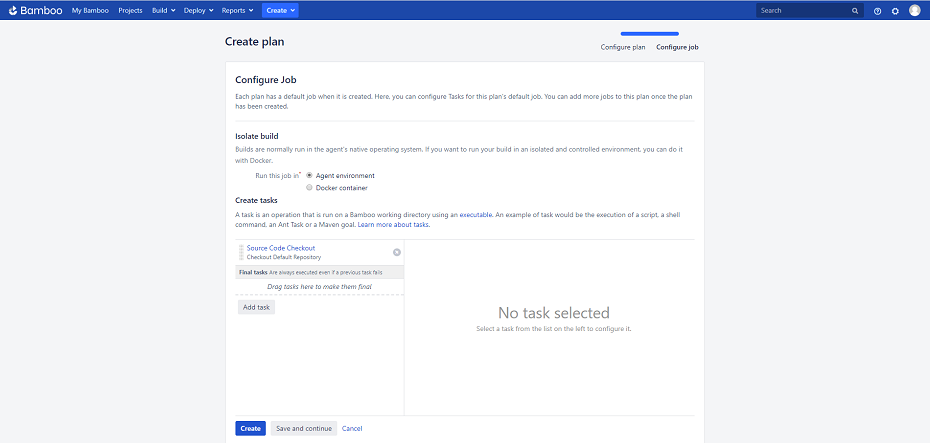
The view can be roughly divided into two areas:
-
Isolate build is a group of controls for defining an environment in which your pipeline is going to run.
-
Create tasks is a set of tasks your pipeline will consist of. Initially, this list has only one task, the checkout from your VCS repository. By default, checkout is done into a temporary repository which is considered to be a root directory for the whole pipeline process. But you can explicitly specify a directory to which your checkout is done (if necessary you can set an option of forced cleanup of directory upon checkout during every build).
Next, we will shape our CI by gradually adding tasks from the dbForge DevOps Automation for SQL Server plug-in to Job.
Configure 'Build a database package' step
The first step in our CI process is Build. This step is intended for validation of the SQL scripts located in VCS by deploying them to the given server.
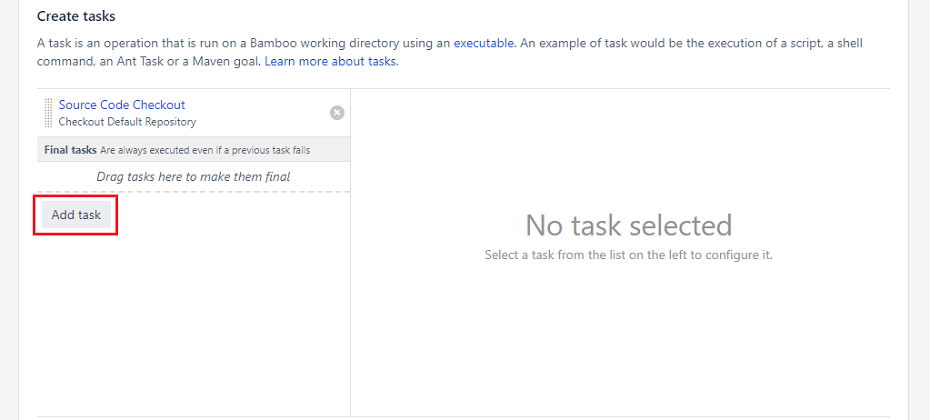
To add this step in the Configure Job view, click Add task in the Create task section.
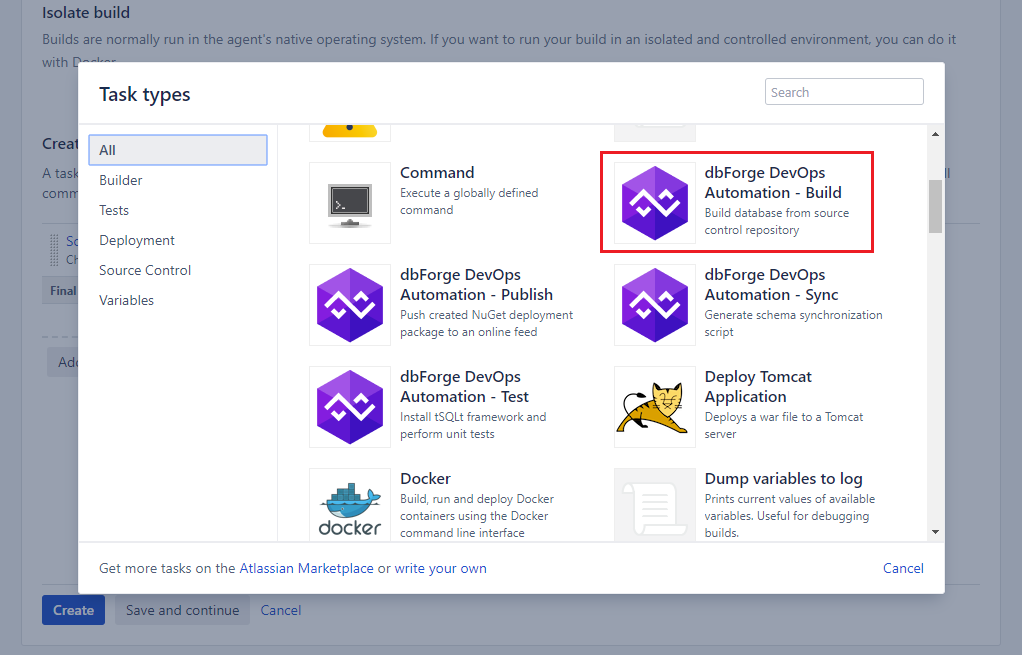
Locate dbForge DevOps Automation – Build among the provided components from the installed plug-ins.
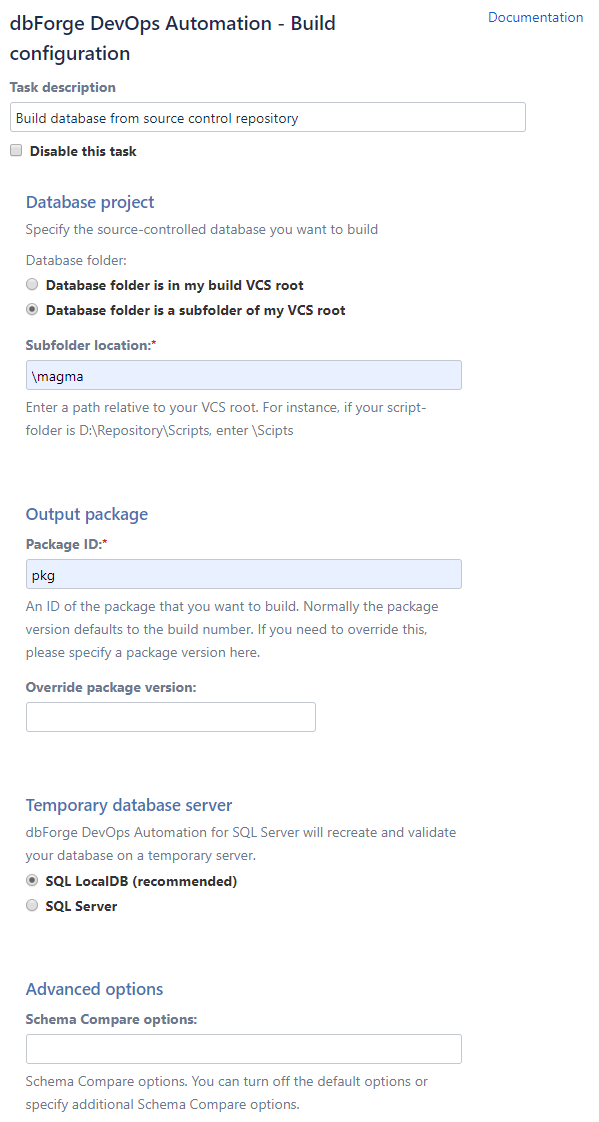
The user interface for the Build task will load. It consists of several main sections and optional advanced settings. Let's consider the functional use of each section:
-
Database project is the location of source folder with the scripts for database deployment in relation to VCS.
- Output package is the name and the version of the NuGet package which will be formed based on the results of the completion of this step (it is a build artifact).
- Temporary database server includes the server connection parameters which will be used for script validation from the source folder by means of deployment.
- Advanced options are additional build settings (for instance, filtering objects for synchronization or using options of any type of comparison or synchronization from dbForge Schema Compare for SQL Server.
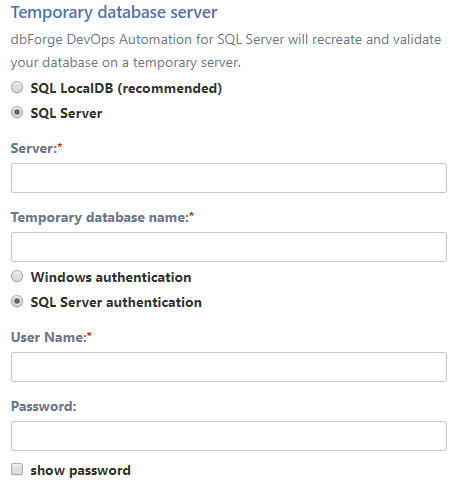
As a Temporary database server, we recommend using SQL LocalDB (in this case, the LocalDB instance will be deployed; there is a temporary database created on it; on the database, the SQL script deployment will be run, after which the temporary database is deleted and LocalDB is closed). If you want to deploy scripts on some specific server, you can select the SQL Server mode and define settings in the corresponding user controls:
Below is an example of configuring the dbForge DevOps Automation for SQL Server – Build step:
Configure 'Test a database using tSQLt' step
The second step in the CI process is Test. The step is intended for SQL script validation by performing the tSQLt unit tests on the given server.
To add this step to the Configure Job view, click Add task in the Create tasks section, and select dbForge DevOps Automation – Test.
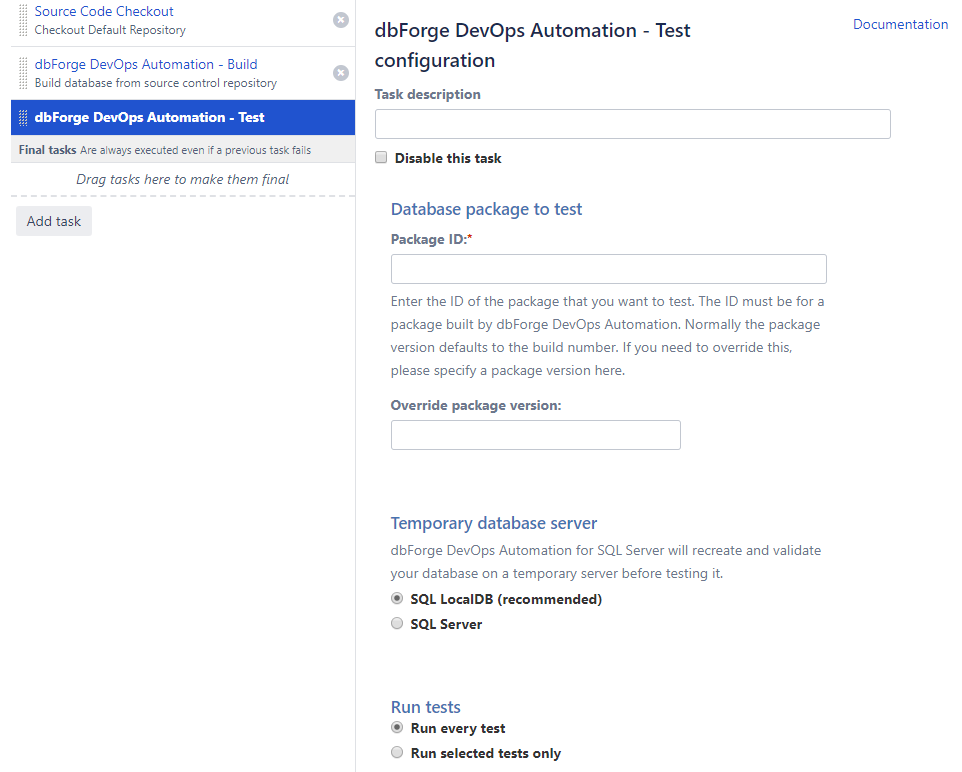
This step includes the following functional sections:
- Database package to tests is the name and the version of the package (formed in the Build step). SQL scripts from this package will be used to deploy to the temporary server to perform tSQLt unit tests.
- Temporary database server includes parameters of the server connection which will be used to perform tSQLt unit tests.
- Run tests is the task for running tests (to run all or only specified tests).
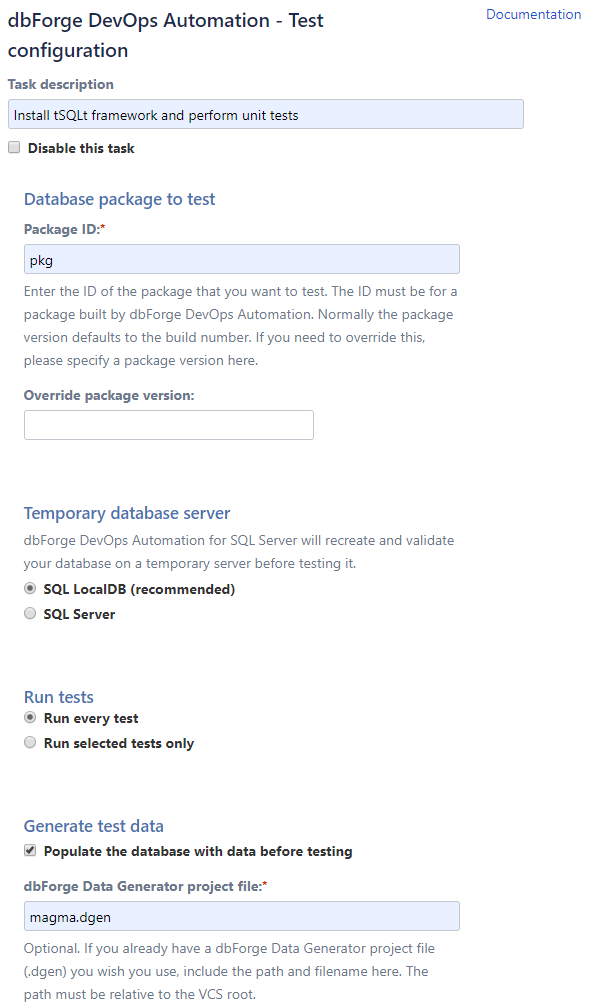
- Generate tests data is the test data generation mode before running tSQLt unit tests.
- Advanced options are additional build options (for example, filtering objects for synchronization, or using the options for any comparison and synchronization from dbForge Schema Compare for SQL Server).
To generate test data before running tests, you need to first create a project file named dbForge Data Generator for SQL Server (*.dgen). This file contains test data settings and rules. It should be located in VCS, that is why the path to this file is formed in relation to checkout directory.
Below is an example of configuring the dbForge DevOps Automation for SQL Server – Test step:
Configure 'Sync a database project' step
The third step in our CI process is the Sync step. The step is intended for synchronization of the generated and tested package with the specified server.
To add this step to the Configure Job view, click Add task in the Create tasks section, and select dbForge DevOps Automation – Sync.
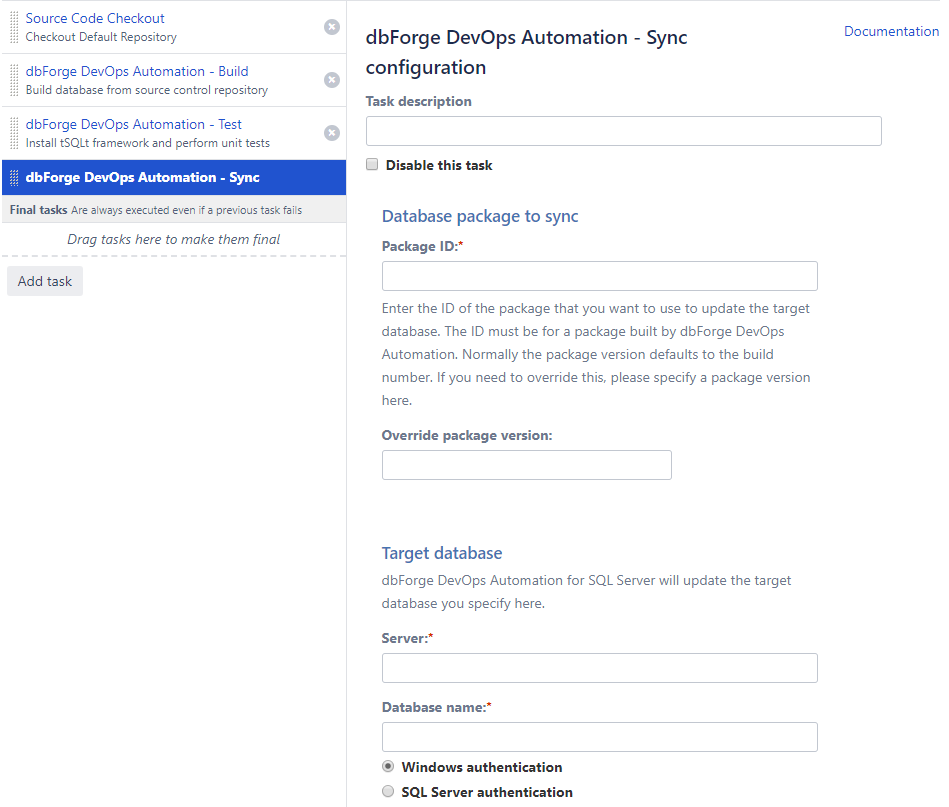
This step includes the following functional sections:
- Database package to sync is the name and the version of the package(generated in the Build step). SQL scripts from this package will be used to deploy to the specified server.
- Target database includes parameters of the connection to the database with which it will be necessary to synchronize.
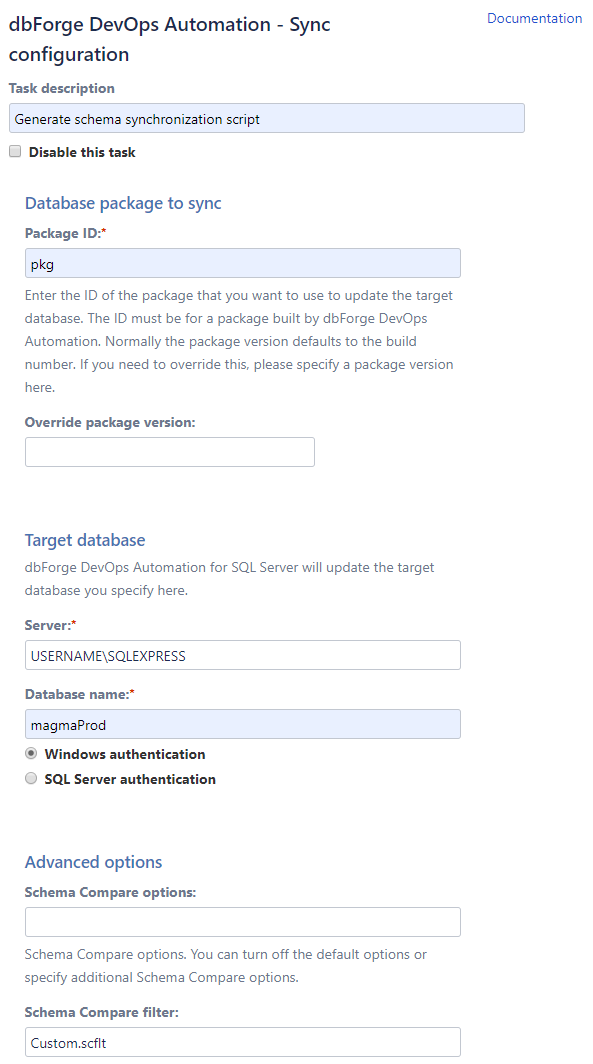
- Advanced options are additional build options (for example, filtering objects for synchronization, or using the options for any comparison and synchronization from dbForge Schema Compare for SQL Server).
Note
Filtering objects during synchronization may be quite handy in many cases. Filtering is done with the help of a filter file (*.scflt), where the filtering rules are set. You can generate this file in dbForge Schema Compare for SQL Server and locate it in VCS, in order to use it in CI process.
Below is an example of configuring the dbForge DevOps Automation for SQL Server – Sync step:
Configure 'Publish a database project' step
The last step of our CI process is Publish. The step is intended for the publication of the formed package to the specified repository.
To add this step to the Configure Job view, click Add task in the Create tasks section, and select dbForge DevOps Automation – Publish.
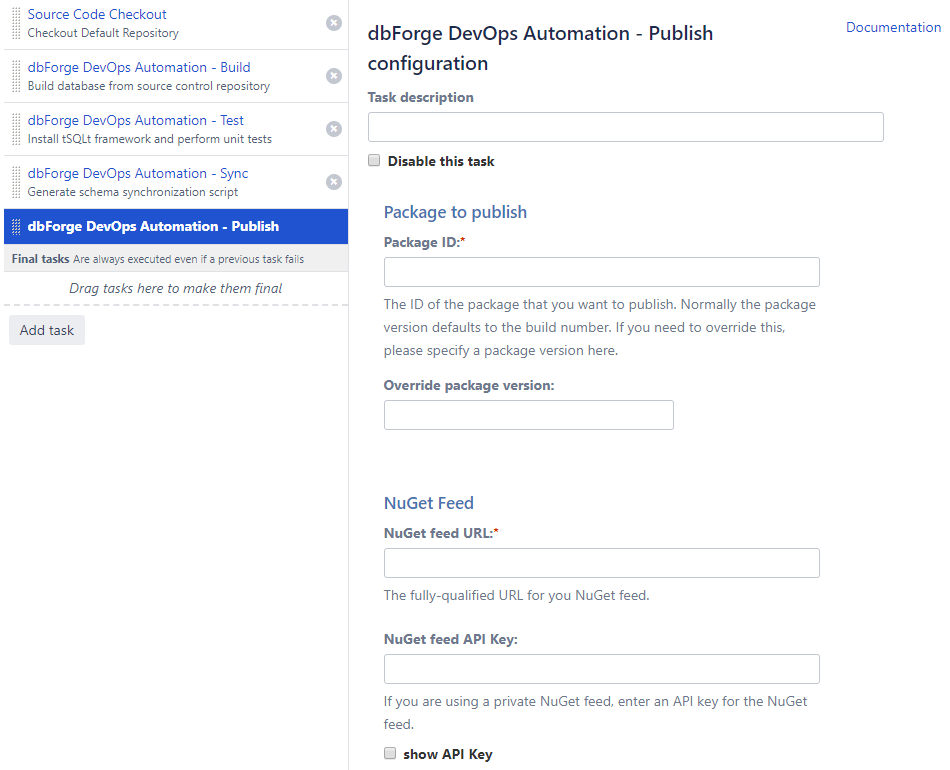
This step involves the following functional sections:
-
Package to publish is the name and the version of the package (generated in the Build step).
-
Feed includes the parameters of the connection to the repository, where the NuGet package needs to be published.
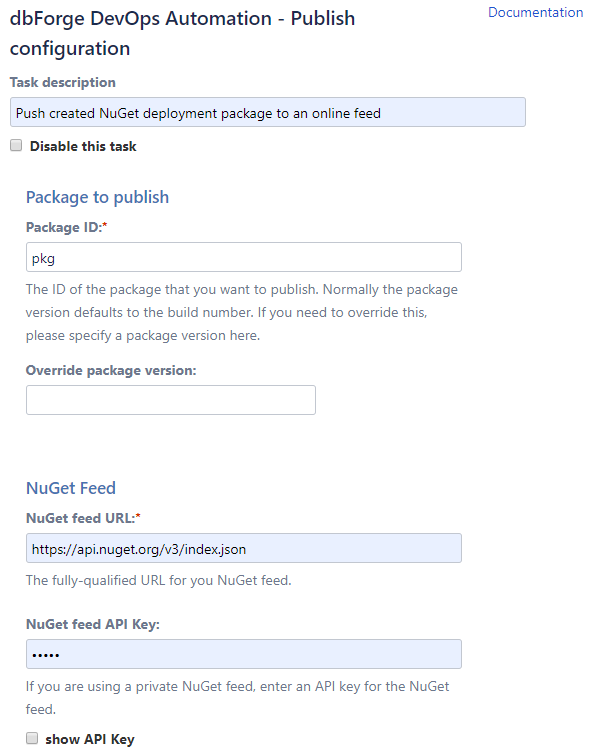
Below, is an example of configuring the dbForge DevOps Automation for SQL Server – Publish step:
Project start and output results
As soon as the project is configured, you can run it. By default, the project is automatically queued for execution, as soon as Bamboo notices new changes in the project repository. But you can run it on your own. For this, click the Run button in the top right corner and then click Run plan:

Then, the project execution will be added to the run queue, and as soon as the appropriate build agent is available, the execution will start. On this page, you can watch the build execution process in real-time:

Information, such as updating source codes from VCS, forming a temporary directory, a detailed log for each build step, and publishing artifacts is displayed in the log.
Also, by clicking the build number in the Recent history section, you can view a detailed log for each of the build steps, including:
- Job result summary:

- Build artifacts:

- Detailed build log:
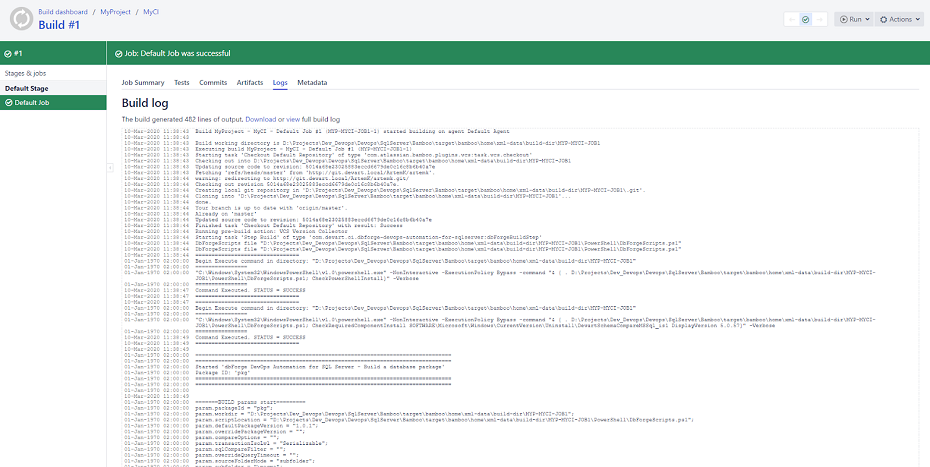
- And other tabs with additional build information (Tests, Commits, Metadata)
Note
With Bamboo, you can also configure mail notification at the end of the project build, setup a flexible trigger system for starting up a current project, and implement post build initiation of dependent projects build, and much more.
Conclusion
We have observed a simple example of the CI process organization with the dbForge DevOps Automation Bamboo Plugin for SQL Server, at the same time this plugin along with dbForge SQL Tools allow you to organize your own agile CI process of any complexity.
Additionally, watch these videos to discover how dbForge products can boost database development.
- How dbForge SQL Complete is involved in the Database DevOps process
- How to import data to SQL Server database with dbForge Data Pump during the DevOps process
- Creating database documentation during the Continuous Integration workflow
- How to automate database schema changes for the CI process during database deployment
- dbForge Source Control in the DevOps pipeline
- How dbForge SQL Complete is involved in the Database DevOps process
- Unit Testing for SQL Server Database in DevOps process