How to deploy changes to a database from version control
There are several ways to deploy changes from a version control repository to a target database.
Manual deployments
Deploy changes with the help of Get Latest in Source Control
Suppose there are two databases - development and production linked to a development repository in the dedicated database development mode. The table1 table in the development database has been modified.
1. In Database Explorer, right-click the local database - development and select Source Control > Commit.
2. In the Local Changes section, select the checkboxes next to the changes you want to commit and click Commit.
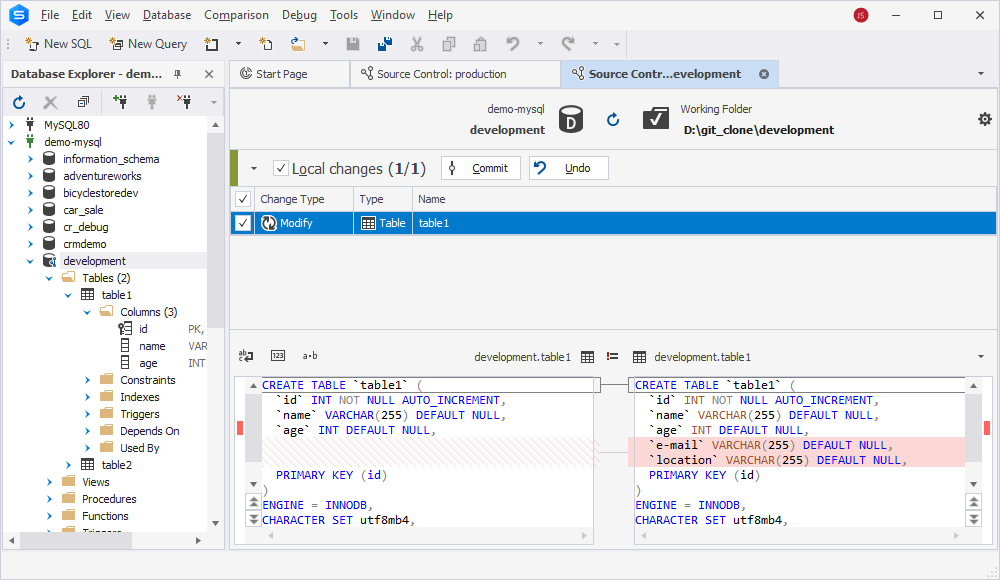
3. The Commit progress window opens, showing the stages of the commit operation. When all the stages are complete, click OK to close the window.
Note
The flow may differ depending on the timeline you link the databases to version control - before or after the commit operation. For more information, see Deploy changes to databases.
4. In Database Explorer, right-click the remote database - production and select Source Control > Get Latest.
Note
If you have modified the same object in both databases, Source Control will mark it as a conflict. To resolve a conflict, go to the Conflicts section, select the object and click Get Remote to apply new changes to the remote database. For more information, see Resolve conflicts.
5. In the Remote changes section, select the object and click Get Latest. For more information, see Get the latest version.
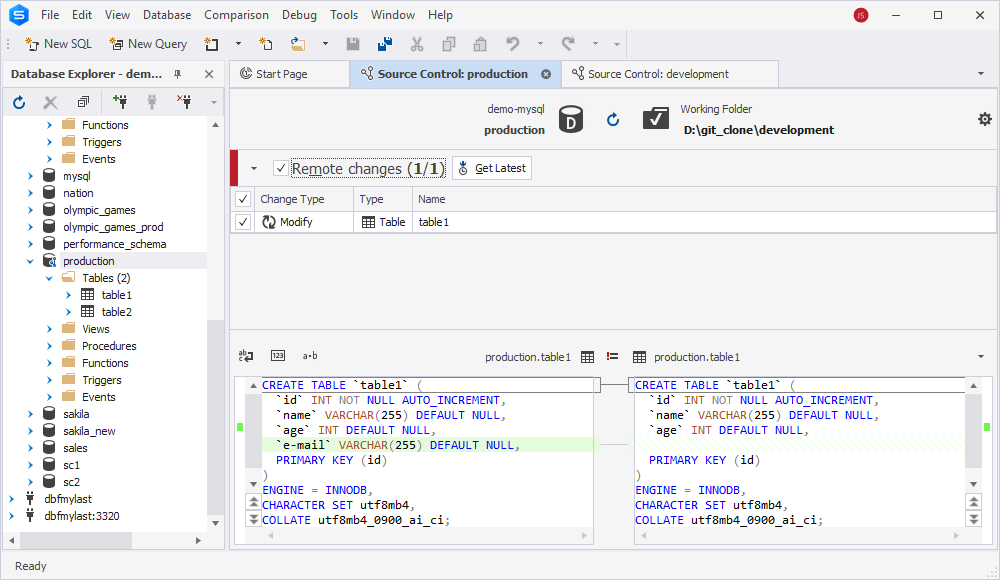
6. Confirm that you want to pull the latest changes and click OK. The Get Latest progress window opens, showing the stages of the operation. When all the stages are complete, click OK to close the progress window. The remote database will be updated with the latest changes.
Deploy changes using Schema Compare
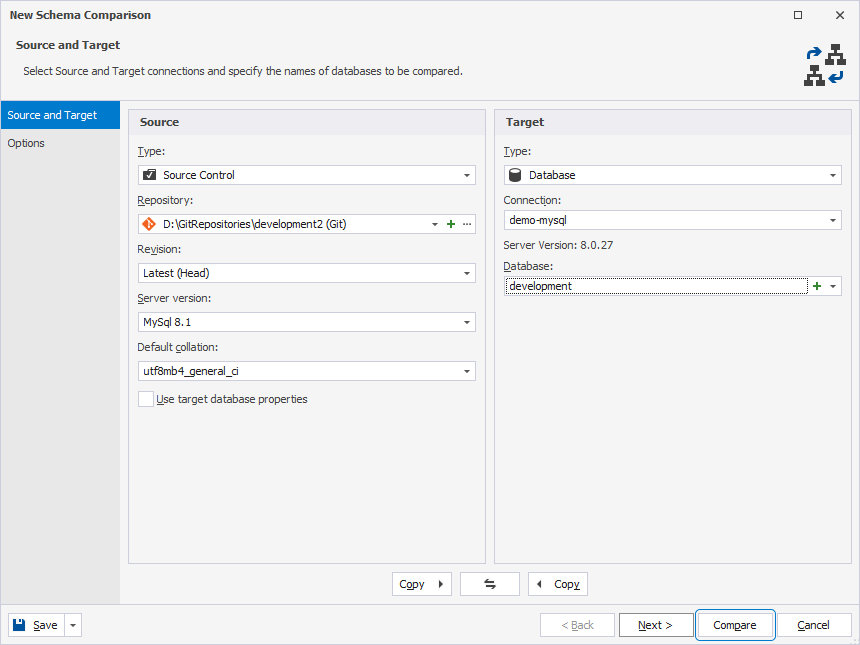
1. On the ribbon, select Comparison > New Schema Comparison to open the wizard.
2. On the Source and Target page of the wizard, do the following:
- Select Source Control as a source type, the required repository, and the revision from version control.
- Select Database as a target type, the required connection, and the database.
4. Click Compare to run the comparison.
5. In the Schema Comparison document that opens, select the objects you want to synchronize and click Synchronize objects to the target database at the top of the page.
6. On the Output page of the Schema Synchronization Wizard, select Execute the script directly against the target database and click Synchronize to deploy the database to the specified revision.
Automated deployments
Deploy changes with the Schema Compare command line
1. Create a copy of the scripts folder on your local machine or check it out from source control.
2. Deploy the local scripts folder to the target database.
For more detailed instructions, see deploying a scripts folder with the dbForge Schema Compare command line.
Deploy changes with a batch file from a scripts folder
Before you start, ensure that you have a scripts folder containing the source .sql files to create the database tables.
1. Create a single SQL file that contains a script to add a new database. The script might be as follows:
set @print:= 'Creating sakila_demo database';
SELECT @print;
USE mysql;

DROP DATABASE IF EXISTS sakila_demo;
CREATE DATABASE sakila_demo;

USE sakila_demo;

source D:\Sakila_demo\actor.sql
source D:\Sakila_demo\category.sql
source D:\Sakila_demo\country.sql
source D:\Sakila_demo\film_text.sql
source D:\Sakila_demo\language.sql
source D:\Sakila_demo\city.sql
source D:\Sakila_demo\film.sql
source D:\Sakila_demo\address.sql
source D:\Sakila_demo\film_actor.sql
source D:\Sakila_demo\film_category.sql
source D:\Sakila_demo\customer.sql
source D:\Sakila_demo\inventory.sql
source D:\Sakila_demo\payment.sql
source D:\Sakila_demo\rental.sql
source D:\Sakila_demo\staff.sql
source D:\Sakila_demo\store.sql

set @print := 'Creation is Completed';
SELECT @print;
where sakila_demo is the sample database to be created, and D:\Sakila_demo\filename.sql is a path to the source file containing the CREATE statement for the sample database table.
2. In any third-party text editor, for example, Notepad or Visual Studio Code, open a new blank document and enter the following script by replacing the parameters with your actual data:
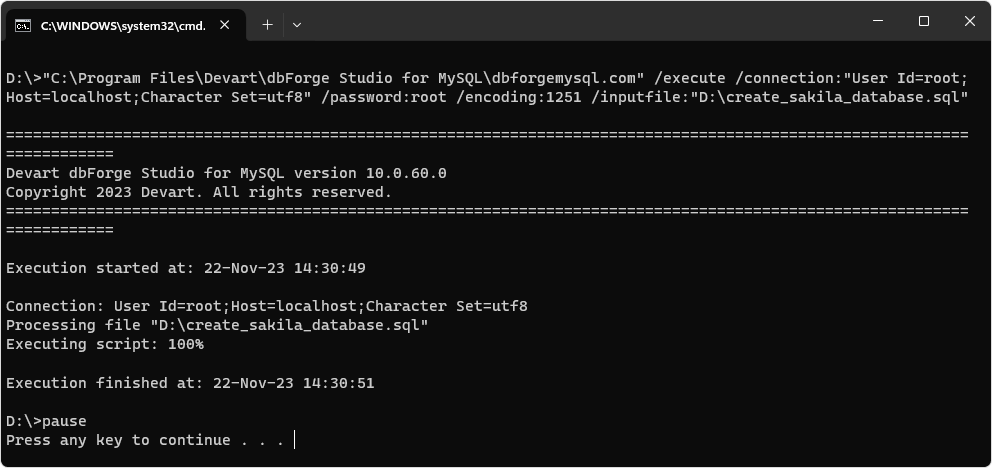
"C:\Program Files\Devart\dbForge Studio for MySQL\dbforgemysql.com" /execute /connection:"User Id=<username>;Host=<hostname>;Character Set=utf8" /encoding:1251 /inputfile:"D:\create_database_file.sql"
pause
| Parameter | Description |
|---|---|
| C:\Program Files\Devart\dbForge Studio for MySQL\dbforgemysql.com | Path to the dbforgemysql.com file, located in dbForge Studio for MySQL installation folder on your PC |
User Id=<username>;Host=<hostname>;Character Set=utf8 |
Connection string that includes a username and a server on which the script will create the specified database |
| D:\create_database_file.sql | Path to the SQL file that contains a script to add a new database |
3. Save the file with the .bat extension.
4. Go to the .bat file location and double-click the file to execute it.
Deploy changes using the mysql command
As an alternative to the batch file, you can deploy the database from the file using the mysql command in the command line.
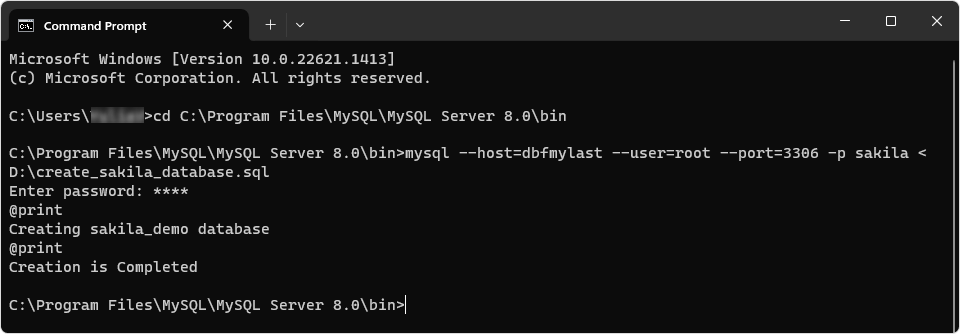
1. Start the Command Prompt.
2. Switch to the MySQL bin directory on your PC using the cd command. The default path is C:\Program Files\MySQL\MySQL Server 8.0\bin.
3. Execute the mysql command to create the database on the target server.
mysql --host=<host_name_or_ip> --port=<port_number> -p -u=<user_name> database_name < <script_file_name>
| Parameter | Description |
|---|---|
| host_name_or_ip | Name of the server you want to connect to deploy the database on |
| port_number | Number of the port |
| user_name | Username to connect to a MySQL target server |
| database_name | Name of the database you want to deploy |
| < | Parameter indicating the process of database recovery |
| script_file_name | Path to a .sql file containing the script to create the database |
Note
The –host and –port parameters are required to use when you connect to a remote server.
4. You will be prompted to enter the password.
Once done, the result might be as follows: