Building and Deploying Project
This topic explains how to build and deploy a project.
Building Project
After you have edited your database project, you should build it to create a script that will deploy all the project changes to the database on the server. A project can be built to a single ready-to-deploy script or a set of scripts with a batch to run it in the MySQL Command-Line Tool.
Note
Your computer might show different names or locations for some of the Visual Studio user interface elements in the following instructions. These elements are determined by your Visual Studio edition and settings. For more information, see Visual Studio Settings.
To build a project:
- Choose a project configuration to build on the Build tab of the Project Properties window. (To open the window, click Properties on the Project menu).
- Right-click in the Solution Explorer window and select Build the Project on the shortcut menu.
Project building is enhanced with the following features:
- Syntax check in project scripts. (If any errors are found, the build is stopped.)
- Check of references to schema objects in all statements.
- Check of any object duplicates.
Project options to customize build results
Before building the project, you can set project options to customize build results.
- Right-click in the Solution Explorer window and select the Properties option, or on the Project menu, click Properties. The Project Properties window opens. It contains three tabs: Build, Build Order, and Database.
- Use the Build tab to define the settings for the generated SQL file with project changes. For example, you can select whether to generate a single SQL script file or a batch script file, etc.
-
The Build Order tab lets you manage the order of files in the build script and deploy execution. You can manage dependencies between objects in different files using build order. For example, table film2 in film_text.Table.sql references table film1 in film_Table.sql, so you should move film_text.Table.sql to locate under film_Table.sql on the Build Order tab.
Note
Actual document look may slightly vary from the above image, depending on the product you use.
- Move to the Database tab to manage target database settings. For example, you can set the Server version to generate SQL statements, using syntax of this server version.

Note
Actual document look may slightly vary from the above image, depending on the product you use.
Deploying Project to Server
To deploy a project, choose project configuration, and click Deploy the Project on the project shortcut menu.
Note
Project files can be deployed only if a connection was assigned to the project.
Deploying an entire project
To deploy an entire project, click Deploy the Project on the Build menu.
Use the Always re-create a database option to guarantee database integrity.
Deploying changes from your project
When you want to deploy only the changes from your project to the server, you should compare your project with the database on the server and create a special schema synchronization script. The script will deploy only required changes to the server.
-
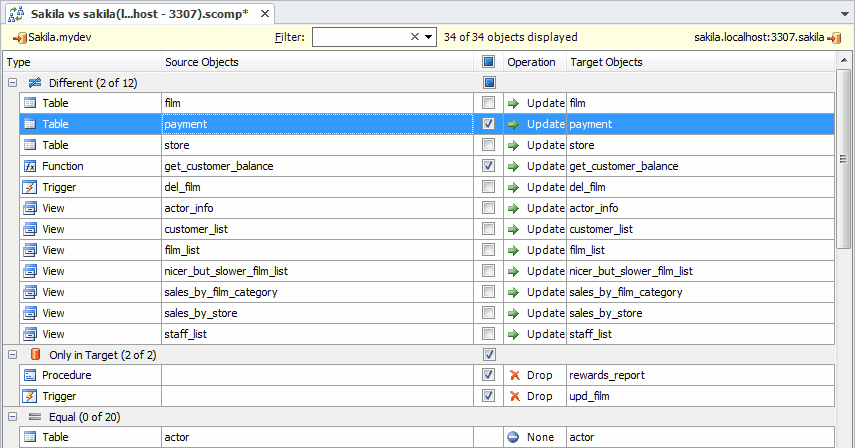
Right-click in the Solution Explorer window and select the Synchronize Project with Server option. The document with comparison results opens.
Note
Actual document look may slightly vary from the above image, depending on the product you use.
- By default, the synchronization actions are automatically selected for each compared object. You can change them, for example, by selecting the Skip action to prevent applying the change.
- On the dbForge Comparison menu, click Synchronize to deploy the project’s changes to the database.
Synchronizing changes from the database on the server with the project
To synchronize changes from the database on the server with your project, do the following:
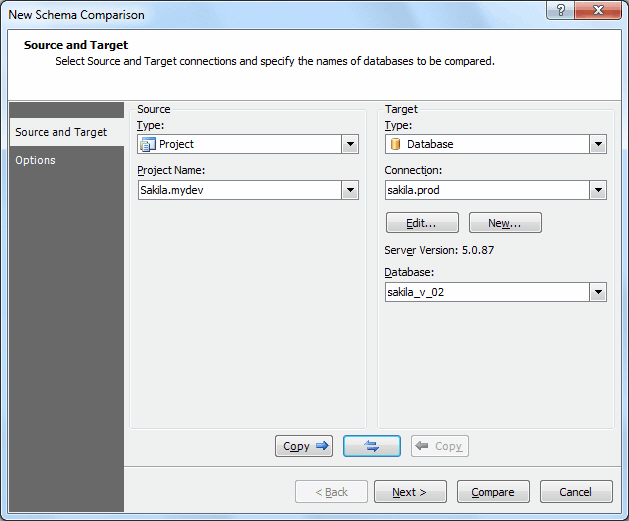
- Right-click the required database in the Database Explorer window, and select New Schema Comparison. The wizard opens.
-
Select the database on the server as Source and your project as Target.
Note
Actual document look may slightly vary from the above image, depending on the product you use.
- Click OK and see the comparison results in the opened window.
- Analyze the differences. By default, the synchronization actions are automatically selected for each compared object, but you can change them, if required.
- Click the Synchronize button on the toolbar to synchronize the database with the project.
While comparing, the project can be either Source or Target. Note, the project is automatically built during comparison, so if any errors occur during this process, the comparison fails.