 Editing Data
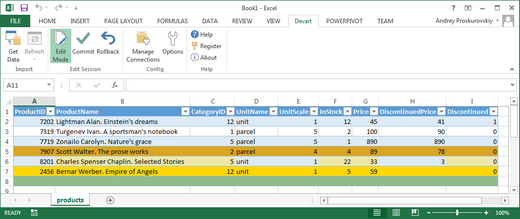
To edit data in the table, an update session must be started. For this, click the Edit Mode button. Now you can edit data in the imported table as you usually do it in Excel. Modified cells will be highlighted in olive by default.
Adding RowsThe simplest way to add rows to the table is to fill the cells of the new empty row, highlighted with green by default, which is at the end of the table, and then press Enter. Or add rows to the table as you usually do it in Excel:
Devart Excel Add-ins underline cells of the new row that require a non-empty value by default. Without values for these columns, the new row cannot be inserted to a data source. Committing will add the new rows to the table in the data source.
Deleting RowsDelete rows from the table as you usually do it in Excel:
Committing will delete the rows from the table in the data source.
Using FormulasYou can use formulas for imported data. For this you need to perform the following actions:
|
 Data Validation
Devart Excel Add-ins provide data validation. It means, that when you are modifying or inserting data in a table, the type of entered data and the type of the column specified at the server side are compared and checked whether they mismatch. In other words, if a column has the type NUMBER (integer), it can't contain any text, dates, etc. If a type mismatch is detected, Devart Excel Add-ins will notify you. For example: |
 Applying Changes
After all needed changes have been made, click the Commit button. If you don't want to apply these changes, you can also close the Execution window and Rollback changes. After this, all your modifications will be undone. After applying or rolling back changes, you can continue editing or switch the Edit Mode off.
If you need to modify another table, click the Get Data button. Select another table and modify the generated SQL query if needed. Repeat the above actions to retrieve and modify the required table data.
Checking for Concurrent Changes
If your modifications don't conflict with any other concurrent changes or you commit your changes forcibly, you will see a generated SQL UPDATE query with all your changes.
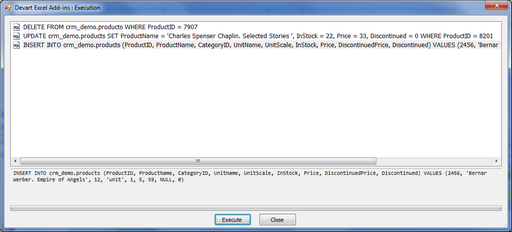
Error HandlingBy default, the generated SQL query is not shown before applying changes. To see the generated query each time before you Commit, go to Devart Excel Add-ins Options and select the corresponding As a result, when the Commit button is clicked, you will see a dialog box, that displays all the INSERT, UPDATE, DELETE statements, generated for the data changes. For example, the following data changes:
will generate the following SQL queries:
In the appeared Execution dialog box, click Execute to apply changes. The SQL query is executed on the server side and the data is updated. |
 See Also

