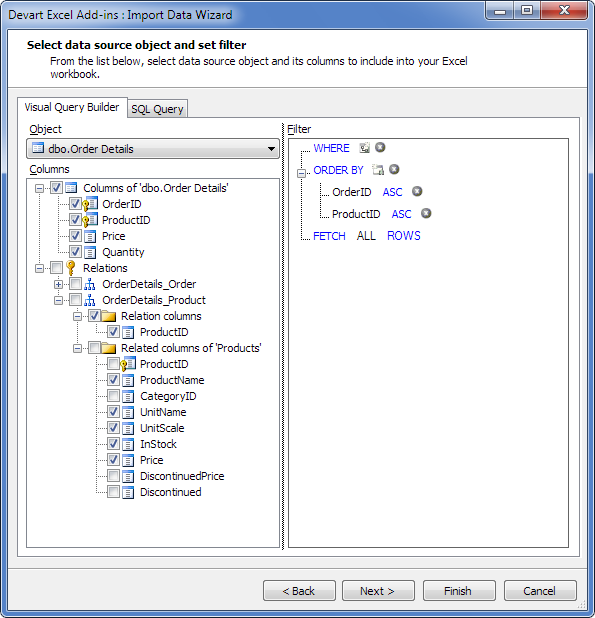
Visual Query Builder is a tool that allows you create any sort of SQL query. It allows you to effortlessly create and edit any complex queries in just several clicks. You don't need to type any code at all, however, if you are an expert in SQL syntax, you can switch to the SQL Query tab and edit the generated query for your needs.
In the Import Data Wizard, switch to the Visual Query Builder tab and select the needed database object (e.g., a table) in the Object list. To quickly find the necessary object in the list, you can also click the Object list and start typing the name of the object to get data from.
After this the object columns and relations are displayed in the Columns tree. Select table columns you want to import or select all columns.
|
|
To be able to modify or delete data in the imported table, make sure to select the Primary Key column  . If there are several Primary Key columns, select all of them. . If there are several Primary Key columns, select all of them.
If you need to insert new rows to the data source and don't want to select all the columns, you must select at least all the required columns from the object. To select all the required columns, right-click the root node in the Columns tree and then click Select all required columns. After this you may select additional columns you want to import data from.
|
Related Tables
To import columns from related tables together with the selected table, select the needed columns from the Relations tree. Note, that you won't be able to make changes to the data of related table columns in the corresponding data source.

After the needed columns are selected, you can filter and order the data, that will be imported, using the WHERE and ORDER BY condition groups.
|
The filter consists of conditions and condition groups.
Condition is a logical expression that compares the specified object values with the values in the data source and returns data, that suits the condition.
Condition group is several conditions or nested condition groups united by a logical operator. Nested condition groups can contain their own nested condition groups and so on. Filter starts from the root condition group, to which you may add conditions or other groups.
Adding a Condition to Condition Group
| 1. | Click the Add Condition button to the right of the group logical operator. |
| 2. | Click <Select a column> and select a table column from the appeared list to filter by. |
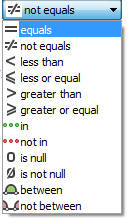
| 3. | Click the = sign and select a comparison operator to compare the value of the required column with the data source. There are standard math and logical operators: |

| • | in (...) - returns data that matches one of the specified values in a range (value1, value2, value3,...); |
| • | not in (...) - returns data that matches none of the specified values in a range (value1, value2, value3,...); |
| • | is null - returns rows that contain empty values of the selected column; |
| • | is not null - returns rows that contain any values of the selected column, but are not empty; |
| • | (...) < between < (...) - returns data that matches values in a range between the specified 2 values; |
| • | not < (...) (...) < between - returns data that matches none of values in a range between the specified 2 values. |
| 4. | Click <Enter a value> and specify the value to compare with. |
Adding a Condition Group
| 1. | Click the Add Group button to the right of the parent group logical operator |
| 2. | Select a group logical operator - And, Or, Not And or Not Or. |
| • | And - returns data matching all the conditions in a group. |
| • | Or - returns data that matches at least one of the specified conditions. |
| • | Not And - excludes data that matches the specified conditions. |
| • | Not Or - excludes data that matches at least one of the specified conditions. |
| 3. | Add conditions and condition groups to the new connection group as described above. |
*To remove a condition or a group from the filter, click the Remove button in the line of the corresponding condition or group.
|
You can sort data by one or more columns. By default, the data is sorted by the Primary Key column ascending (ASC).
To add a column to sort data by:
| 1. | Click the Add a new sort criteria button next to the ORDER BY statement. |
| 2. | Click <Select a column> and select a table column to sort by from the appeared list. |
| 3. | Click ASC and select the needed sorting order. |
In this case, data will be sorted by several specified columns in turn (ordered in the first specified column, then - in the second, etc.).
To change a column to sort data by:
| 1. | In the ORDER BY section click the column name set by default. |
| 2. | Select another column from the appeared list. |
| 3. | Click ASC and select the needed sorting order. |
To remove sorting by a column, click the Remove this sort criteria button to the right of the criteria, or click the Clear all button to the right of the ORDER BY statement.
|
By default, the generated query will fetch all rows that match conditions. The maximum number of rows to import can be limited. This value may be changed in the FETCH ROWS clause, while composing the query. For this, click ALL and specify the required number of rows.
The Maximum row count setting is also available in the Filter section of Devart Excel Add-ins Options.
|
 | | Visual Query Builder |
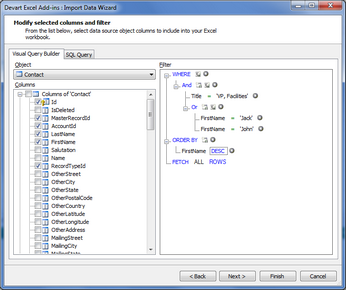
Suppose, we have a table "Contact" and want to get contacts with first name "Jack" or "John" and title "VP, Facilities". For this we should perform the following steps:
| 1. | Select the Contact table from the list of database objects. |
| 2. | Select the columns we want to import: ID (Primary Key), AccountId, FirstName, LastName, Title, etc. |
| 3. | To get only contacts with the title "VP, Facilities" we should add a condition to the WHERE section of the query. Select the Title column and set its value equal to "VP, Facilities". |
| 4. | We need to get contacts, whose names are "Jack" or "John". For this, we should add a new condition group with the logical operator Or inside the existing And condition group, and create 2 conditions in this new condition group. In the first condition, we specify the FirstName value equal to "Jack", and in the second condition - FirstName = "John". |
| 5. | Next we want to sort contacts descending by their names. So, in the ORDER BY section, we select the FirstName column and order it with DESC. |
| 6. | To retrieve ALL the contacts matching our conditions, we don't change the default FETCH ALL ROWS value. Otherwise, if you want to import a definite maximum number of records, just specify this number in this section instead of ALL. |
| 7. | Click Next to preview the table, that will be imported. Or сlick Finish to import data and start editing. |
|
 Selecting Data to Import
 Configuring WHERE Condition
 Configuring Sorting Order
 Number of Fetched Rows
 Example
 See Also

