Classes are basic elements designed for describing the data structure within a model. Classes are composed of properties and describe presentation of high level architecture such as fields and tables of a database. On the diagram, classes are represented as light-blue (by default) shapes, that can be moved, resized, collapsed, etc. Visual presentation of classes on the diagram can be customized, for details refer to Diagram Skins and Shape Colors section.
Classes can be added to the model either by dragging existing tables from the Database Explorer, or by creating a new class manually.
To create a new class manually, use one of the following ways:
| • | Click the New Class button  on the Model toolbar. on the Model toolbar. |
| • | Click the New Class button on the Model Explorer toolbar, this will add a new class to the model only. |
| • | Press ALT+C shortcut keys. |
| • | Right-click the diagram and select New Class from the Add submenu of the shortcut menu. |
| • | Right-click the Classes node in the Model Explorer window and select the New Class menu command, this will add a new class to the model only. |
| • | Select New Class from the Model menu (available in the standalone application only). |
Any of these actions calls the Class Editor dialog where you can set parameters for the class and create class properties.
To create an empty class with the default name:
| • | Press the INSERT key in the Classes node of the Model Explorer window, in this case the class will not be displayed in the diagram area; |
| • | Press the INSERT key in the active digram area, this will add an empty class both in the diagram and in the model. |
To add an existing class from the Model Explorer window to the diagram area together with the objects related to it, right-click the required class in the Model Explorer window and then select the Add On Diagram With Related context menu option.
Apart from dragging objects from Database Explorer to the model, the Database Explorer window has a set of means designed for adding new classes to a model. These means are implemented as context menu options of a table in Database Explorer:
| • | Add To Model - this option adds a table selected in the Database Explorer window to the model, in this case the class will not be displayed in the diagram area; |
| • | Add To Model With Related - this option adds a table selected in the Database Explorer window to the model together with objects related to it; in this case the class and the related objects will not be displayed in the diagram area; |
| • | Add To Storage Model - this option adds a table selected in the Database Explorer window to the storage part of the model, in this case the class will not be displayed either in the diagram area or in the conceptual part of the model. |
|
To edit a class, do the following:
| 1. | Double-click the class on the diagram or in the Model Explorer. The Class Editor dialog box will be displayed. |
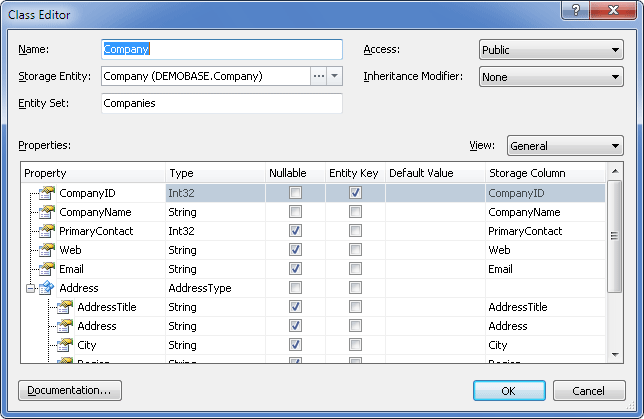
| 2. | In the Class Editor dialog box, set class parameters and edit class properties as required: change property names, types, default values, etc. right in the Properties grid. For more information, see the Class Editor topic. |
|
|
The Storage Entity drop-down list defines the table in the Storage part to which the class is mapped; clicking the three-dotted button calls the Storage Entity Editor dialog that in its turn allows you to edit the storage table. Under the Model-First approach, if synchronization is enabled, together with a new class the corresponding object is immediately created in the Storage part and is available for editing.
Storage column properties can be accessed from the Class Editor dialog by clicking the three-dotted button in the required cell of the Storage Column, this will display the Storage Column Editor dialog box allowing you to edit the storage column as required.
|
| 3. | To add a property, use either the shortcut menu of the Class Properties grid or the INSERT key. The Property Editor dialog will be displayed where you can set the property parameters. For more information on property editing, see the Creating and Editing Properties topic. |
| 4. | To input summary information about the class, go to the Documentation Editor by clicking the Documentation... button. |
| 5. | To change the order of properties within a class, drag the properties to their right places in the class on the diagram or in the Model Explorer window. |
|
To delete a class use one of the following options:
| • | in case you want to delete the class from the diagram area only, select it in the diagram area and press SHIFT+DELETE; |
| • | right-click the required class on the diagram area or in the Model Explorer, and select Delete in the context menu or select the required class and press the DELETE key. |
Entity Developer will then ask you whether you want to delete the object from the model too, and whether the object should be deleted from the conceptual model together with the corresponding storage model objects.
|
The following context menu options are available for Entity Framework classes:
Select Storage - looks for a table in the Storage part, to which the class in the Conceptual model is mapped.
Create Storage and Mapping - for a class in the Conceptual model, this option creates the corresponding table in the Storage part and the corresponding mapping between them. If this option is selected for a class already having a Storage counterpart and mapping, a dialog box will be displayed offering to create the Storage object and mapping anew. In fact this option is a manual call of synchronization for a particular object in the Conceptual model. For more information on how to turn mapping synchronization on and off, refer to Mapping Synchronization topic.
|
Send feedback on this topic
© 2008 - 2026 Devart. All rights reserved.
 Creating a Class