Compare and sync data with a SQL ODBC Linked Server as the source
In this topic, we will provide a detailed guide on how to compare data between two databases that are hosted on separate servers - Oracle and SQL Server. To achieve this, we will first outline the steps to configure an ODBC Oracle Linked Server. Then, we will demonstrate how to use this linked server to compare data between the Oracle database and the SQL Server database.
Note
The topic primarily focuses on utilizing the Devart ODBC Driver for Oracle to establish a connection with an Oracle server and compare data with SQL Server. However, it is important to note that the flexibility of Devart ODBC allows for using any other supported data source as either the source or target. For example, Snowflake can be effectively integrated into the workflow. If you are interested in exploring the full range of available Devart ODBC drivers, you can find a comprehensive list on our website.
What is an ODBC Linked Server
ODBC (Open Database Connectivity) is a standard interface that allows applications to access data from different database management systems (DBMSs) using SQL queries. An ODBC Linked Server is a way to connect to a remote data source from within SQL Server, allowing you to query data from another database system as if it were a local database.
An ODBC Linked Server works by creating a connection to a remote database using an ODBC driver. Once the connection is established, you can execute SQL queries against the remote database as if it was hosted locally. This allows you to join data from multiple sources in a single query, without having to move the data between systems.
How to configure data comparison between the Linked Server and a SQL Server database
Prerequisites:
- A source database that is hosted on an Oracle server
- A target database that is hosted on SQL Server
Step 1: Install and configure the Oracle ODBC driver
1.1 Download Devart ODBC driver for Oracle.
1.2 Launch the downloaded file and follow the installation wizard instructions to install the driver.
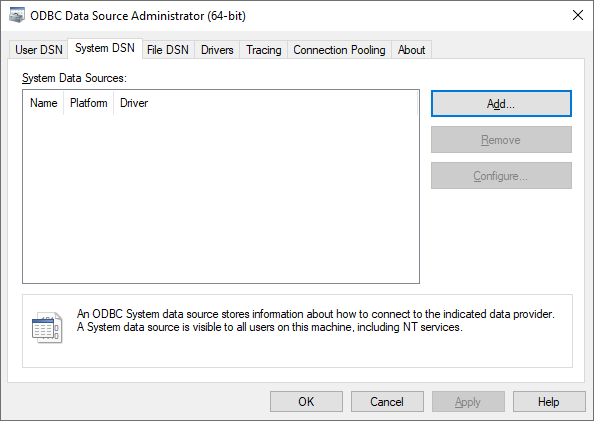
1.3 Once the driver is installed, open the ODBC Data Source Administrator utility on your machine. You can find it by searching for “ODBC Data Sources” in the Start menu.
1.4 On the System DSN tab, click Add to create a new data source.
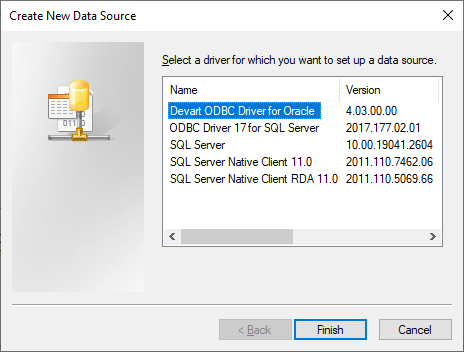
1.5 In the Create New Data Source dialog that appears, select Devart ODBC driver for Oracle and click Finish.
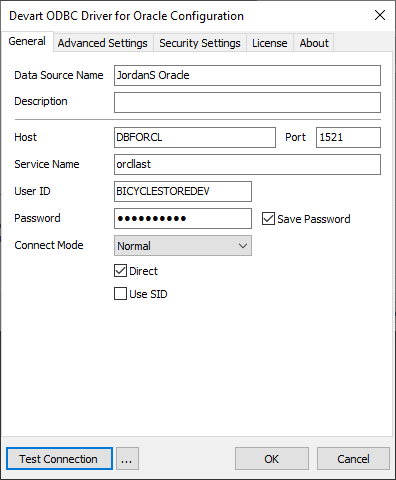
1.6 Next, in the Devart ODBC driver for Oracle Configuration dialog, enter a name for the data source and fill in the required information, including the server name or IP address, the port number, the database name, and the user credentials.
Note
If you choose to use a direct connection, you will need to select the Direct checkbox during the configuration process.
1.7 Once you have entered all the required information, click Test Connection to verify that the ODBC driver is properly installed and configured.
1.8 If the test is successful, click OK to save the data source. You can now use this data source to connect to the Oracle server from other applications, such as SQL Server.
Step 2: Configure the Linked Server in SQL Server
To configure the linked server in SQL Server, follow these steps:
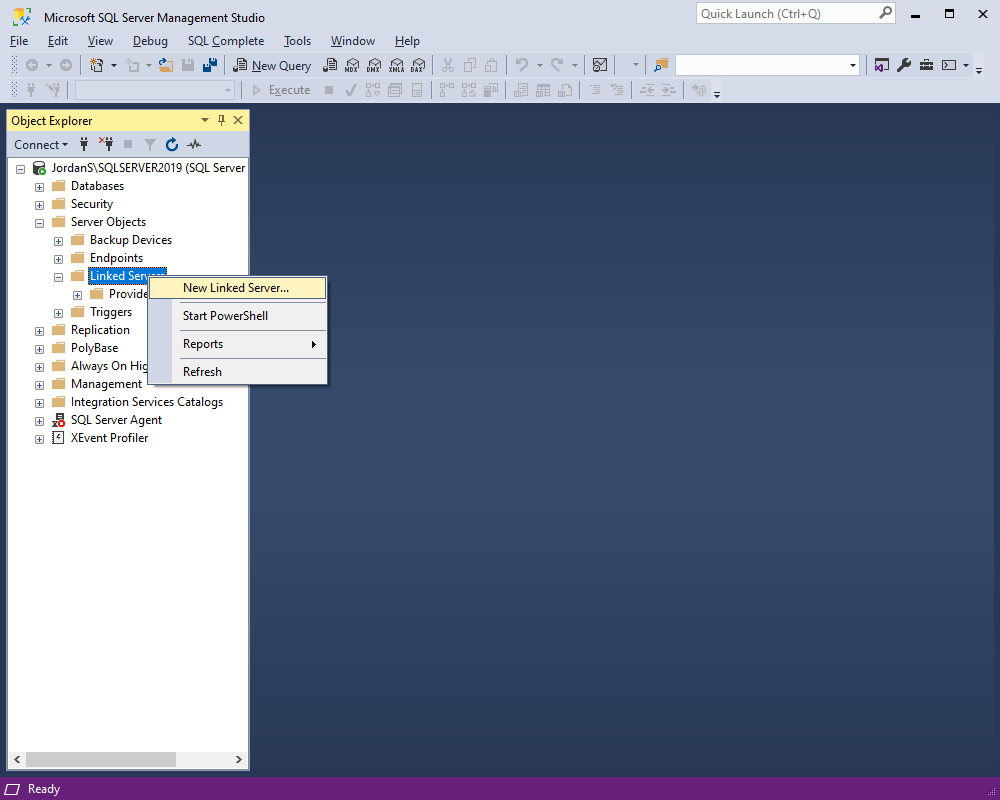
2.1 Open SQL Server Management Studio and connect to the SQL Server instance.
2.2 Expand the Server Objects node in the Object Explorer pane, right-click Linked Servers, and select New Linked Server from the context menu.
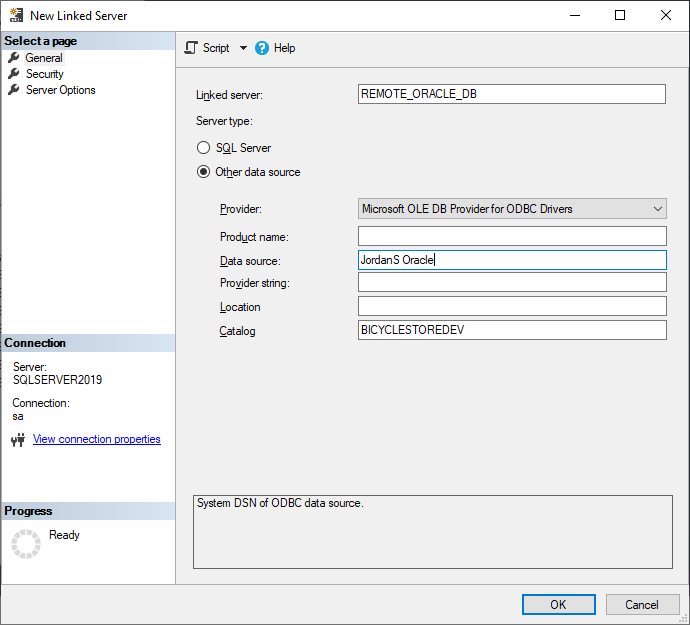
2.3 In the New Linked Server dialog, provide the necessary configurations for the linked server:
- In the Linked server field, enter a name for the linked server.
- Under Server type, select Other data source.
- In the Provider drop-down list, select Microsoft OLE DB Provider for ODBC drivers.
- In the Data source field, enter the name of the Oracle ODBC data source that you created earlier.
- In the Catalog field, enter the name of a database residing on the Oracle server.
Click OK to save the linked server configuration.
2.4 Expand the corresponding node in Object Explorer to make sure that the linking process was successful - you should be able to see the database tables associated with the linked server.
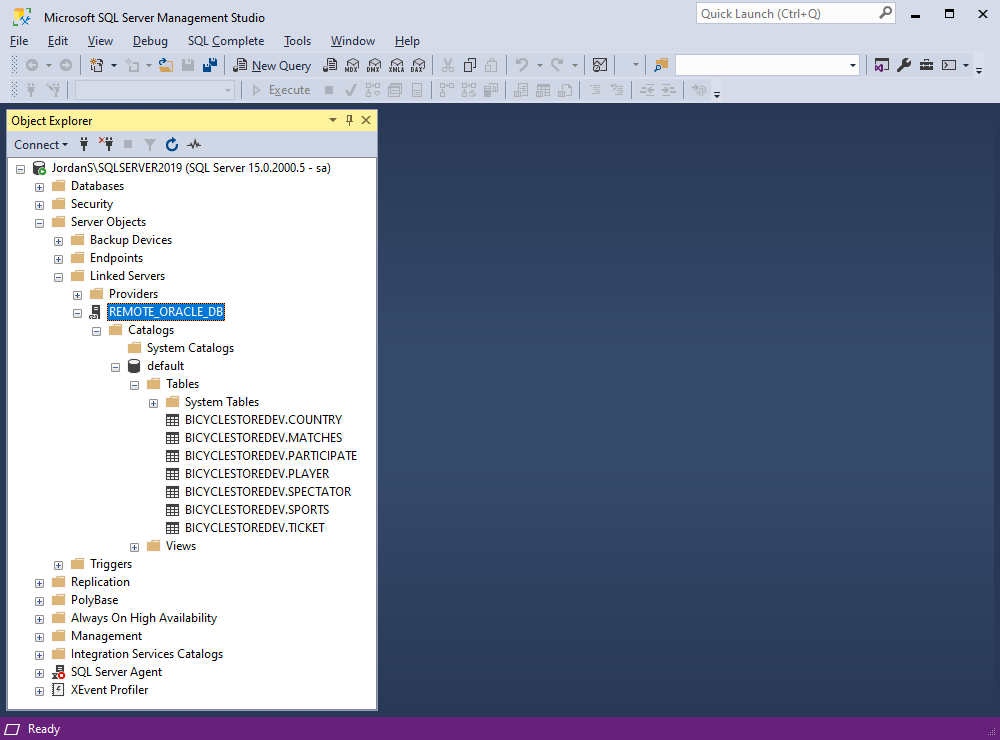
Once you have configured the linked server, you can use it to access the Oracle database from SQL Server.
Step 3: Compare data between the SQL Server and Oracle databases
Working with linked servers in SQL Server
To work with data from the linked server in SQL Server, you can use standard T-SQL statements to query the data from the linked server. Here’s an example of how to retrieve data from a table in the linked database:
SELECT * FROM [<linked_server_name>].[<database_name>].[<schema_name>].[<table_name>];
When working with object names in SQL Server, they typically consist of four parts. Two of these parts - [<linked_server_name>] and [<table_name>] - are required, while the other two - [<database_name>] and [<schema_name>] - are optional.
For example, Oracle does not have a traditional concept of a database, so when querying data from an Oracle table using a linked server in SQL Server, you would use the following syntax:
SELECT * FROM [<linked_server_name>]..[<schema_name>].[<table_name>];
In MySQL, there is no concept of a schema like there is in SQL Server, so when querying data from a MySQL table using a linked server in SQL Server, you would use the following syntax:
SELECT * FROM [<linked_server_name>].[<database_name>]..[<table_name>];
How to compare data between databases using a linked server as the Source
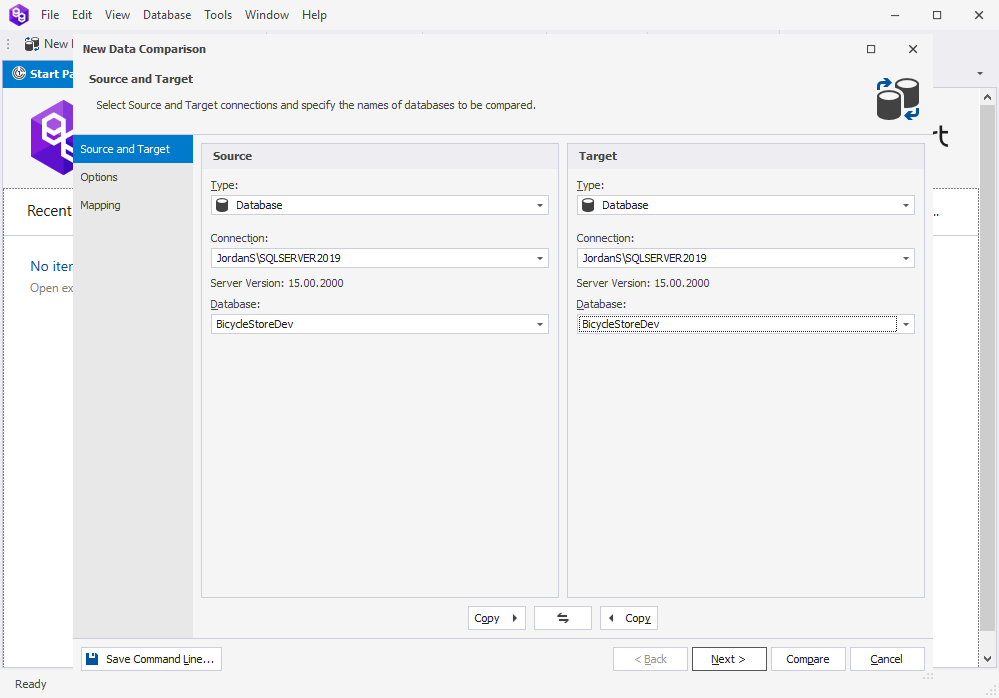
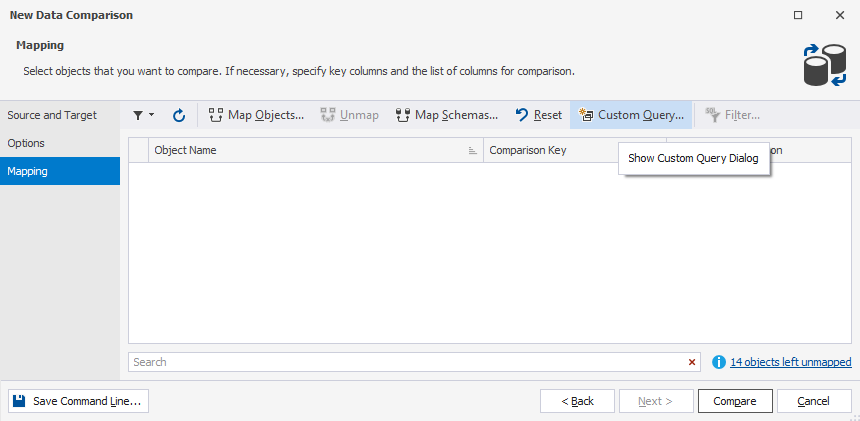
3.1 Open dbForge Data Compare for SQL Server and launch New Data Comparison.
3.2 In the New Data Comparison wizard, for both Source and Target select the database that resides on SQL Server.
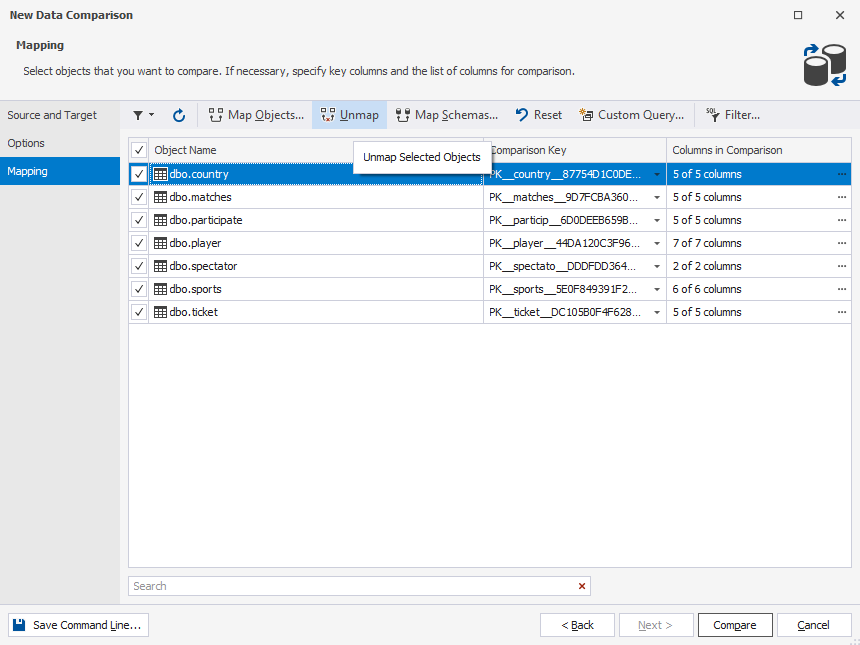
3.3 On the Mapping page of the wizard, unmap all the tables.
3.4 Click Custom Query on the ribbon menu.
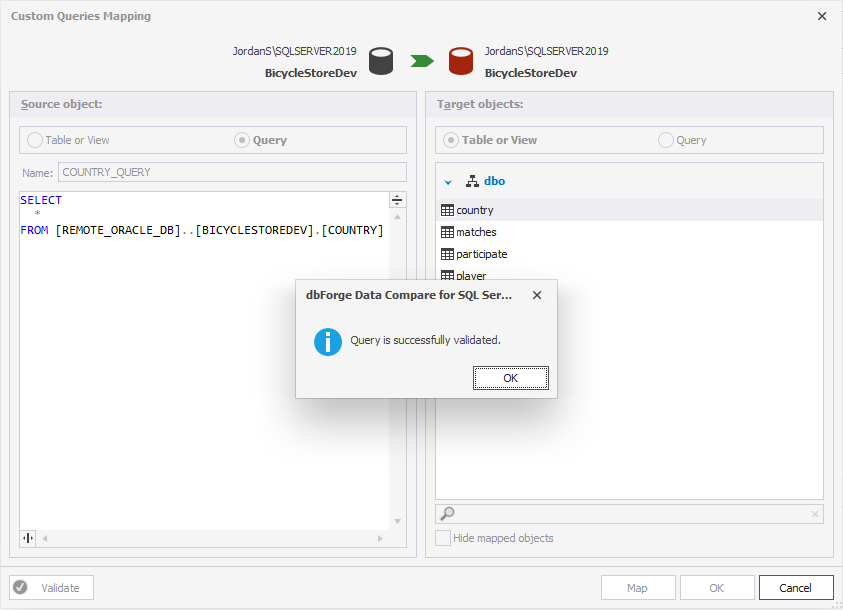
3.5 Under Source object, select Query and enter the following query:
SELECT * FROM [REMOTE_ORACLE_DB]..[BICYCLESTOREDEV].[COUNTRY]
Next, under Target object, select Table or View and then select the country table in the list that will appear. Click Validate to check the mapping. If it is successful, click OK.
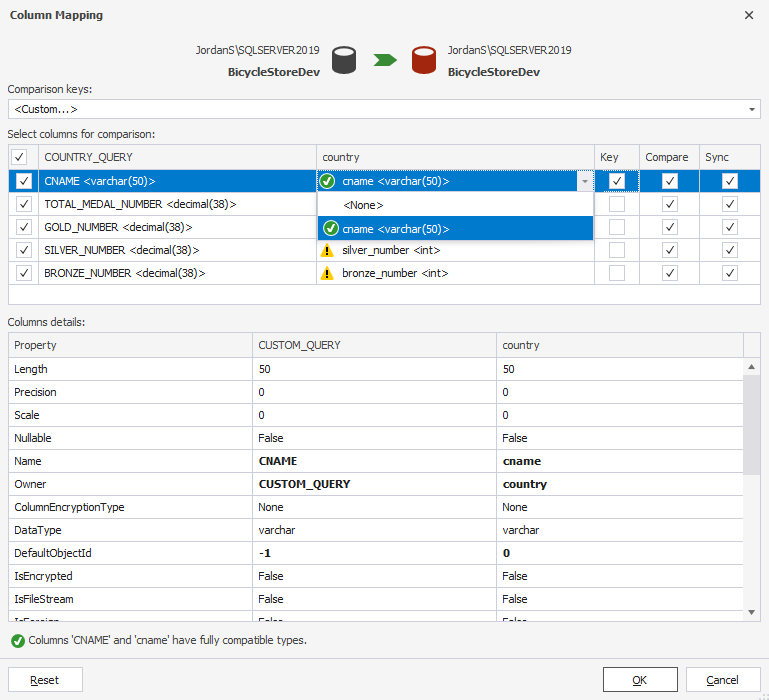
3.6 Now we need to map columns and set a comparison key. For this, select Custom in the Comparison Key drop-down.
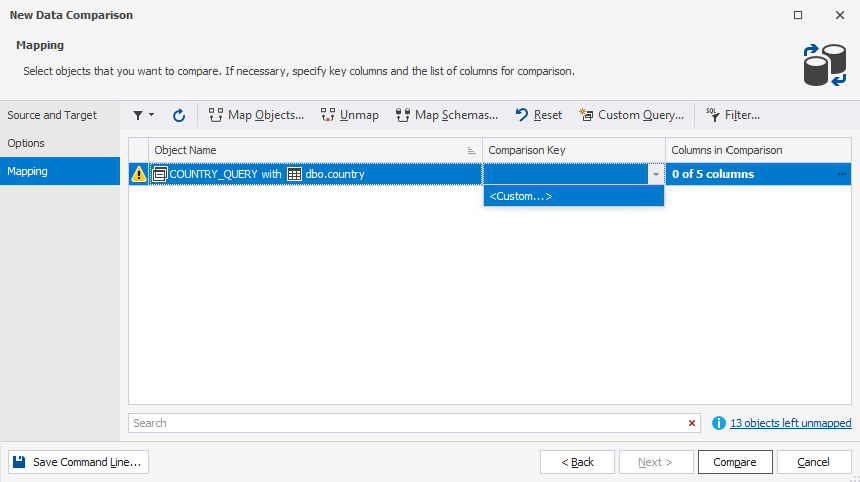
Then, in the Column Mapping dialog that appears map the source and target columns and select a comparison key.
3.7 Follow the same steps (3.4-3.6) for any additional tables that you want to include in the comparison.
3.8 Once done, click Compare.

Afterward, you can manipulate the results of the comparison and synchronise the source and target as you usually do.
Note
You can not use the linked server as a target since it is not possible to synchronize source with the custom query results.
Object reference variations
Connecting to various DBMSs through ODBC and Linked Server follows a consistent approach, but it entails a subtle nuance. When referring to objects on the remote server in queries, the designated format is:
SELECT * FROM [<linked_server_name>].[<database_name>].[<schema_name>].[<object_name>]
However, certain DBMSs lack the DATABASE component (e.g., Oracle), while others omit the SCHEMA (MySQL), and some possess neither (Salesforce).
To accommodate these scenarios, the object references undergo the following transformations:
1. Cases without a database:
SELECT * FROM [<linkedserver_name>].[].[<schema_name>].[<object_name>]
2. Cases without a schema:
SELECT * FROM [<linkedserver_name>].[<database_name>].[].[<object_name>]
3. Cases without a schema and a database:
SELECT * FROM [<linkedserver_name>].[].[].[<object_name>]
While we used an example of an Oracle database in this topic, you can utilize any other data source. The process for configuring different data sources is described in the How to configure Devart ODBC drivers documentation topic. Also, if you want to learn how to compare PostgreSQL and SQL Server databases using Linked Server, feel free to refer to the Linking and Comparing SQL Server and PostgreSQL Databases article.