Working with Text Editor
The text editor is the word processor of dbForge Data Compare for Oracle. When the text editor is used to edit text, it is referred to as the text editor. When it is used to edit SQL source code, it is referred to as the code editor. You can open multiple code editors to view or/and edit code. A list of all documents open for editing in instances of the code editor is available on the Windows menu.
To open Text editor:
-
On the File menu, click New, and then click File. Alternatively, on the Standard toolbar, click the New File button.
-
The New File dialog box opens.
-
Select either the Text file or the XML file form the General Files section.
The only difference between XML and text editors is that XML editor provides syntax highlighting for XML code. You can customize XML highlighting and coloring in Fonts and Colors, Text Editor, and Options dialog box.
User Interface
Code pane
The area where code or text is displayed for editing. It provides SQL statement completion.
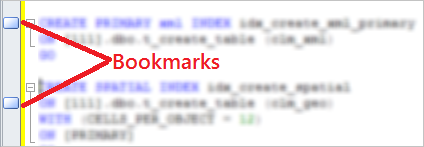
Indicator margin
A gray column on the left side of the code editor where indicators for breakpoints and bookmarks are displayed. Clicking this area sets a breakpoint on the adjacent line of code.
Selection margin
A column between the indicator margin and the editing window where you can click to select lines of code.
Horizontal and vertical scroll bars
Scroll the code pane horizontally and vertically so that you can view the code that extends beyond the viewable edges of the pane.
Text Editor Toolbar
The Text Editor toolbar contains tools related to the code completion features, commenting and uncommenting of code, bookmarks, etc.

Display an Object Member List
Displays a list of valid databases, tables, columns, and other database objects. When a member from the list is selected, you can insert that member into your code by pressing TAB, or by typing a space or period.
Display Parameter Info
This feature opens the Parameters list to give you information about the number, names, and types of parameters required by a function or attribute. The Parameters list also displays parameter information for nested functions. If you type a function as a parameter to another function, the Parameters list displays the parameters for the inner function. Then, when the inner function Parameters list is complete, the Parameters list reverts to displaying the outer function parameters.
To view Parameter Info for functions:
-
After the function name, type an open parenthesis as you normally would to open the Parameters list.
-
dbForge Data Compare for Oracle displays the complete declaration for the function in a pop-up window just under the insertion point. The first parameter in the list appears in bold.
-
As you type the function parameters, the bold changes to reflect the next parameter that you need to enter.
-
Press ESC at any time to close the list, or continue typing until you have completed the function.
-
Typing the closing parenthesis also closes the Parameters list.
Display Quick Info
This option displays the complete declaration for any identifier in your code.
You can manually invoke the Quick Info feature as follows:
-
On the Edit menu, click Code Completion, and then click Quick Info.
-
Use the keyboard shortcut CTRL+K, CTRL+I.
-
Select the Quick Info toolbar button from the Text Editor toolbar.
Display Word Completion
Complete word types the rest of a variable, command, or function name once you have entered enough characters to disambiguate the term. Type the first few letters of the name, and then press ALT+RIGHT ARROW or CTRL+SPACEBAR.
Refresh Local Cache
If you are writing a query on a database while someone else is making changes to the structure of that database, the suggestions offered by dbForge Data Compare for Oracle may become out of date. For instance, if someone has added several tables to a database while you have been connected to that database, these tables will not appear in the suggestions box. To reload the database objects, click Refresh Suggestions. Refreshing suggestions applies only to the database which you are currently connected to.
Reset Suggestions Cache
If you connect to a number of different databases during the same session, dbForge Data Compare for Oracle will load all the objects for each database as required, without unloading any of the previously stored objects. This means that you can go back to the previous queries and continue to see suggestions for any database which you have previously connected to.
dbForge Data Compare for Oracle loads database objects into its memory whenever you connect to a database in order to display suggestions from that database. If you connect to several databases with a large number of objects, this may eventually result in running out of memory. To reset the memory at any time, click Reset Suggestion Cache.
Decrease Line Indent
Removes a tab (or the equivalent spaces) from the selected lines or the current line.
Increase Line Indent
Adds a tab (or the equivalent spaces) to the selected lines or the current line.
Comment out the selected lines
Adds comment characters to the selection or the current line.
Uncomment the selected lines
Removes comment characters from the selection or the current line.
Toggle a bookmark on the current line
Adds or removes a bookmark on the selected line of the document in the active Editor and it does not alter the line of code bookmarked.
Move the caret to the previous bookmark
Selects the previous bookmark. When the first bookmark is reached, jumps ahead to the last one.
Move the caret to the next bookmark
Selects the next bookmark. When the last bookmark is reached, jumps back to the first one.
Clear all bookmarks in current document
Removes all the bookmarks in the current document.
Format Document
Automatically formats SQL code in the currently opened document.
Selecting text and code
You can quickly select a single word, line of text, or multiple paragraphs while you work with the code in the editor. Keyboard shortcuts also let you select text starting from the cursor to any other point in your document.
To select text:
- To select any amount of text, just drag the mouse over the text.
- To select a word, either double-click a word or put your cursor next to word and press CTRL+SHIFT+ either RIGHT ARROW or LEFT ARROW.
- To select a line of text, drag the mouse over a line.
- To select text from the cursor to the start or end of the line, press SHIFT+ either HOME or END.
Editing text and code
The Editor allows you to manipulate text in the same ways as most word processing applications or text editors. For example, you can:
- Copy and Paste text or code inside the editor and between several Editors or between the Editor and other text editing applications.
- Put the Code Editor into the overstrike mode using the INSERT key
- Use the DELETE and BACKSPACE keys to remove text or code
Navigating text and code
There are various ways to move through the text or code in Code Editor using the mouse and navigation keys:
- Use the arrow keys to move one character at a time, or the arrow keys in combination with the CTRL key to move one word at a time. Arrow keys move one line at a time also.
- Click a location with the mouse.
- Use the scroll bars or scroll wheel on the mouse to move through the code.
- Use the HOME, END, PAGEUP, and PAGEDOWN keys.
- Use CTRL+PAGE UP and CTRL+PAGE DOWN to move the insertion point to the top or bottom of the window, respectively.
- Use CTRL+UP ARROW and CTRL+DOWN ARROW to scroll the view without moving the insertion point.
Go to Line command
Use the Go to Line command to a specific line number:
- In the General, Text Editor, Options Dialog Box, select the Line Numbers option.
- With a document open in the Editor, select Go to Line on the Edit menu.
- Enter the line number you want to move to.
Change Text Case in the Editor
You can use menu commands or keyboard shortcuts to convert the case of the selected text to all upper case or to all lower case.
To switch text to upper case:
- Select the text you want to convert.
- On the Edit menu, select Advanced.
- To convert a text to all upper case, choose Make Uppercase, or press CTRL+SHIFT+U. To convert text to all lower case, choose Make Lowercase, or press CTRL+U.
Setting Bookmarks
As the name suggests, bookmarking accelerates your code navigation in the text editor.
There may be some piece of the code where you need to move to very frequently. Generally, you scroll the page and move to that section. However, dbForge Data Compare for Oracle provides great features by which you can move to a particular section very quickly using some shortcut keys. This is called Bookmarking of Code.
You can place a bookmark by clicking on the bookmark icon or use CTRL + B, CTRL + T.
To create or remove a bookmark using the Text Editor toolbar:
- Open a file in the Editor.
- Place the insertion point on the line you want to bookmark.
- Click the Toggle a bookmark on the current line button on the Text toolbar.
To move to a bookmarked line:
- Scroll to the bookmarked line.
- On the Text toolbar, the Move the caret to the previous bookmark and Move the caret to the next bookmark buttons are enabled.
- Click these buttons to navigate to bookmarks in files within the current solution or project.
View White Space and Word Wrap
You can turn View White Space and Word Wrap modes on or off by selecting the corresponding commands on the Advanced submenu of the Edit menu.
View White Space mode displays spaces and tab characters.
Word Wrap automatically displays any portion of a line that extends horizontally beyond the viewable editor area on the next line.
Text Indenting
The Editor provides a text indenting functionality. You can set the indent at some line, thus, when you press ENTER, this indent is set at the next line. To change line indenting, use Increase Line Indent and Decrease Line Indent options.
To increase or decrease indenting, perform the following actions:
- Select the text you want to indent.
- On the Edit menu, select Advanced.
- Select Increase Line Indent or Decrease Line Indent to manage the indentation.
Code Outlining
SQL Editor allows you to hide parts of the code. Outlining marks are shown left of the code editor window. Code blocks which belong to the same structural item can be collapsed by using the minus (-) symbol. Outlined code is not deleted, it is merely hidden from the view.
You can then expand the outlined statement or user-defined region by clicking the plus sign (+) next to the symbol.
Outlining SQL Statements
The statement is outlined in the following cases:
- it spans over two or more lines
- it is a CREATE statement
Nested SQL statement (for example, SELECT in CREATE VIEW) is outlined only if it starts from the new line.
Statement is not outlined if it is very short and takes only one line of the code. Stored code condition and cycle operators are not outlined; the same is about nested BEGIN … END blocks.
User-defined Outlining Regions
You can outline a code block using Regions.
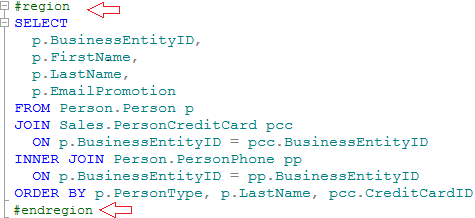
To create a region, type #region command at the start line of the region. No symbols except spaces are allowed at the same line before #region command. A region may have the name, thus, simply specify it after space at the same line. Each region statement has to be closed by the #endregion command. Type #endregion at the beginning of the line determining the region end.
You can create named regions using the #region <region name> and #endregion <region name> commands.
SQL code block grouped by the specified region can be collapsed/expanded by a user. You can create nested regions to operate several SQL code blocks.