Security best practices
This topic describes how to implement SQL Server security best practices with dbForge Studio for SQL Server to protect databases from unauthorized access, data breaches, and other vulnerabilities while maintaining compliance with security standards.
Prerequisites
- dbForge Studio for SQL Server
- A SQL Server instance with administrative access to configure security settings
- A database that you want to secure
Configure secure authentication
You can configure secure authentication methods in Security Manager or SQL Editor to control access to the SQL Server instance.
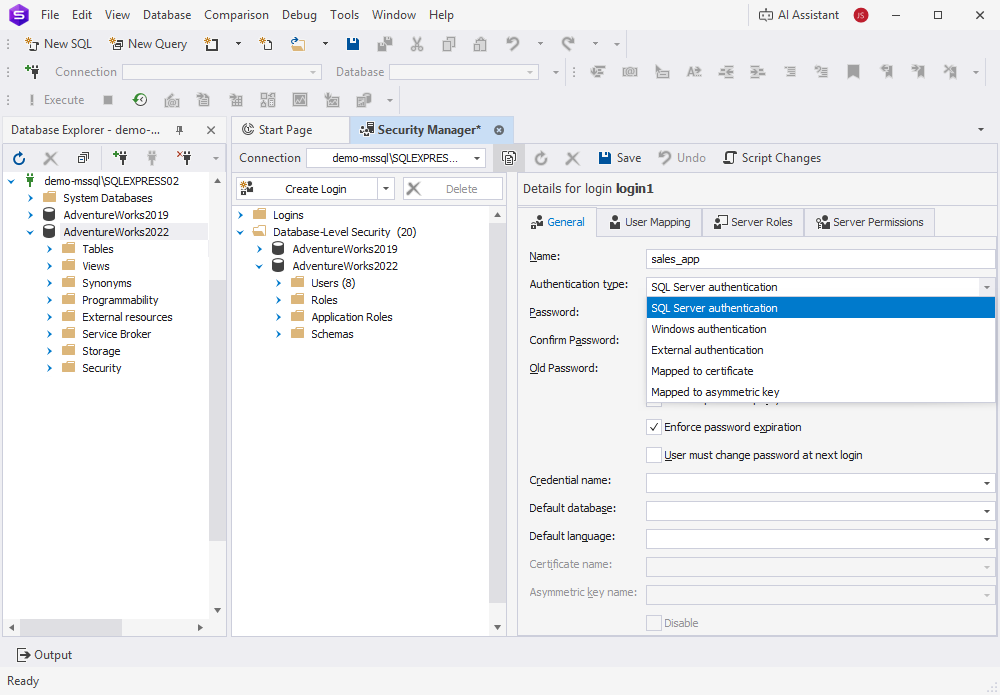
Configure authentication using Security Manager
1. In dbForge Studio for SQL Server, select Database > Security Manager.
2. Create a login.
2.1. In Name, specify the login name.
2.2. In Authentication type, select the required authentication method:
- SQL Server authentication – Enables users to connect by providing a SQL Server-specific username and password.
- Windows authentication – Uses the user’s Windows account for integrated authentication.
- External authentication – Enables connection through Azure Active Directory or other external identity providers.
- Mapped to certificate – Authenticates the user using a database certificate.
- Mapped to asymmetric key – Authenticates the user using an asymmetric key.
2.3. Configure the settings for the selected authentication method as needed.
2.4. Click Save.
Configure authentication in SQL Editor
1. In dbForge Studio for SQL Server, select File > New > SQL.
2. Enter the statement to create a new SQL Server login with password policies.
CREATE LOGIN your_login
WITH PASSWORD = 'your_password',
     CHECK_EXPIRATION = ON,
     CHECK_POLICY = ON;
3. Click Execute.
4. Optional: Disable the sa account to improve security.
ALTER LOGIN sa DISABLE;
Tip
Use Windows Authentication whenever possible to manage credentials centrally through Active Directory.
Implement role-based access control (RBAC)
RBAC grants permissions to roles and assigns those roles to users, which lets you control who can read, write, or administer database objects. In dbForge Studio for SQL Server, you can create users and roles, configure role membership, and manage GRANT and DENY permissions. For more information, see Implement and manage role-based access control in SQL Server.
Encrypt sensitive data
You can use encryption to protect sensitive data from unauthorized access, even if the database files are exposed or stolen. Use Transparent Data Encryption (TDE) to protect the entire database, or column-level encryption to protect selected columns that contain confidential information.
Implement Transparent Data Encryption
Transparent Data Encryption (TDE) automatically encrypts database and log files without requiring changes to applications.
To enable TDE:
1. Create a master key and certificate.
USE your_database_name;
CREATE MASTER KEY ENCRYPTION BY PASSWORD = 'your_masterkey_password';
CREATE CERTIFICATE your_certificate_name
    WITH SUBJECT = 'subject_for_your_certificate';
2. Enable TDE in the database.
USE your_database_name;
GO
CREATE DATABASE ENCRYPTION KEY
    WITH ALGORITHM = AES_256
    ENCRYPTION BY SERVER CERTIFICATE your_certificate_name;
GO
ALTER DATABASE your_database_name SET ENCRYPTION ON;
GO
Note
After you enable TDE, all data written to disk is automatically encrypted. Existing data is encrypted gradually in the background.
Implement column-level encryption
Column-level encryption lets you encrypt specific columns, such as columns that store credit card numbers or personally identifiable information.
To enable column-level encryption:
1. Create a symmetric key for column-level encryption.
USE your_database_name;
GO
CREATE SYMMETRIC KEY your_key_name
    WITH ALGORITHM = AES_256
    ENCRYPTION BY CERTIFICATE your_certificate_name;
GO
2. Open the symmetric key in the current session.
Note
You must open the symmetric key in every session that performs encryption or decryption operations.
OPEN SYMMETRIC KEY your_key_name
    DECRYPTION BY CERTIFICATE your_certificate_name;
GO
3. Add a column to store encrypted data.
ALTER TABLE your_table_name
    ADD encrypted_credit_card VARBINARY(128);  -- Column for encrypted credit card data
GO
4. Encrypt data in the column.
UPDATE your_table_name
SET encrypted_credit_card = ENCRYPTBYKEY(
    KEY_GUID('your_key_name'),
    CAST(credit_card AS NVARCHAR(100))
);
GO
Verify the encryption status
You can check the encryption status and view the encryption keys and certificates.
USE your_database_name;

-- Check TDE encryption status
-- encryption_enabled = 1 -> TDE is ON
-- encryption_enabled = 0 -> TDE is OFF
SELECT
    name AS database_name,
    is_encrypted AS encryption_enabled
FROM sys.databases
WHERE name = 'your_database_name';
GO

-- List the symmetric keys
SELECT name, key_algorithm, create_date
FROM sys.symmetric_keys;
GO

-- List the certificates
SELECT name, subject
FROM sys.certificates;
GO
Back up encryption keys and certificates
You can back up encryption keys and certificates to prevent permanent data loss.
Warning
Store key and certificate backups in a secure location with restricted access. Without these backups, you can’t restore or access encrypted data.
-- Back up the TDE certificate
BACKUP CERTIFICATE your_certificate_name
TO FILE = 'C:\Backups\your_certificate_name.cer'
WITH PRIVATE KEY (
    FILE = 'C:\Backups\your_certificate_name.pvk',
    ENCRYPTION BY PASSWORD = 'your_strong_backup_password'
);
GO

-- Open the symmetric key before backup
OPEN SYMMETRIC KEY your_key_name
    DECRYPTION BY CERTIFICATE your_certificate_name;
GO

-- Back up the symmetric key
BACKUP SYMMETRIC KEY your_key_name
TO FILE = 'C:\Backups\your_key_name.key'
ENCRYPTION BY PASSWORD = 'your_strong_backup_password';
GO
Enable auditing and monitoring
You can enable auditing and monitoring to track database activity, review user actions, and identify unauthorized access attempts. Regular auditing helps maintain compliance with security policies and detect potential threats early. For more information, see Implement and manage role-based access control.
Encrypt backups and restrict access to them
You can encrypt database backups and restrict access to them by using the Backup wizard in dbForge Studio for SQL Server or by running SQL commands in SQL Editor.
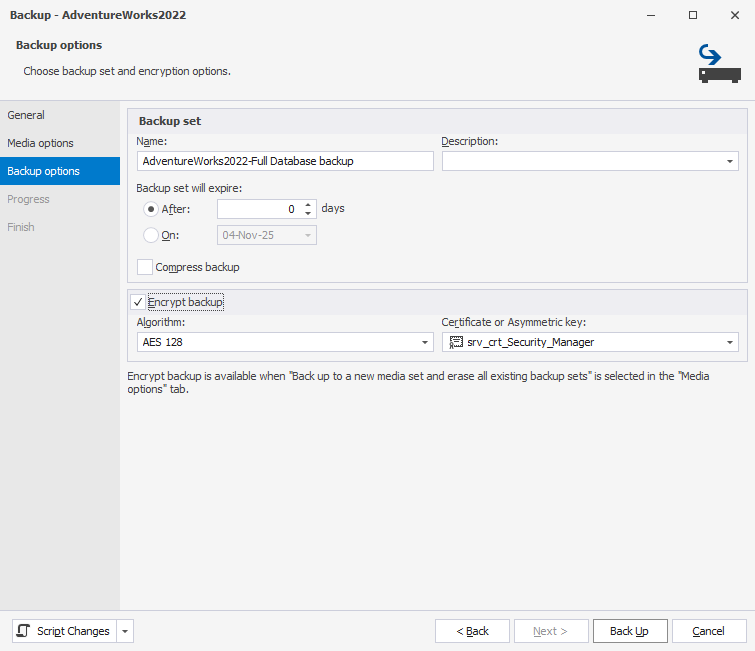
Encrypt a database backup using the wizard
1. In Database Explorer, right-click the database, then select Tasks > Back up.
2. In the Backup Database wizard, on the Media options page, select Back up to a new media set and erase all existing backup sets.
3. On the Backup options page, select Encrypt backup.
4. In Certificate or Asymmetric key, select a certificate or asymmetric key.
5. In Algorithm, select the encryption key algorithm.
Encrypt a database backup in SQL Editor
1. In dbForge Studio for SQL Server, select File > New > SQL.
2. Enter the following code to create an encrypted backup.
BACKUP DATABASE your_database_name
TO DISK = 'C:\Backups\your_database_name.bak'
WITH ENCRYPTION (ALGORITHM = AES_256, SERVER CERTIFICATE = your_certificate_name);
GO
3. Click Execute.
Restrict access to the backup folder
You can limit access to the folder that stores database backups by using Windows file permissions.
Tip
Store encrypted backups in a secure, off-site location. Limit access to authorized personnel only to ensure data confidentiality and compliance with security standards.
To restrict access:
1. In File Explorer, right-click the folder you want to restrict access to, then select Properties.
2. On the Security tab, remove the Everyone and Users groups.
3. In Full Control, enable access for:
- The SQL Server service account
NT SERVICE\MSSQLSERVERorNT SERVICE\MSSQL$<InstanceName> - Database administrators, for example,
DOMAIN\DBA_Team
4. Deny or remove permissions for all other accounts.
Test backup restoration
Run the following code in a non-production environment to verify that the backup can be restored successfully.
RESTORE DATABASE your_test_database_name
FROM DISK = 'C:\Backups\your_database_name.bak'
WITH MOVE 'your_database_name' TO 'C:\Data\your_test_database_name.mdf',
     MOVE 'your_database_name_log' TO 'C:\Data\your_test_database_name.ldf',
     REPLACE;
GO
Monitor and audit security configurations
Monitor and audit SQL Server security settings to manage risks, detect unauthorized activity, and maintain database integrity. For more information, see Implement and manage role-based access control in SQL Server.
Recommendations
| Recommendation | Details |
|---|---|
| Grant minimum required permissions | Give users and roles only the permissions they need. |
| Use Windows Authentication | Whenever possible, use Active Directory for centralized and more secure authentication. |
| Encrypt sensitive data | Protect your data at rest using Transparent Data Encryption or column-level encryption. |
| Enable auditing | Enable auditing to track access to sensitive data and changes to security settings. |
| Secure backups | Encrypt backups and restrict access to backup files. |
| Disable the sa account | Rename or disable the default sa account, and make sure all SQL logins use strong passwords. |
| Apply updates regularly | Keep SQL Server and dbForge Studio up to date to fix known vulnerabilities. |
| Limit server-level roles | Avoid assigning high-level roles, such as sysadmin or securityadmin, to application accounts unless required. |
| Use strong passwords | Enforce complex password policies and regular password changes. |
| Monitor login attempts | Track failed login attempts to help detect possible brute-force attacks early. |
| Limit network exposure | Configure SQL Server to use only required network interfaces and protect access with firewalls. |
| Secure connection strings | Store connection strings securely, preferably in encrypted configuration files. |
| Review permissions regularly | Use Security Manager to review user roles and permissions regularly and remove unnecessary access. |
| Use schema-level permissions | Grant permissions at the schema level to simplify administration. |
| Avoid granting permissions to the public role | Don’t grant permissions to the public role to prevent unintended access to data. |
| Back up encryption keys | Keep encryption keys and certificates in a secure off-site location. |
| Test security in staging | Always test security configurations in a non-production environment before applying them to production. |
| Monitor resource usage | Use the Monitor tool in dbForge Studio to detect unusual activity that might indicate a security issue. |
| Document security policies | Use the Documentation tool in dbForge Studio to maintain up-to-date records of your security settings and policies. |