Archive old data
This topic explains how to archive old data in SQL Server by using table partitioning and dbForge Studio for SQL Server tools, such as SQL Editor, Table Designer, Query Profiler, and Index Manager.
Table partitioning splits large tables into smaller, manageable segments based on a specified key, such as a date. This approach improves archiving efficiency, supports better query performance, and simplifies data management within a single database.
Prerequisites
- A SQL Server instance that supports partitioning: Enterprise or Developer Edition (any version), or Standard Edition (SQL Server 2016 SP1 or later).
- A database with a large table containing data to archive, such as historical orders or logs.
Step 1: Identify partitioning criteria
Determine the partitioning criteria, such as date ranges, to archive old data. You can analyze data distribution in SQL Editor:
1. Open SQL Editor.
2. Run the query to identify data ranges for partitioning.
Tip
Choose a highly selective partition key and define ranges that align with your data retention policy. For example, use
OrderDateas the partition key and retain five years of active data.
SELECT
  YEAR(orderdate) AS Year
 ,COUNT(*) AS RecordCount
FROM Orders
GROUP BY YEAR(orderdate)
ORDER BY Year;
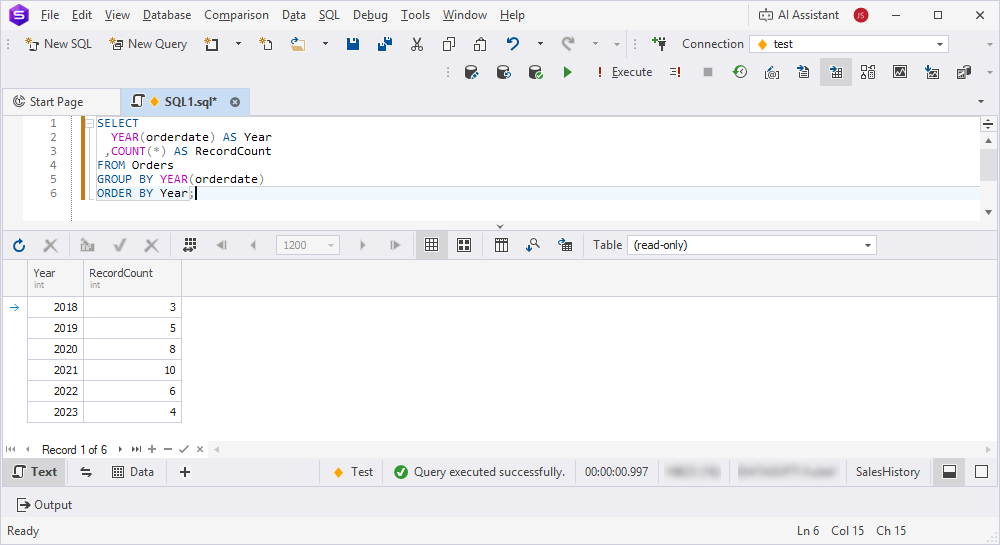
3. Define partition ranges by creating one partition per year for all orders older than a specific year, for example, 2020.
Step 2: Configure filegroups and files for partitions
Configure filegroups and database files to store partitions and improve manageability and performance using Database Editor or SQL Editor.
Configure filegroups and files for partitions in one of these ways:
-
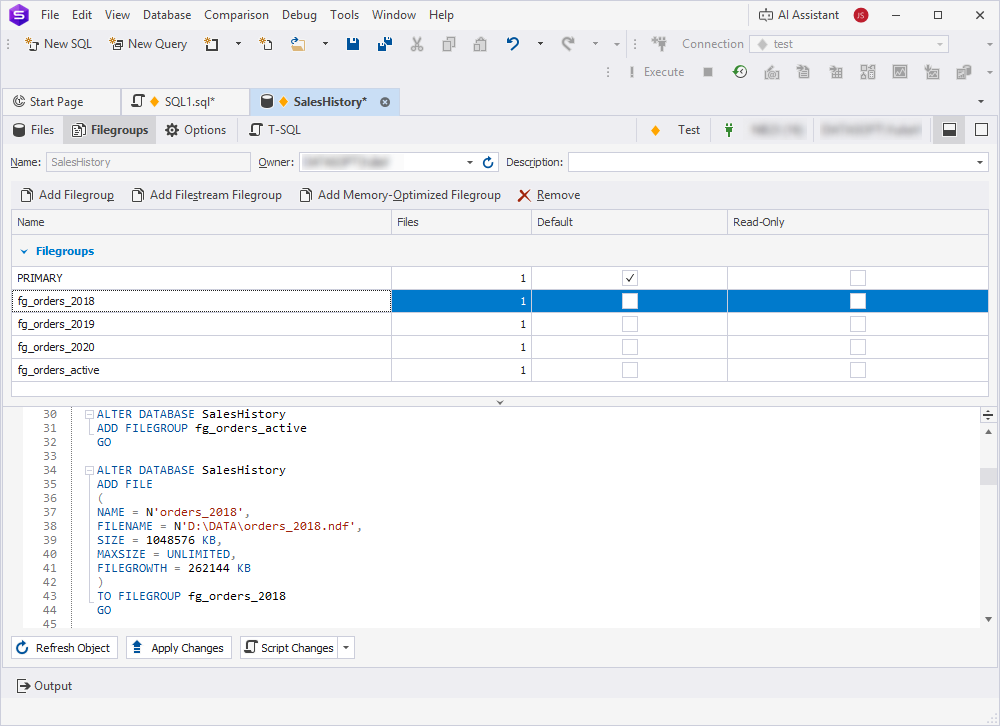
In Database Editor, use the Filegroups tab to create filegroups and the Files tab to add files to each group. You can also enter T-SQL scripts on the T-SQL tab.
-
In SQL Editor, execute the following scripts:
Click to open the scripts
-- Create new filegroups

USE master;
ALTER DATABASE SalesHistory ADD FILEGROUP FG_Orders_2018;
ALTER DATABASE SalesHistory ADD FILEGROUP FG_Orders_2019;
ALTER DATABASE SalesHistory ADD FILEGROUP FG_Orders_2020;
ALTER DATABASE SalesHistory ADD FILEGROUP FG_Orders_active;
GO

-- Add files to the group

ALTER DATABASE SalesHistory
ADD FILE (
NAME = N'orders_2018',
FILENAME = N'D:\DATA\orders_2018.ndf',
SIZE = 1024MB,
FILEGROWTH = 256MB
) TO FILEGROUP FG_Orders_2018;
GO

ALTER DATABASE SalesHistory
ADD FILE (
NAME = N'orders_2019',
FILENAME = N'D:\DATA\orders_2019.ndf',
SIZE = 1024MB,
FILEGROWTH = 256MB
) TO FILEGROUP FG_Orders_2019;
GO

ALTER DATABASE SalesHistory
ADD FILE (
NAME = N'orders_2020',
FILENAME = N'D:\DATA\orders_2020.ndf',
SIZE = 1024MB,
FILEGROWTH = 256MB
) TO FILEGROUP FG_Orders_2020;
GO

ALTER DATABASE SalesHistory
ADD FILE (
NAME = N'orders_active',
FILENAME = N'D:\DATA\orders_active.ndf',
SIZE = 1024MB,
FILEGROWTH = 256MB
) TO FILEGROUP FG_Orders_active;
GO
The filegroups appear under Storage > Filegroups in Database Explorer.
Tip
Store older partitions (for example,
FG_Orders_2018) on slower, cost-effective storage, and keep active partitions on faster disks to optimize performance and resource usage.
Step 3: Create a partition function and scheme
You can use SQL Editor to create a partition function and scheme to split data based on the selected key:
1. Open SQL Editor.
2. Create a partition function to define range boundaries, for example, one partition per year.
Tip
You can use
RANGE RIGHTfor date-based partitioning to simplify range definitions and adjust boundary values based on data volume and retention policy.
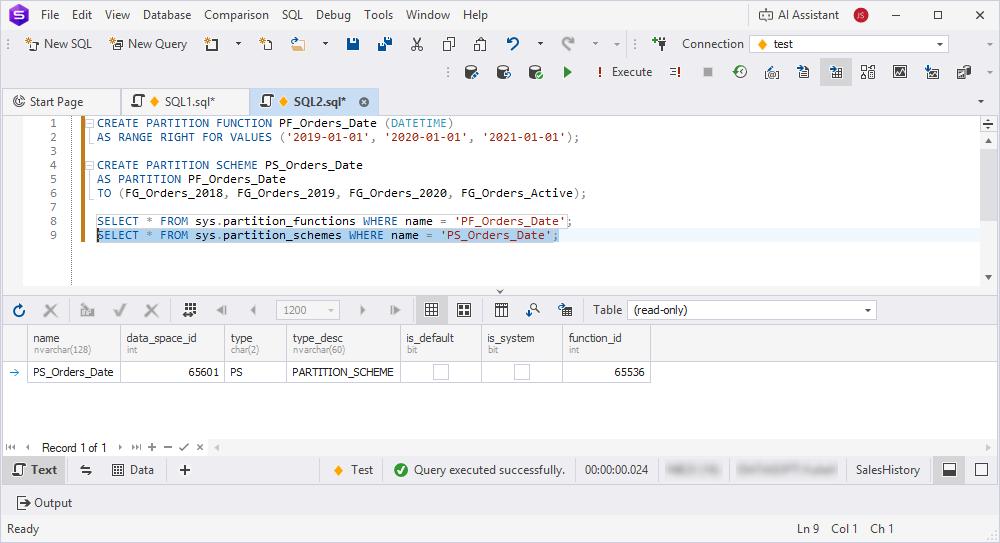
CREATE PARTITION FUNCTION PF_Orders_Date (DATETIME)
AS RANGE RIGHT FOR VALUES ('2019-01-01', '2020-01-01', '2021-01-01');
This configuration creates the following partitions:
date < '2019-01-01'date >= '2019-01-01' AND date < '2020-01-01'date >= '2020-01-01' AND date < '2021-01-01'date >= '2021-01-01'
3. Create a partition scheme to map partitions to filegroups.
CREATE PARTITION SCHEME PS_Orders_Date
AS PARTITION PF_Orders_Date
TO (FG_Orders_2018, FG_Orders_2019, FG_Orders_2020, FG_Orders_active);
Note
Filegroup names indicate the primary year of the data, but the actual contents depend on the partition boundaries:
FG_Orders_2018: All data before 2019-01-01
FG_Orders_2019: Data from 2019-01-01 to 2019-12-31
FG_Orders_2020: Data from 2020-01-01 to 2020-12-31
FG_Orders_active: Data from 2021-01-01 onward
4. Verify the partition function and scheme.
SELECT * FROM sys.partition_functions WHERE name = 'PF_Orders_Date';
SELECT * FROM sys.partition_schemes WHERE name = 'PS_Orders_Date';
Step 4: Partition the target table
You can use Table Designer or SQL Editor to apply partitioning to the target table to distribute data across partitions.
This guide uses three tables:
- Orders – The original table that contains all data. You can partition this table or migrate its data to a partitioned table.
- Orders_Archive – The partitioned table that stores data across filegroups by date.
- Orders_2018_Staging – A temporary table that receives partitions during the archive process by using partition switching.
To partition the target table:
1. Open SQL Editor.
2. Move an existing table to the partition scheme, or create a new table on the partition scheme:
- Existing table: Rebuild the clustered index on the partition scheme.
CREATE CLUSTERED INDEX PK_Orders_OrderDate
ON Orders (OrderDate, OrderID)
ON PS_Orders_Date (OrderDate);
Note
If the table already has a clustered index, drop it before you create the recommended index because a table can have only one clustered index.
- New table: Create the table directly on the partition scheme.
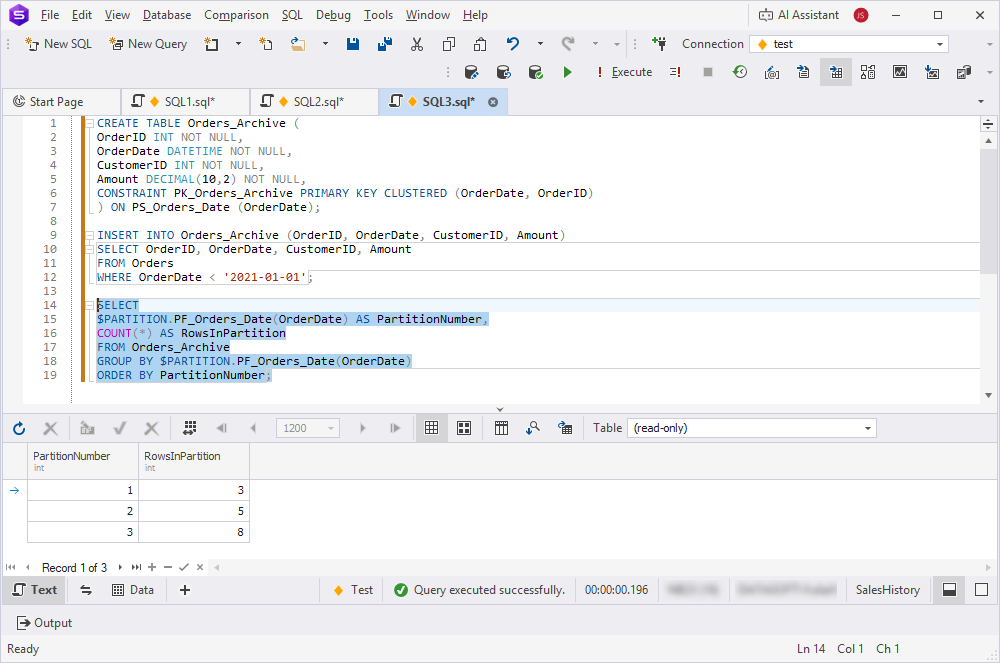
CREATE TABLE Orders_Archive (
OrderID INT NOT NULL,
OrderDate DATETIME NOT NULL,
CustomerID INT NOT NULL,
Amount DECIMAL(10,2) NOT NULL,
CONSTRAINT PK_Orders_Archive PRIMARY KEY CLUSTERED (OrderDate, OrderID)
) ON PS_Orders_Date (OrderDate);
3. If data exists, migrate it to the partitioned table.
INSERT INTO Orders_Archive (OrderID, OrderDate, CustomerID, Amount)
SELECT OrderID, OrderDate, CustomerID, Amount
FROM Orders
WHERE OrderDate < '2021-01-01';
4. Verify the data distribution across partitions.
SELECT
$PARTITION.PF_Orders_Date(OrderDate) AS PartitionNumber,
COUNT(*) AS RowsInPartition
FROM Orders_Archive
GROUP BY $PARTITION.PF_Orders_Date(OrderDate)
ORDER BY PartitionNumber;
Tip
You can use Table Designer to verify table partitioning settings on the Storage tab.
Step 5: Archive old partitions
You can use SQL Editor to switch or merge partitions, move old partitions to read-only filegroups or separate storage for archiving, and configure filegroups as read-only.
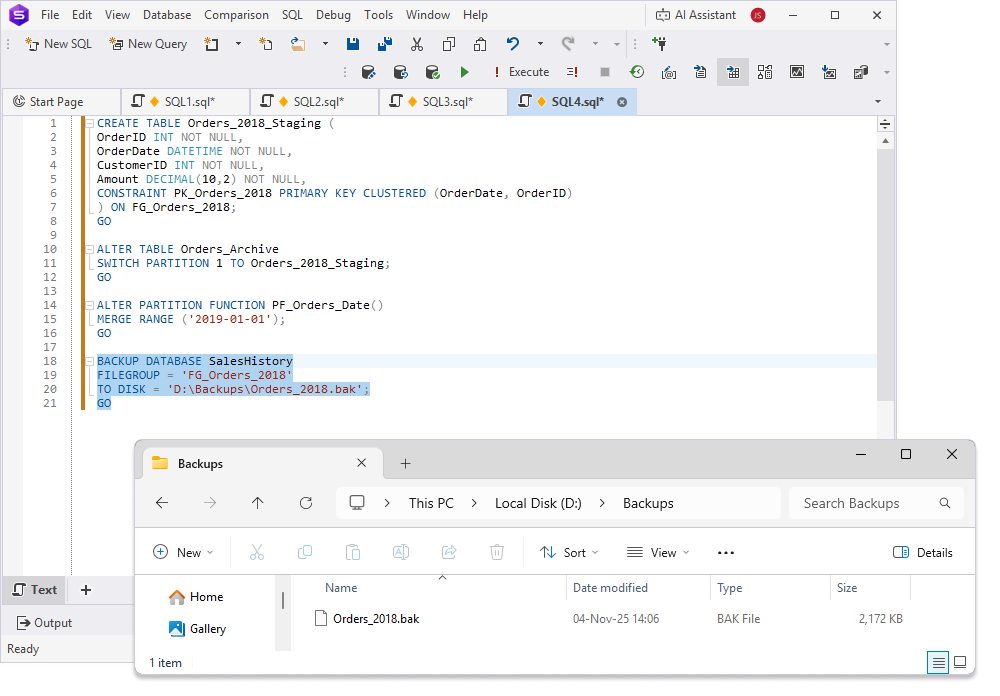
Note
Before you archive old partitions, create the Backups folder where the
Orders_2018.bakfile will be stored.
Warning
For partition switching to succeed, the staging table must meet these requirements:
- Have the same column structure: names, data types, and nullability.
- Be located on the same filegroup as the source partition.
- Have the same indexes and constraints.
- Have a CHECK constraint that matches the partition boundary, for example:
ALTER TABLE Orders_2018_Staging
ADD CONSTRAINT CK_Orders_2018_Date
CHECK (OrderDate < '2019-01-01');
To archive old partitions:
1. Create a staging table for archiving.
CREATE TABLE Orders_2018_Staging (
OrderID INT NOT NULL,
OrderDate DATETIME NOT NULL,
CustomerID INT NOT NULL,
Amount DECIMAL(10,2) NOT NULL,
CONSTRAINT PK_Orders_2018 PRIMARY KEY CLUSTERED (OrderDate, OrderID)
) ON FG_Orders_2018;
GO
2. Switch an old partition to the staging table.
ALTER TABLE Orders_Archive
SWITCH PARTITION 1 TO Orders_2018_Staging;
GO
3. Optional: Merge old partitions to consolidate data.
ALTER PARTITION FUNCTION PF_Orders_Date()
MERGE RANGE ('2019-01-01');
GO
Warning
After a
MERGEoperation, partition numbers are reassigned. For example, partition 2 becomes partition 1, partition 3 becomes partition 2, and so on. Update any scripts or jobs that reference partitions by position.
4. Back up the archived partition or filegroup.
BACKUP DATABASE SalesHistory
FILEGROUP = 'FG_Orders_2018'
TO DISK = 'D:\Backups\Orders_2018.bak';
GO
Tip
You can use partition switching for zero-downtime archiving, because it is faster than copying data.
Step 6: Optimize and maintain partitions
You can use Index Manager and Table Designer to optimize partitioned tables and keep partitions efficient and accessible for queries.
To optimize partitioned tables:
1. Rebuild indexes on active partitions to reduce fragmentation.
ALTER INDEX PK_Orders_Archive ON Orders_Archive
REBUILD PARTITION = 3;
GO
Warning
REBUILD PARTITIONlocks the partition during the operation. For large partitions in production, use anONLINErebuild to reduce downtime (requires Enterprise Edition).
2. Enable compression on older partitions to save space.
ALTER TABLE Orders_Archive
REBUILD PARTITION = 1 WITH (DATA_COMPRESSION = PAGE);
GO
Note
Apply compression to partitions before switching them to staging tables. After the
SWITCHoperation, the source partition is empty.
3. Update statistics for partitioned tables.
UPDATE STATISTICS Orders_Archive;
Tip
You can use dbForge Studio Query Profiler to monitor partition performance and analyze query execution plans.
Match indexes with the partition key, for example,
OrderDateto improve query performance and ensure efficient partition elimination.
Step 7: Automate partition management
You can use SQL Server Agent in SSMS or SQL Editor in dbForge Studio to automate partition creation, switching, and archiving.
Schedule partition management in SQL Server Agent
To create a job in SQL Server Agent:
1. In Object Explorer (SSMS), expand the server where the job will be created.
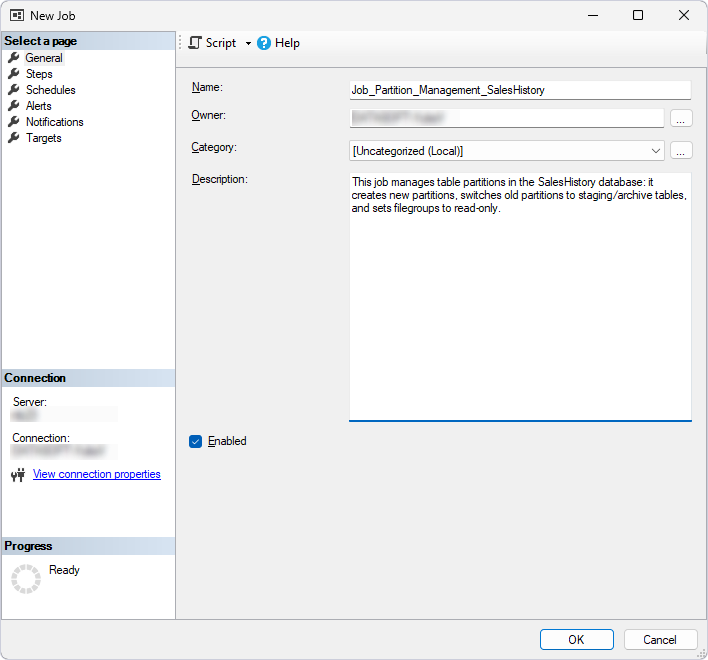
2. Right-click the SQL Server Agent node, then select New > Job. The New Job wizard opens.
3. On the General page, specify the job name and, optionally, a description.
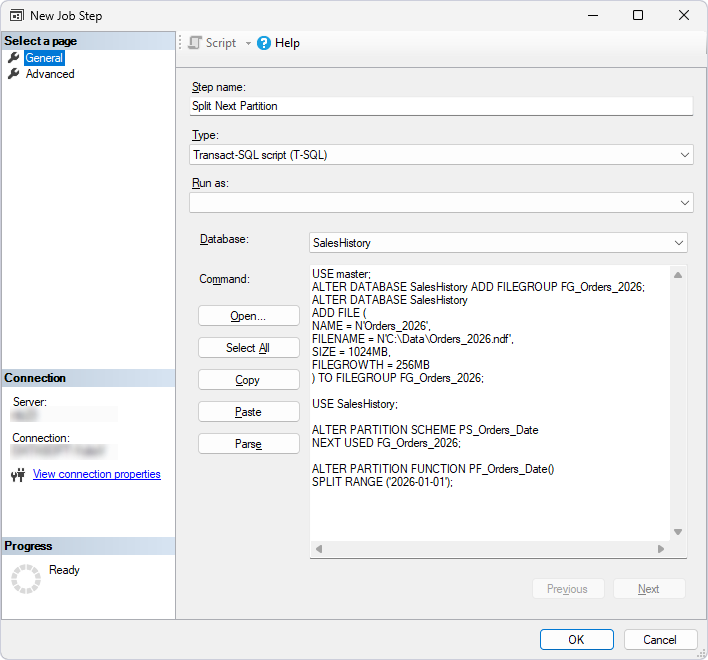
4. On the Steps page, add steps for splitting partitions:
4.1. Click New.
4.2. In Step name, enter the step name, for example, Step 1 – Split Next Partition.
4.3. In Database, select the database.
4.4. In the text box, enter the script.
Note
ALTER DATABASEcan be executed in any database context. However,ALTER PARTITION SCHEMEandALTER PARTITION FUNCTIONmust be executed in the context of the database that contains these objects.
USE master;

ALTER DATABASE SalesHistory ADD FILEGROUP FG_Orders_2026;
ALTER DATABASE SalesHistory
ADD FILE (
NAME = N'Orders_2026',
FILENAME = N'D:\Data\Orders_2026.ndf',
SIZE = 1024MB,
FILEGROWTH = 256MB
) TO FILEGROUP FG_Orders_2026;

USE SalesHistory;

ALTER PARTITION SCHEME PS_Orders_Date
NEXT USED FG_Orders_2026;

ALTER PARTITION FUNCTION PF_Orders_Date()
SPLIT RANGE ('2026-01-01');
Tip
For production environments, calculate the year dynamically to avoid updating the script annually:
DECLARE @NextYear DATE = DATEFROMPARTS(YEAR(GETDATE()) + 1, 1, 1);
DECLARE @SQL NVARCHAR(MAX) = N'ALTER PARTITION FUNCTION PF_Orders_Date() SPLIT RANGE (''' + CONVERT(NVARCHAR, @NextYear, 23) + ''');';
EXEC sp_executesql @SQL;
4.5. Click OK.
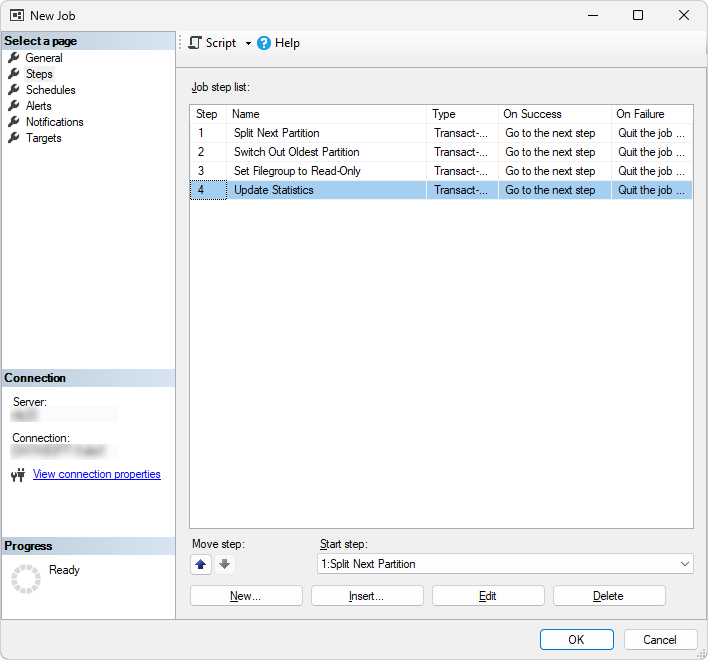
5. Repeat step 4 for each action you want to include in the job.
5.1. Add a step for switching out the oldest partition, for example, Step 2 – Switch Out Oldest Partition.
ALTER TABLE Orders_Archive
SWITCH PARTITION 1 TO Orders_2018_Staging;
5.2. Add a step for configuring a filegroup as read-only, for example, Step 3 – Set Filegroup to Read-Only.
ALTER DATABASE SalesHistory
MODIFY FILEGROUP FG_Orders_2019 READONLY;
5.3. Add a step for updating statistics, for example, Step 4 – Update Statistics.
UPDATE STATISTICS Orders_Archive;
All job steps are added.
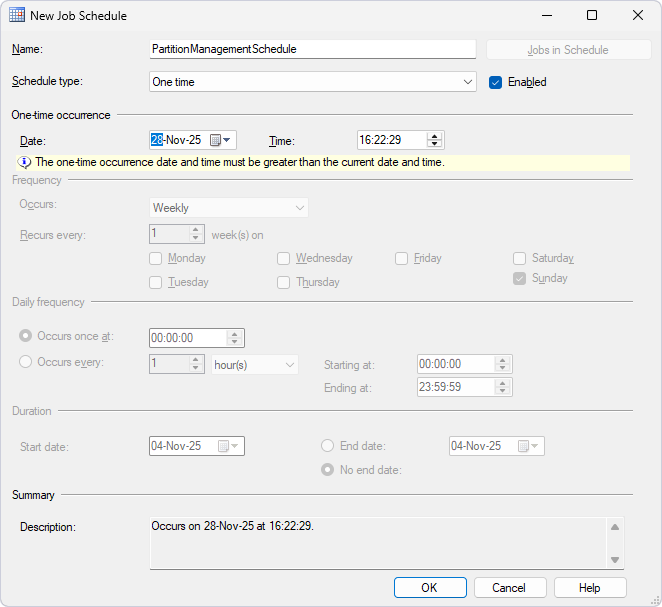
6. Select Schedules.
7. In the New Job Schedule dialog that opens, configure the job schedule.
8. Click OK.
Automate partition management via PowerShell
You can integrate the job into CI/CD pipelines with dbForge DevOps Automation by using PowerShell cmdlets.
Prerequisites
- Download and install dbForge DevOps Automation for SQL Server on your computer.
- Install PowerShell version 3.0 or later.
- Create a .sql file for each step in an empty folder on your computer, for example,
D:\Scripts. The scripts for steps are provided in Schedule partition management in SQL Server Agent
To automate partition management via PowerShell:
1. Open Windows PowerShell ISE.
2. Enter the script.
$serverName = "<server_name>"
$databaseName = "<database_name>"

# Create database connection
Write-Host "Creating database connection..."
$connection = New-DevartSqlDatabaseConnection -Server $serverName -Database $databaseName -WindowsAuthentication $true

# Partition Archiving Job
Write-Host "Partition Archiving Job"
$result = Invoke-DevartExecuteScript -Connection $connection -Database $databaseName -Input <path_to_job_steps>
where:
<server_name>– The name of the server where you want to create the job.<database_name>– The name of the database where the job steps will run.<path_to_job_steps>– The full path to the folder that contains the .sql files for the job steps.
3. Execute the script.
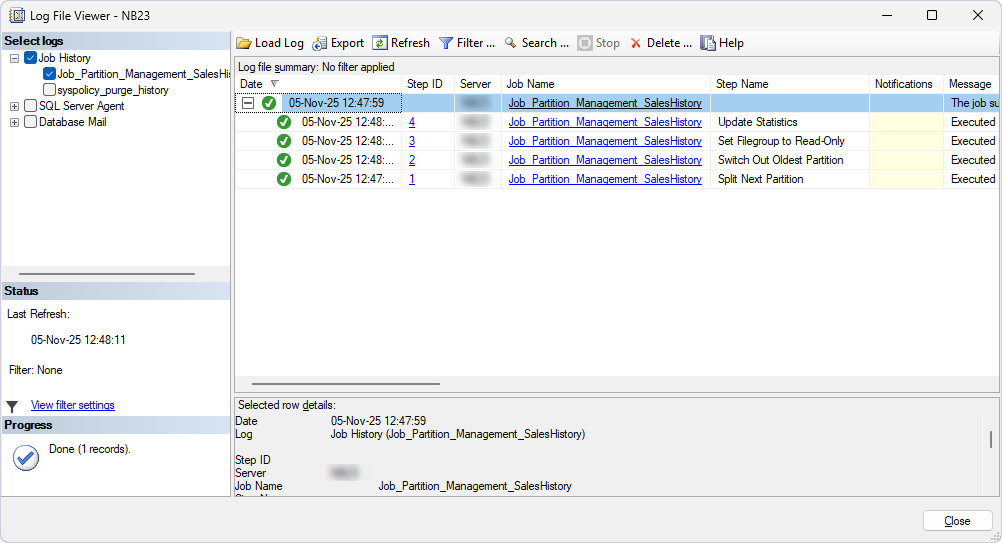
Monitor job execution
You can monitor job execution by using the Log File Viewer dialog in SQL Server Agent.
Tip
You can use dbForge Studio AI Assistant to generate partition management scripts. For example, in the AI chat, enter Create a script that adds a new partition for 2026.
Best practices
Follow these recommendations to optimize data archiving.
| Best practice | Details |
|---|---|
| Choose a meaningful partition key | Use a column with clear range boundaries, such as OrderDate, to support efficient partitioning. |
| Align partitions with retention policies | Create partitions that match retention periods, such as yearly partitions for a five-year retention policy. |
| Use read-only filegroups for archives | Set old archive partitions to read-only to prevent accidental changes. |
| Back up partitions | Back up archived partitions or filegroups to support data recoverability. |
| Enable compression | Apply page compression to older partitions to reduce storage costs. |
| Minimize partition count | Limit the number of partitions to balance manageability and performance. |
| Automate partition maintenance | Schedule partition splitting and archiving with SQL Server Agent. |
| Monitor partition performance | Use Query Profiler to analyze query performance. |
| Document partition strategy | Use the Documentation feature in dbForge Studio to record partition functions, schemes, and schedules. |
| Update statistics regularly | Run UPDATE STATISTICS after modifying partitions to maintain query performance. |
| Secure archived partitions | Restrict access to read-only filegroups by using Security Manager or SQL Editor:GRANT SELECT ON SCHEMA :: <schema_name> TO <role_name>; |
| Use aligned indexes | Partition indexes by using the same partition scheme as the table to avoid performance issues. |
| Plan storage allocation | Allocate sufficient disk space for new partitions and monitor partition growth. |
| Avoid over-partitioning | Avoid creating too many partitions because they can increase overhead. Use manageable ranges, such as monthly or yearly partitions. |
| Test backup restoration | Periodically restore archived filegroups to verify recoverability. |
| Log partition operations | Enable SQL Server Agent logging to track partition maintenance tasks. |
| Optimize query performance | Create filtered indexes on active partitions for frequently queried data. |
| Validate data integrity | After switching partitions, verify the data using Data Compare. |
| Use AI for automation | Use the AI Assistant in dbForge Studio to optimize partitioning scripts. |