How to encrypt data in transit and at rest in SQL Server
Proper encryption keeps sensitive data secure and protects it from unauthorized access, ensuring compliance with security standards.
This guide provides step-by-step instructions for encrypting SQL Server data in transit (over network connections) and at rest (stored in the database) using dbForge Studio for SQL Server.
Prerequisites
- A SQL Server instance with administrative access to configure encryption settings.
- A target database containing sensitive data to encrypt.
Encrypt data in transit with SSL/TLS
To encrypt data transmitted between connections, you need to configure SQL Server to use a certificate.
Create the certificate
1. To obtain or create a valid SSL/TLS certificate, use a trusted Certificate Authority (CA) or create a self-signed certificate for testing.
New-SelfSignedCertificate `
-CertStoreLocation Cert:\LocalMachine\My `
-DnsName "<local_hostname>" `
-NotAfter (Get-Date).AddYears(5) `
-FriendlyName "SQL Server TLS Certificate" `
-KeyUsage DigitalSignature, KeyEncipherment `
-KeySpec KeyExchange
This script generates a self-signed certificate on a machine running SQL Server and installs it in the local machine certificate store.
Note
Run the PowerShell script as an administrator.
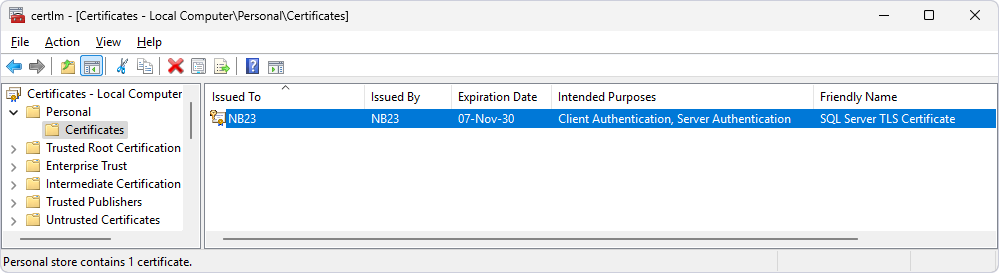
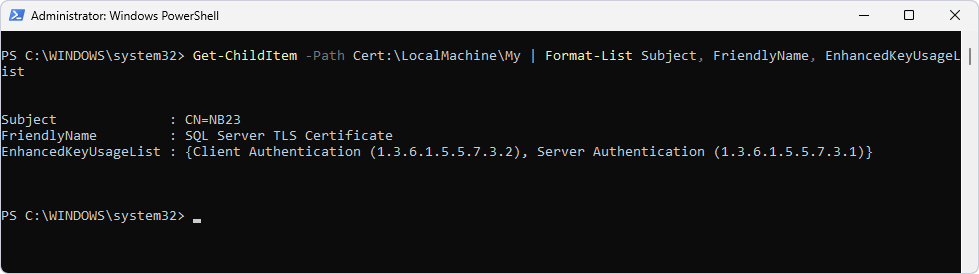
2. Verify the installation of the certificate on the SQL Server machine:
2.1. Press Windows+R to open Microsoft Management Console (MMC).
2.2. Enter certlm.msc.
2.3. Navigate to Personal > Certificates.
Alternatively, run the following PowerShell command to verify the certificate installation:
Get-ChildItem -Path Cert:\LocalMachine\My | Format-List Subject, FriendlyName, EnhancedKeyUsageList
Configure SQL Server to use the certificate
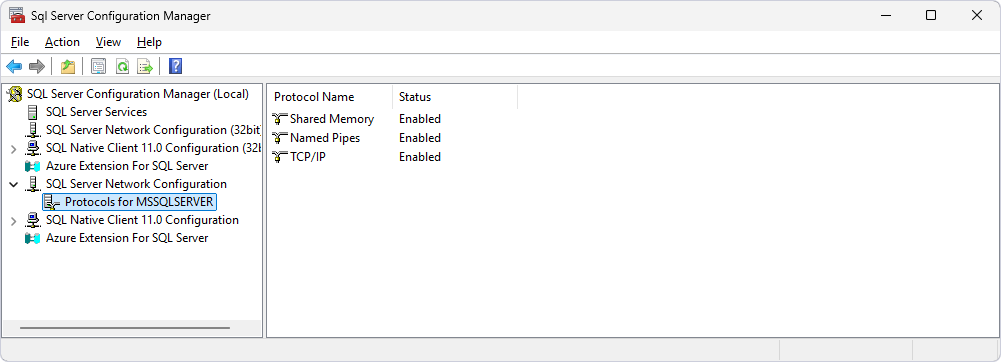
1. Open SQL Server Configuration Manager and navigate to SQL Server Network Configuration > Protocols for ‘instance_name’.
TCP/IP is enabled.
2. Right-click Protocols for ‘instance_name’ and select Properties.
3. On the Certificate tab, under Certificate, select SQL Server TLS Certificate, then click Apply.
4. Click OK to close the dialog.
5. Press Windows+R and enter certlm.msc.
6. Expand the Personal node > Certificates.
7. Right-click the created certificate, then select All Tasks > Manage Private Keys.
8. In the Permissions for SQL Server TLS Certificate private keys dialog, click Add.
9. In Enter the object names to select, enter the SQL Server service name.
10. Under Permissions for ‘service_name’, select the checkboxes for Full control and Read.
11. Click Apply > OK.
Export the certificate
1. Right-click the certificate, then select All Tasks > Export.
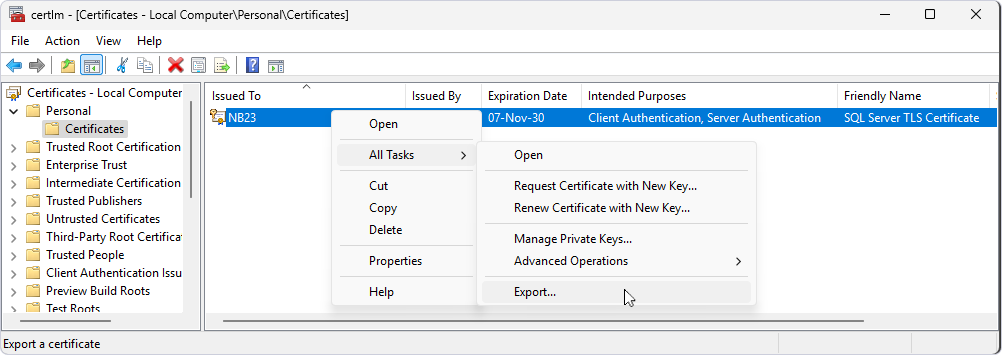
2. In the Certificate Export Wizard, click Next.
3. Select the DER encoded (.CER) format, then click Next.
4. On the File to Export page, click Browse, then select the folder where you want to export the certificate, and enter a file name.
To proceed, click Next.
5. Click Finish > OK.
Import the certificate
You need to import the certificate so the system can trust it, allowing you to establish an encrypted connection in dbForge Studio for SQL Server.
To import the certificate:
1. Press Windows+R and enter certlm.msc.
2. Expand the Trusted Root Certification Authorities node.
3. Right-click the Certificates folder, then select All Tasks > Import.
4. In the Certificate Import Wizard, click Next.
5. On the File to Import page, click Browse and select the exported certificate.
To proceed, click Next.
6. Click Finish > OK.
7. Restart the SQL Server service.
Verify the encrypted connection
1. Open dbForge Studio for SQL Server.
2. Create a database connection with encryption:
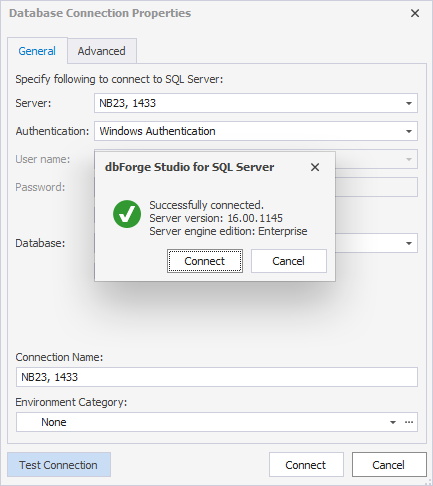
2.1. On the General tab of the Database Connection Properties dialog, enter the server properties.
Note
In Server, specify the local hostname and port separated by a comma. You can view the port in SQL Server Configuration Manager > Protocols for ‘instance_name’ > TCP/IP > Properties > IPAll.
2.2. On the Advanced tab, select Encrypt connection.
2.3. Click Test Connection > Connect.
Test the encrypted connection
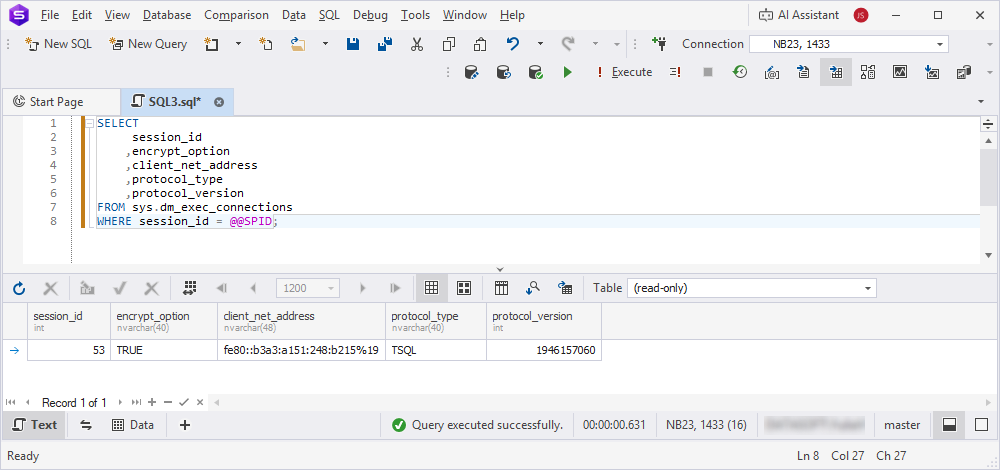
1. Open SQL Editor.
2. Run a query to verify that the connection is encrypted by checking the connection properties in the session details.
If the encrypt_option value is TRUE, the connection is successfully encrypted.
SELECT
     session_id
    ,encrypt_option
    ,client_net_address
    ,protocol_type
    ,protocol_version
FROM sys.dm_exec_connections
WHERE session_id = @@SPID;
Force encryption for all connections (optional)
1. Open SQL Server Configuration Manager.
2. Right-click Protocols for ‘instance_name’ and select Properties.
3. On the Flags tab, select Yes for Force encryption.
4. Click Apply > OK.
5. Restart the SQL Server service.
6. In Database Explorer, right-click the encrypted connection, then select Modify Connection.
7. Go to the Advanced tab.
8. In the Enter additional connection string properties box, enter Encrypt=True;TrustServerCertificate=True (for self-signed certificates).
9. Click Connect.
Tip
Use a CA-issued certificate in a production environment to avoid trust warnings and compatibility issues that may occur with self-signed certificates.
Implement transparent data encryption for data at rest
The Transparent Data Encryption (TDE) encrypts the entire database at rest, including data files, backups, and transaction logs.
To enable TDE:
1. Open SQL Editor.
2. Create a master key in the master database.
USE master;

CREATE MASTER KEY ENCRYPTION BY PASSWORD = 'SecureMasterKey123!';
3. Create a certificate for TDE.
CREATE CERTIFICATE tde_cert_crmdata
WITH SUBJECT = 'TDE Certificate for crmdata';
GO
4. Back up the certificate and master key to a secure location.
-- Make sure the folder D:\Certificates exists and SQL Server has write permissions
BACKUP CERTIFICATE tde_cert_crmdata
TO FILE = 'D:\Certificates\tde_cert_crmdata.cer'
WITH PRIVATE KEY (
FILE = 'D:\Certificates\tde_cert_crmdata.pvk',
ENCRYPTION BY PASSWORD = 'CertPassword123!'
);

BACKUP MASTER KEY
TO FILE = 'D:\Certificates\MasterKey.key'
ENCRYPTION BY PASSWORD = 'MasterKeyPassword123!';
GO
5. Create a database encryption key and enable TDE for the target database.
USE crmdata;
GO

CREATE DATABASE ENCRYPTION KEY
WITH ALGORITHM = AES_256
ENCRYPTION BY SERVER CERTIFICATE tde_cert_crmdata;
GO

ALTER DATABASE crmdata SET ENCRYPTION ON;
GO
Note
Encryption scan can take a significant time depending on the database size.
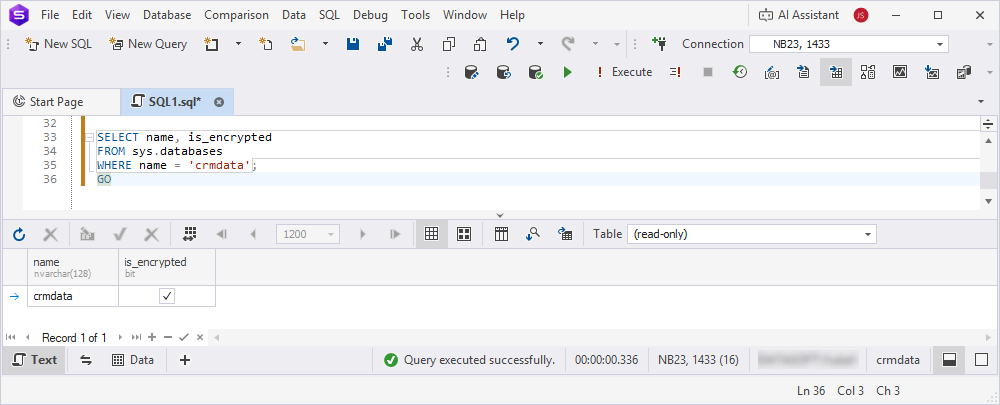
6. Verify the TDE status.
SELECT name, is_encrypted
FROM sys.databases
WHERE name = 'crmdata';
GO
Tip
Store certificate and key backups in a secure, off-site location and restrict access to authorized personnel only.
For more information about encrypting sensitive data by using TDE, see Security best practices.
Encrypt specific columns with column-level encryption
When you need to encrypt columns containing sensitive information, such as credit card numbers or Social Security numbers (SSNs), you can use column-level encryption to protect that specific data.
You can use SQL Editor or Table Editor to implement column-level encryption.
1. Open SQL Editor.
2. Create a symmetric key and certificate for encryption.
USE crmdata;
GO

-- Create a database master key (required for certificates)
CREATE MASTER KEY ENCRYPTION BY PASSWORD = 'StrongMasterKey123!';
GO

-- Certificate for column-level encryption
CREATE CERTIFICATE column_cert
WITH SUBJECT = 'Column Encryption Certificate';
GO

-- Symmetric key encrypted by the certificate
CREATE SYMMETRIC KEY symkey1
WITH ALGORITHM = AES_256
ENCRYPTION BY CERTIFICATE column_cert;
GO
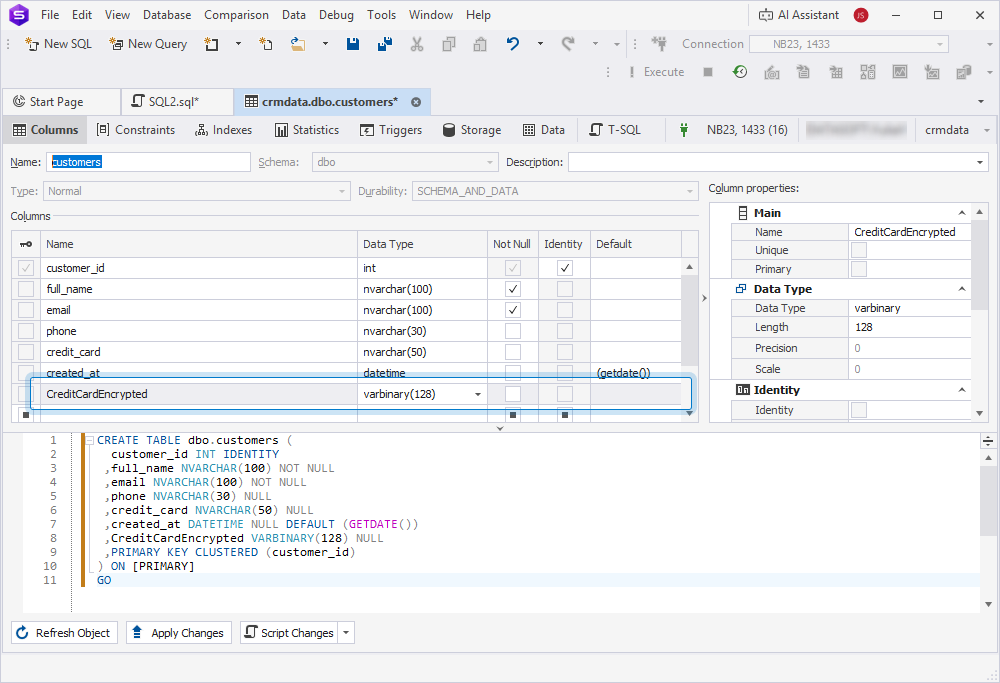
3. Add an encrypted column to the target table in Table Editor:
3.1. In Database Explorer, right-click the table, then select Open Editor.
3.2. Add a new column.
3.3. Apply the changes.
4. In SQL Editor, encrypt data in the column.
USE crmdata;
GO

-- Open the symmetric key for encryption operations
OPEN SYMMETRIC KEY symkey1
DECRYPTION BY CERTIFICATE column_cert;
GO

-- Encrypt existing plain-text credit card data into the encrypted column
UPDATE customers
SET CreditCardEncrypted = ENCRYPTBYKEY(KEY_GUID('symkey1'), credit_card);
GO

-- Remove the plaintext column after encryption
ALTER TABLE customers DROP COLUMN credit_card;

-- Close the symmetric key after use
CLOSE SYMMETRIC KEY symkey1;
GO
5. Query the encrypted data.
USE crmdata;
GO

-- Open symmetric key to decrypt data
OPEN SYMMETRIC KEY symkey1
DECRYPTION BY CERTIFICATE column_cert;
GO

-- Decrypt and display sensitive data
SELECT
customer_id,
full_name,
email,
CAST(DECRYPTBYKEY(CreditCardEncrypted) AS NVARCHAR(50)) AS creditcard_decrypted
FROM customers;
GO

-- Close symmetric key after use
CLOSE SYMMETRIC KEY symkey1;
GO
6. Back up the certificate and key.
USE crmdata;
GO

-- Back up the column-level encryption certificate and its private key
BACKUP CERTIFICATE column_cert
TO FILE = 'D:\Certificates\Column_Cert.cer'
WITH PRIVATE KEY (
FILE = 'D:\Certificates\Column_Cert.pvk',
ENCRYPTION BY PASSWORD = 'CertPassword123!'
);
GO
Tip
Grant access to the symmetric key only to authorized roles by using Security Manager to restrict decryption capabilities to those roles.
Secure backup files with encryption
You can encrypt database backups to protect data at rest in backup files and prevent data loss.
Validate and monitor encryption
You can verify that encryption is correctly implemented and monitor for potential issues. Additionally, use SQL Editor and Security Manager to review and confirm encryption settings.
To verify the encryption settings:
1. Open SQL Editor.
2. Verify the TDE status.
SELECT name, is_encrypted
FROM sys.databases
WHERE name = 'crmdata';
GO
3. Check the encryption key details.
USE crmdata;
GO
-- List symmetric keys in the database
SELECT * FROM sys.symmetric_keys;
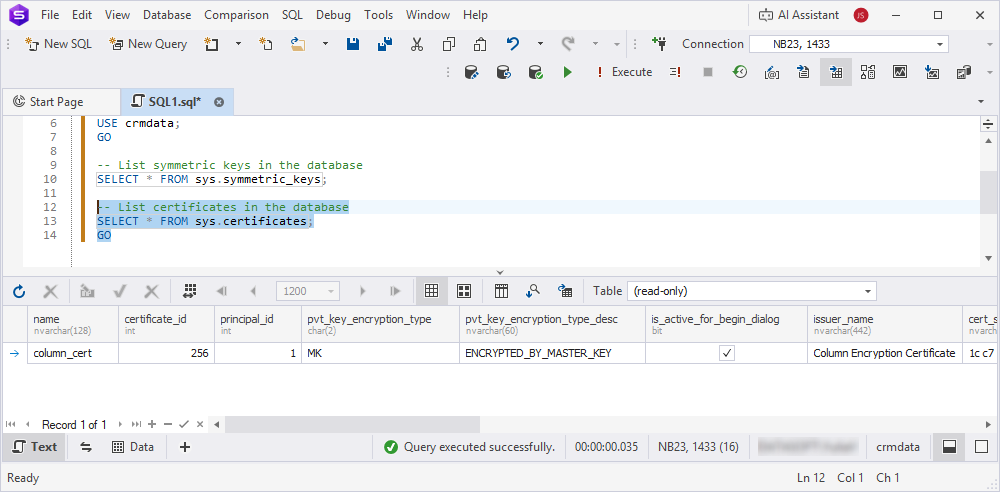
-- List certificates in the database
SELECT * FROM sys.certificates;
GO
4. Monitor SSL/TLS connections by reviewing the session properties to confirm that encryption is in use.
SELECT
    c.session_id,
    s.login_name,
    c.client_net_address,
    c.protocol_type,
    c.encrypt_option,
    c.auth_scheme,
    s.host_name,
    s.program_name,
    c.connect_time
FROM sys.dm_exec_connections AS c
    JOIN sys.dm_exec_sessions AS s
ON c.session_id = s.session_id
    ORDER BY c.session_id;
GO
If the encrypt_option column is TRUE, the connection uses TLS/SSL.
5. Set up SQL Server Audit to track encryption key access.
USE master;
GO
-- Create a server audit that writes audit logs to a file
CREATE SERVER AUDIT Encryption_Audit
TO FILE (FILEPATH = 'D:\Audits\',
MAXSIZE = 10 MB,
MAX_ROLLOVER_FILES = 5)
WITH (QUEUE_DELAY = 1000,
ON_FAILURE = CONTINUE);
GO

-- Create a database audit specification for crmdata
-- Track execution of fn_get_audit_file by public role
CREATE DATABASE AUDIT SPECIFICATION Encryption_Audit_Spec
FOR SERVER AUDIT Encryption_Audit
ADD (EXECUTE ON OBJECT::sys.fn_get_audit_file BY public)
WITH (STATE = ON);
GO
6. Generate audit reports by using Report Designer to analyze and document encryption usage.
Tip
Schedule periodic audits by using SQL Server Agent to ensure encryption keys and certificates remain secure.
Manage encryption keys and certificates
To prevent data loss, manage and back up encryption keys and certificates. To achieve this, use SQL Editor and Security Manager.
To manage encryption keys and certificates:
1. Regularly back up the master key, certificates, and symmetric keys to a secure location:
- Restrict access to keys and certificates by using SQL Editor.
USE crmdata;
GO

-- Create a database role for administrators
IF NOT EXISTS (SELECT 1 FROM sys.database_principals WHERE name = 'Role_Admins')
    CREATE ROLE Role_Admins;
GO

-- Grant access only to specific roles, for example, Role_Admins
GRANT VIEW DEFINITION ON CERTIFICATE::column_cert TO Role_Admins;
GRANT CONTROL ON SYMMETRIC KEY::symkey1 TO Role_Admins;
GO
- Document key management procedures by using dbForge Studio Documentation feature.
2. To rotate certificates periodically (for example, every 0.5 to 2 years), create a new certificate and update the encryption key.
USE master;
GO

-- Create a new server certificate for TDE
CREATE CERTIFICATE tde_cert_new
WITH SUBJECT = 'New TDE Certificate';
GO

USE crmdata;
GO

-- Regenerate database encryption key by using the new certificate
ALTER DATABASE ENCRYPTION KEY
ENCRYPTION BY SERVER CERTIFICATE tde_cert_new;
GO
Tip
Store key backups in a secure, encrypted vault and restrict access to authorized administrators only.
Recommendations
| Recommendation | Details |
|---|---|
| Use strong encryption algorithms | Use AES-256 for TDE and column-level encryption for robust security. |
| Enforce SSL/TLS for all connections | Include Encrypt=True in connection strings and enable Force Encryption in SQL Server Configuration Manager. |
| Back up keys securely | Store encryption keys and certificates in a secure, access-restricted location separate from the primary system. |
| Update certificates periodically | Update certificates every 0.5 – 2 years to reduce the risks of compromised keys. |
| Restrict key access | Grant access to encryption keys only to authorized roles by using Security Manager. |
| Test backup restoration | Test backup restoration regularly to confirm that encrypted backups can be successfully recovered. |
| Monitor encryption usage | Use SQL Server Audit to track access to encryption keys and detect unauthorized attempts. |
| Use CA-issued certificates | In a production environment, use SSL/TLS certificates issued by a trusted Certificate Authority to prevent trust and validation issues. |
| Document encryption policies | Use dbForge Studio Documentation feature to record encryption configurations and procedures. |
| Minimize encrypted columns | Encrypt only sensitive columns to reduce performance overhead and simplify key management. |
| Audit encryption keys | Regularly review key access permissions by using SQL Editor and system views, such as sys.symmetric_keys or sys.certificates. |
| Protect connection strings | Store application connection strings in encrypted configuration files or secure vaults. |
| Test encryption in a staging environment | Verify all encryption settings before production deployment. |
| Enable firewall rules | Restrict SQL Server network access to trusted IP addresses and protect encrypted connections. |
| Use strong passwords for keys | Enforce complex passwords for master keys and certificate private keys. |
| Automate key backups | Schedule regular backups of keys and certificates, and store them in a secure location. |
| Avoid hardcoding keys | Never hardcode encryption keys in application code or scripts. |
| Train teams on encryption | Educate database administrators on key management by using the dbForge Studio Documentation feature. |