Compare selected tables via the CLI
This article describes two methods for comparing databases via the command line (CLI) using the tablediff utility and the Data Compare tool in dbForge Studio for SQL Server. It also explains how to schedule a comparison task for automated execution.
Prerequisites
-
Microsoft SQL Server and the tablediff utility are installed.
-
dbForge Studio for SQL Server is installed.
-
Administrative rights are granted to both the SQL Server instance and databases.
Compare tables using tablediff
The tablediff utility is a command-line tool included with the SQL Server Replication tools. It is used to compare data between two tables.
1. Open Command Prompt as an Administrator.
2. Enter the path to the tablediff utility located in the Microsoft SQL Server installation folder. The default path is:
C:\Program Files\Microsoft SQL Server\Your_SQL_Version\COM
Note
Your_SQL_Version identifies the SQL Server version number. For instance, 160 stands for SQL Server 2022 (16.x).
3. Enter the following command, replacing the placeholder values with your own.
tablediff -sourceserver "SourceServer" -sourcedatabase "SourceDatabase" -sourcetable "SourceTable" -sourceschema SourceSchema ^

          -destinationserver "TargetServer" -destinationdatabase "TargetDatabase" -destinationtable "TargetTable" -destinationschema TargetSchema ^

          -f "D:\SyncScript.sql"
-
-sourceserver "SourceServer"– The name of the server where the source database is located. -
-sourcedatabase "SourceDatabase"– The name of the source database containing the table to compare. -
-sourcetable "SourceTable"– The name of the table in the source database to compare. -
-sourceschema SourceSchema– The schema in the source database containing the source table (e.g., dbo). -
-destinationserver "TargetServer"– The name of the server where the target database is located. -
-destinationdatabase "TargetDatabase"– The name of the database on the target server containing the table to compare. -
-destinationtable "TargetTable"– The name of the table in the target database to compare. -
-destinationschema TargetSchema– The schema in the target database containing the target table (e.g., dbo). -
-f "D:\SyncScript.sql"– The path to the file where the synchronization script will be saved.
4. Press Enter.
The comparison results are then displayed, and the synchronization script is saved to the specified path.

Note
Repeat these steps to compare more tables if needed.
Compare tables with the Data Compare CLI
The Data Compare tool in dbForge Studio for SQL Server provides a command-line interface (CLI) for comparing multiple tables. It offers customizable options and detailed reporting capabilities.
Step 1: Configure comparison settings.
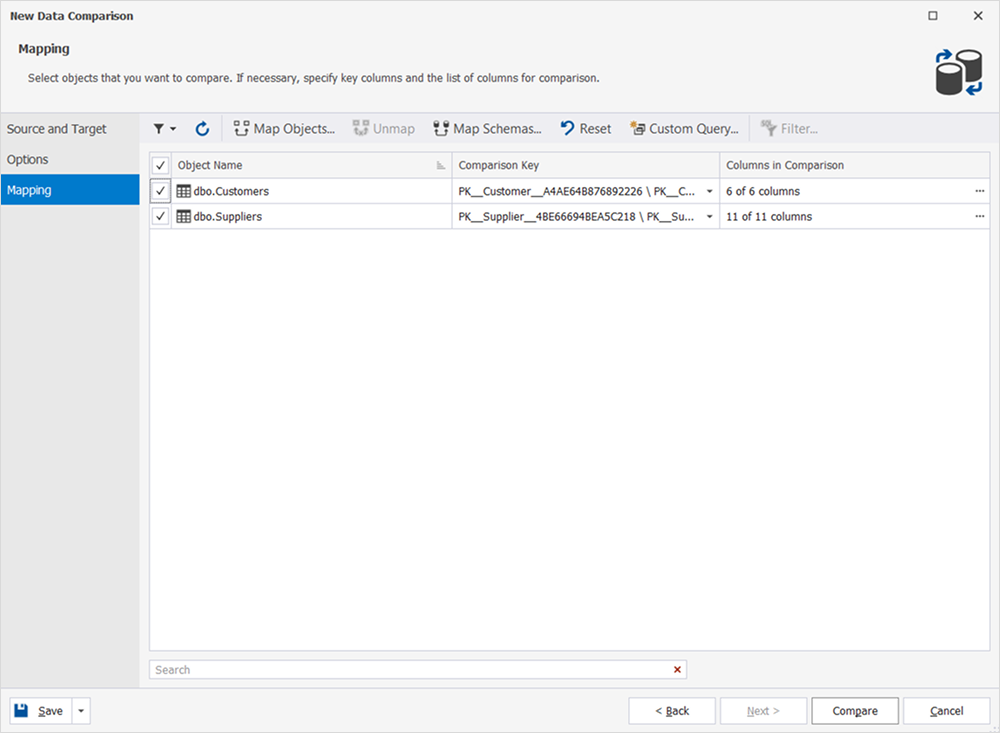
After configuring the settings, save the comparison project. Select Save > Save Document.
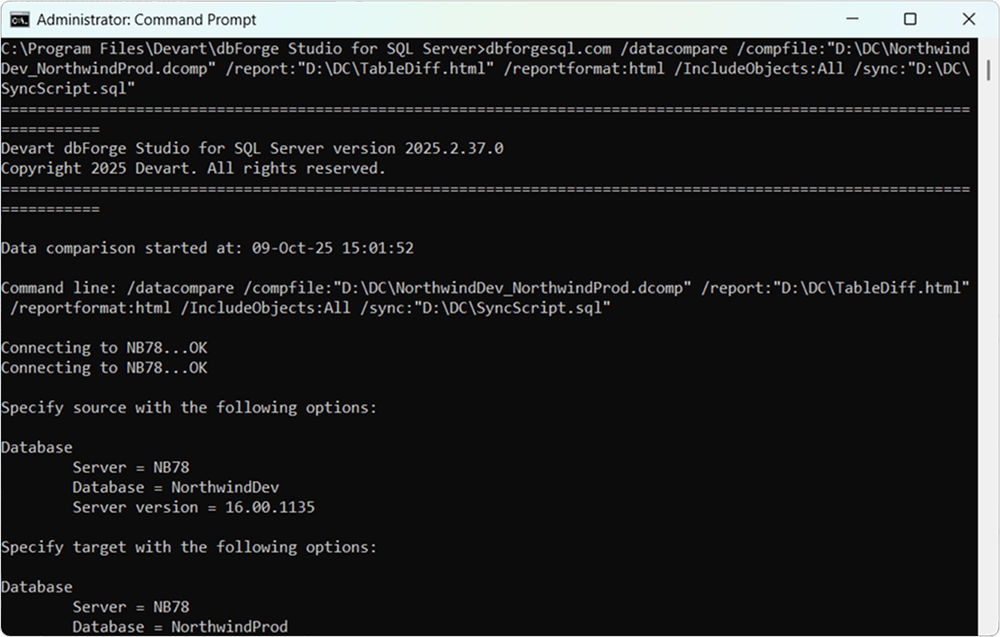
Step 2: Run the comparison from CLI.
"C:\Program Files\Devart\dbForge Studio for SQL Server\dbforgesql.com" /datacompare /compfile:"D:\ProjectDocument.dcomp" /report:"D:\ReportFile.html" /reportformat:html /IncludeObjects:All /sync:"D:\SyncScript.sql"
Note
After the comparison is complete, you can review the generated report and access the synchronization file to analyze identified differences and synchronize data between the compared tables. Both files are available in the specified paths.
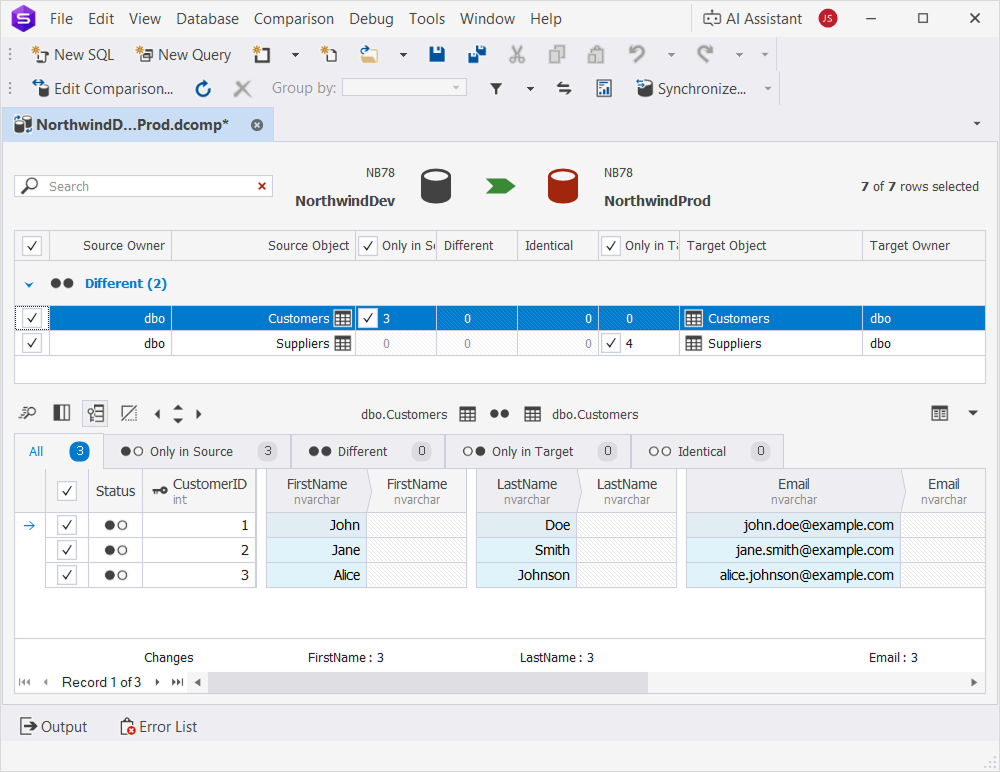
Step 3: Verify comparison results.
1. Open dbForge Studio for SQL Server.
2. In the menu bar, select File > Open File, then choose the .dcomp comparison project created in Step 1.
3. Review the differences between the source and target tables.
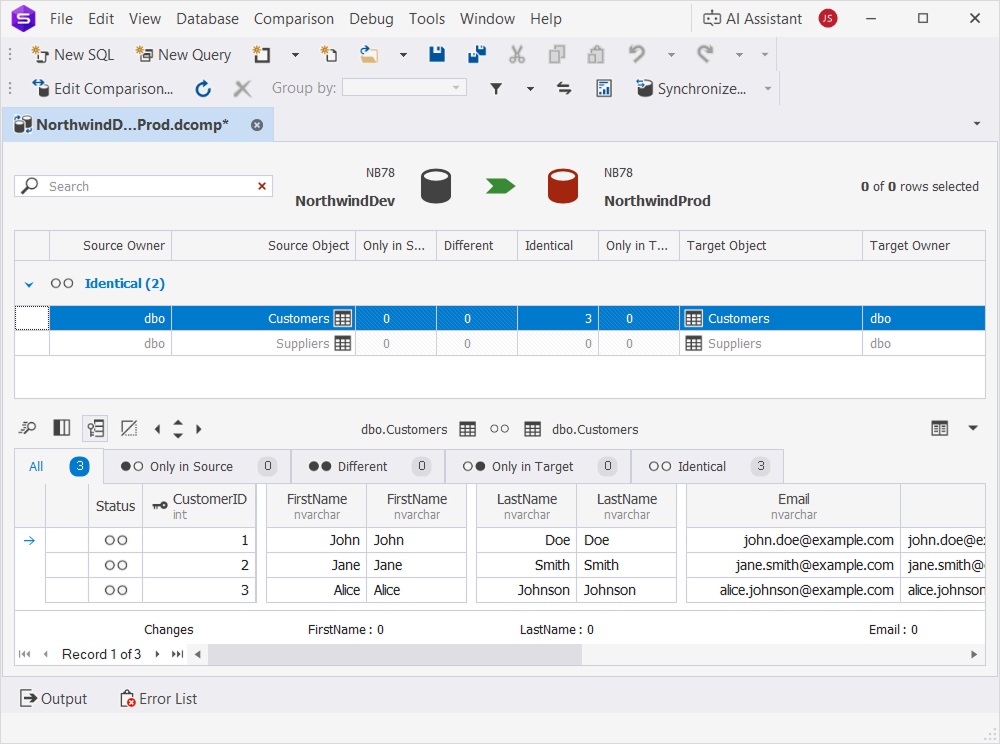
Step 4 (Optional): Synchronize data.
Tip
To prevent data loss, back up the target database before synchronization.
1. In the menu bar, select File > Open File, then choose the .sql synchronization script created in Step 2.
2. Click Execute.
3. Refresh the project to verify that the source and target tables are identical.
Automate table comparison
To perform table comparison regularly, you need to create a batch file and schedule its execution.
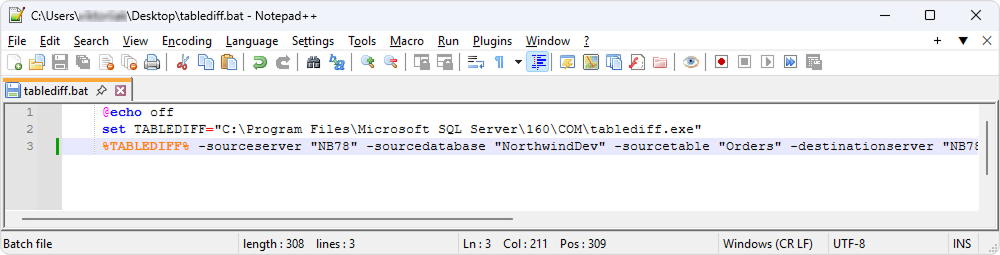
Step 1: Create a batch file.
To create a batch file, choose a procedure depending on the tool you are using:
- Create a batch file in tablediff.
1. Open a text editor.
2. Enter the following command, replacing the placeholders with your own.
  @echo off
     set TABLEDIFF="C:\Program Files\Microsoft SQL Server\160\COM\tablediff.exe"
     %TABLEDIFF% -sourceserver "SourceServer" -sourcedatabase "SourceDatabase" -sourcetable "SourceTable" -destinationserver "TargetServer" -destinationdatabase "TargetDatabase" -destinationtable "TargetTable" -f "D:\SyncScript.sql"
3. Save the file with the .bat extension.
- Create a batch file in dbForge Studio for SQL Server.
For detailed instructions, see How to create a command-line execution file.
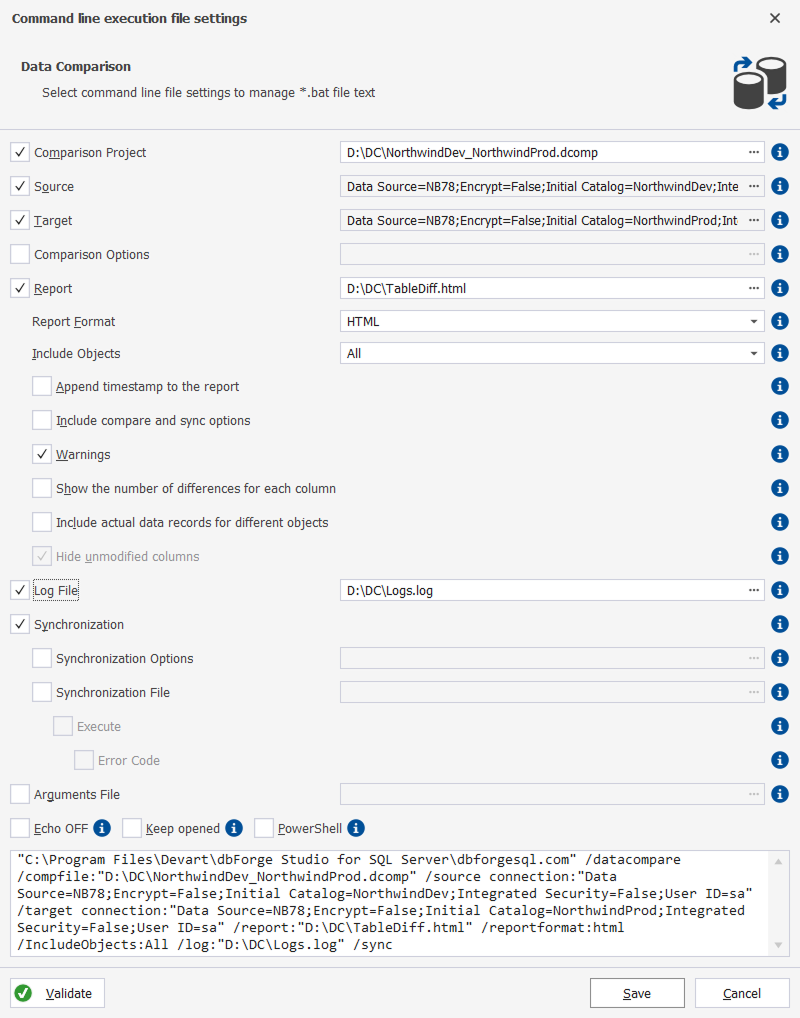
Tip
You can specify the path to a log file if you want to capture execution details.
To avoid overwriting a previously generated report, add a datestamp to your report file name when creating a batch file.
Step 2: Schedule a comparison task.
To schedule a comparison task, use one of the following ways:
- Schedule a task in Task Scheduler.
For detailed instructions, see How to schedule data comparison.
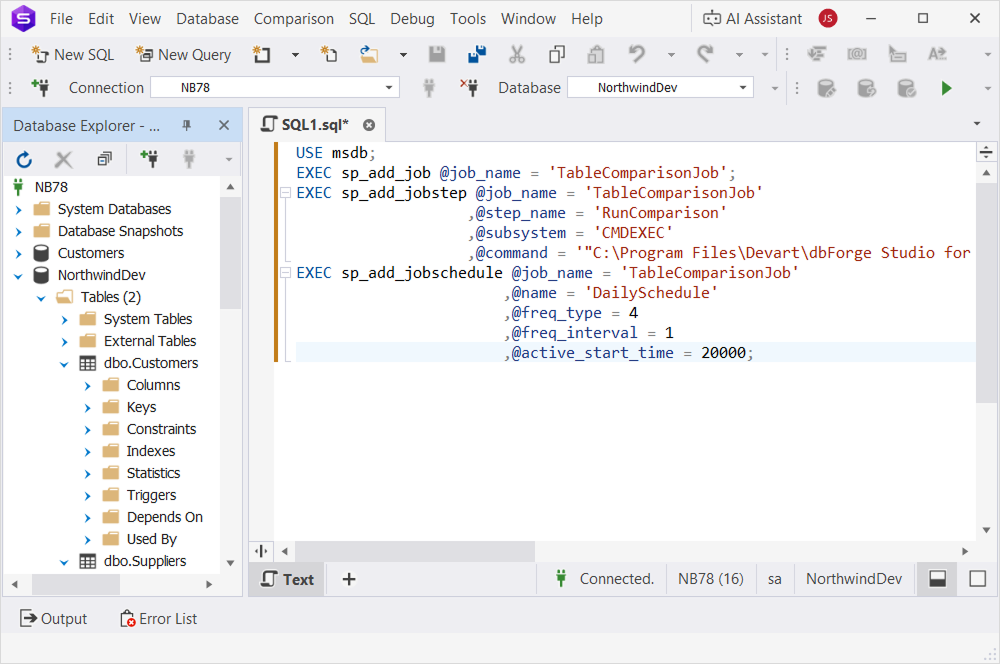
- Schedule a task in SQL Server.
You can schedule a comparison task using a SQL Server Agent job that runs the CLI commands via CMDEXEC.
1. In dbForge Studio for SQL Server, open a new SQL document.
2. Enter the following command, replacing the placeholder values with your own.
USE msdb;
EXEC sp_add_job @job_name = 'TableComparisonJob';
EXEC sp_add_jobstep @job_name = 'TableComparisonJob'
                   ,@step_name = 'RunComparison'
                   ,@subsystem = 'CMDEXEC'
                   ,@command = '"C:\Program Files\Devart\dbForge Studio for SQL Server\dbforgesql.com" /datacompare /compfile:"D:\ComparisonProject.dcomp" /report:"D:\TableDiff.html" /AppendTimestampReport:Yes';
EXEC sp_add_jobschedule @job_name = 'TableComparisonJob'
                       ,@name = 'DailySchedule'
                       ,@freq_type = 4
                       ,@freq_interval = 1
                       ,@active_start_time = 20000;
-
@job_name = 'TableComparisonJob'– The name of the SQL Agent job. -
@command– The path to the dbforgesql.com, comparison project, and report files. -
@name = 'DailySchedule'– The task name. -
@freq_type = 4– The frequency type, where: 1 = one time, 4 = daily, 8 = weekly, 16 = monthly. -
@freq_interval = 1– The interval of the task execution, in days. -
@active_start_time = 20000– The task start time in the HHMMSS format.
Note
You can monitor job execution in SQL Server Agent.
If you schedule a comparison task using the batch file created in dbForge Studio for SQL Server, you can also review the log files in the specified path.
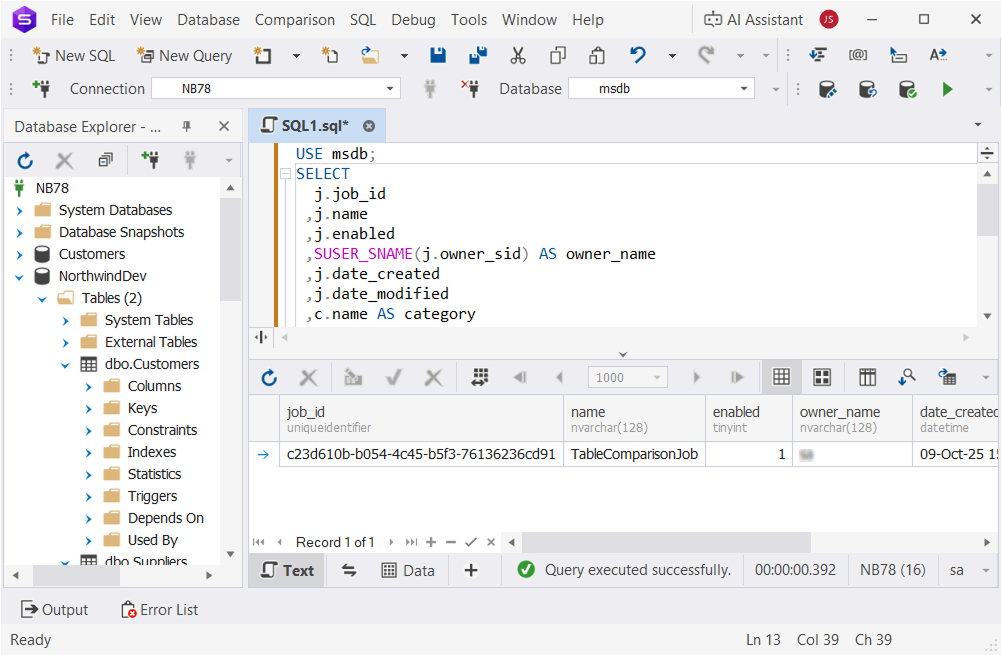
3. Click Execute.
4. Verify that the task has been created. Enter the following command and click Execute.
USE msdb;
SELECT
  j.job_id
 ,j.name
 ,j.enabled
 ,SUSER_SNAME(j.owner_sid) AS owner_name
 ,j.date_created
 ,j.date_modified
 ,c.name AS category
FROM dbo.sysjobs AS j
LEFT JOIN dbo.syscategories AS c
  ON j.category_id = c.category_id
WHERE j.name = N'TableComparisonJob';
Recommendations
In addition to the tablediff utility and the Data Compare CLI, you can efficiently compare selected tables between SQL Server databases by using dbForge tools such as SQL Editor, Data Compare, and AI Assistant. The following recommendations will help you enhance the process with automation, reporting, and validation capabilities.
| Comparison Best Practice | Description |
|---|---|
| Select specific tables | Select only specific tables for comparison to ensure faster performance. |
| Use Windows Authentication | Use an integrated security for CLI commands. |
| Back up before synchronization | Create a backup of a target database before executing synchronization scripts. |
| Validate schema compatibility | Before performing data comparison, use Schema Compare to ensure source and target tables have identical schemas. |
| Test CLI commands | Test role changes in a development environment with SQL Editor before hitting production. |
| Generate detailed reports | Use Data Compare’s reporting features to document differences for auditing. |
| Automate recurring tasks | Schedule comparisons using Windows Task Scheduler or SQL Server Agent to maintain consistency. |
| Review synchronization scripts | Review generated synchronization scripts in a SQL Editor to ensure accuracy before its execution. |
| Handle large tables | For large tables, use tablediff with the -et option to create a temporary table containing the differences, or apply batch processing in dbForge. |
| Secure credentials | Avoid hardcoding passwords in batch files. Instead, use encrypted credential files or integrated security for authentication. |
| Monitor performance | Use the dbForge Studio’s Monitor to assess the impact on server performance after perfroming comparisons. |
| Use dbForge for complex comparisons | Use Data Compare for advanced filtering, custom mappings, and detailed reporting. |
| Check exit codes | Monitor Data Compare’s exit codes (for example, 0 - success; 10- command line usage error) for an automated error handling. |
| Use versioned outputs | Add timestamps to report and script filenames to maintain a comparison history. |
| Compare keyed tables | Ensure tables have primary keys or unique indexes for accurate comparisons with tablediff. |
| Limit scope for performance | Exclude unnecessary columns or rows using dbForge’s filtering options to speed up comparisons. |
| Log CLI operations | Enable logging of executed CLI operations in Data Compare for troubleshooting. |
| Validate results | Use the Data Compare user interface to review CLI results for accuracy. |
| Use AI for scripting | Use dbForge Studio AI Assistant to generate or optimize CLI scripts. |