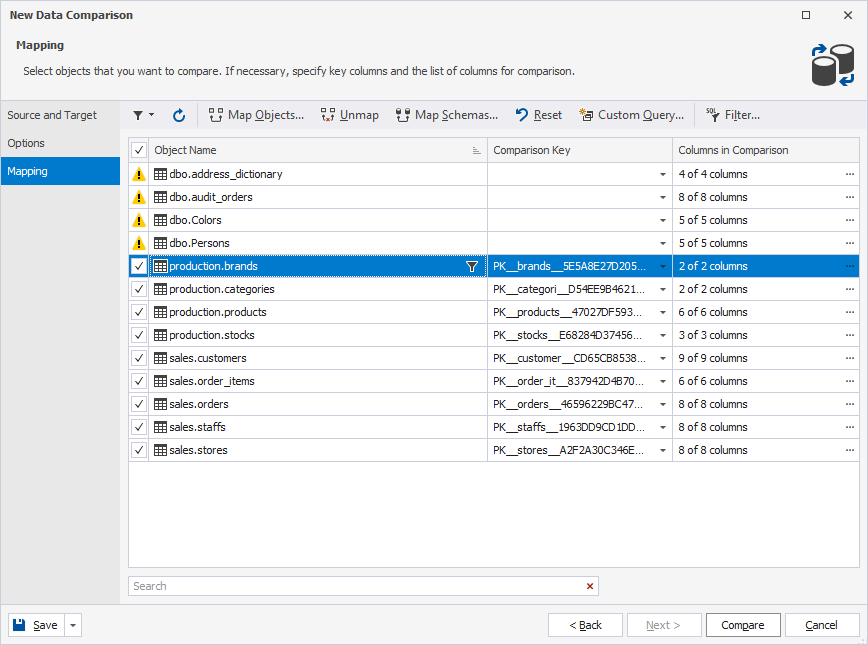
Select tables, views, and columns for comparison
dbForge Studio automatically maps tables, views, and columns between the source and target if they have the same name and belong to the same schema (owner).
You can map objects with different names manually on the Mapping page of the New Data Comparison wizard.
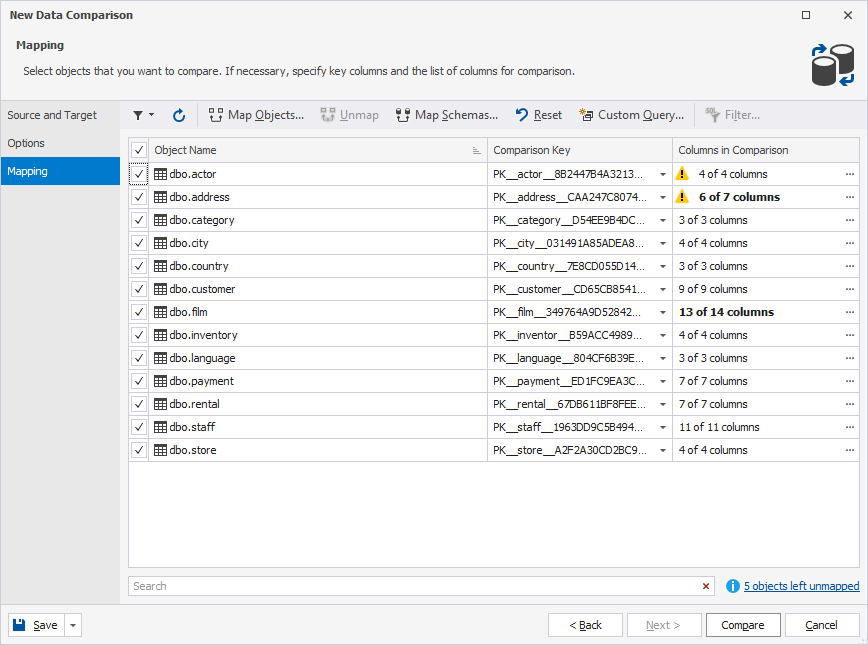
Select a comparison key
dbForge Studio automatically assigns a comparison key when:
- A table contains a matching primary key, unique index, or unique constraint.
- A view contains a matching unique clustered index.
Note
Each table or view to be compared must have a comparison key to correctly match rows between the two data sources.
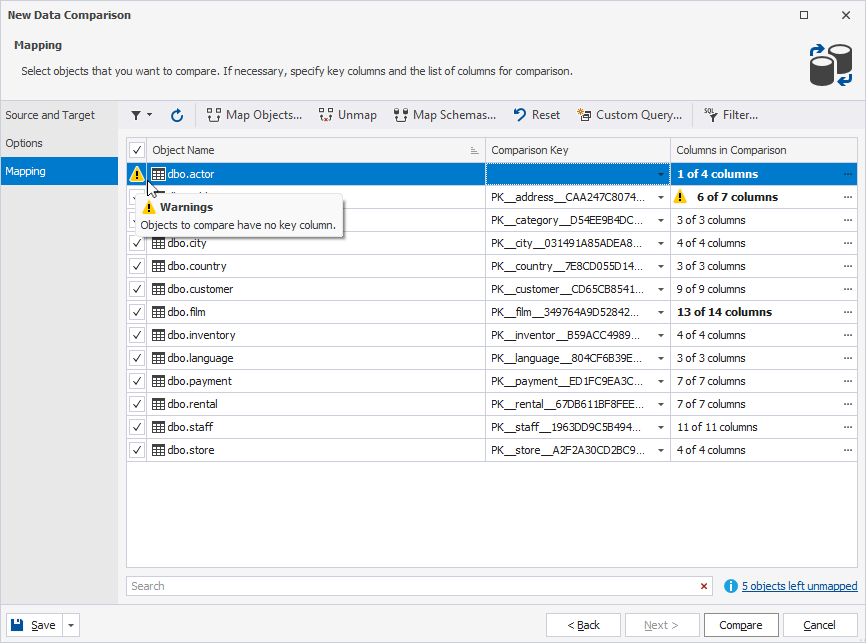
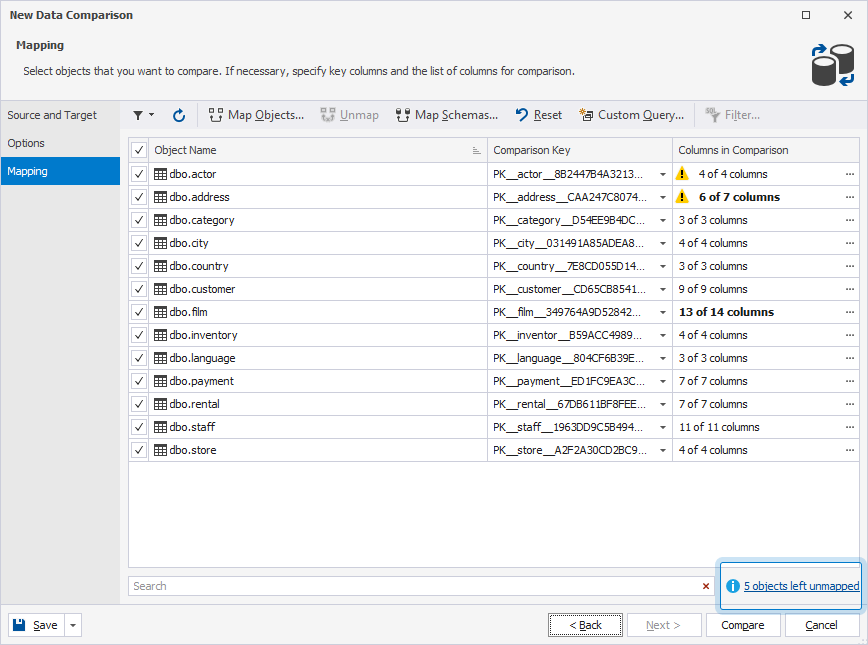
When the Studio can’t identify a comparison key for a table or view, it adds  to the object with the warning:
Objects to compare have no key column.
To set a comparison key:
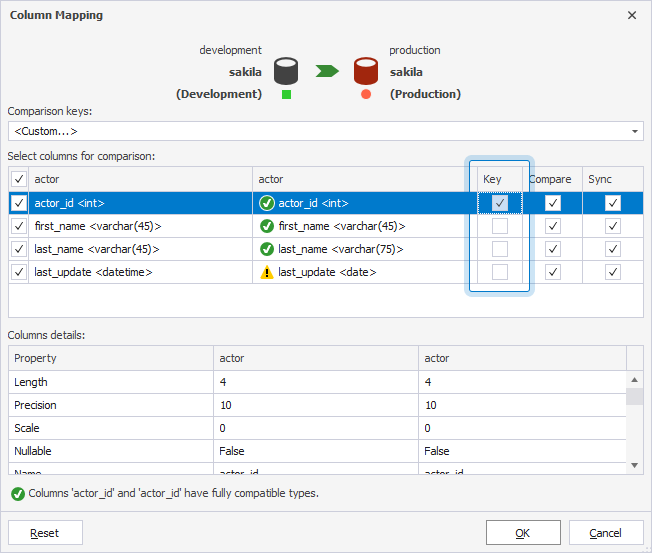
1. In the Comparison Key column, click the ![]() dropdown arrow in the row where you want to set a comparison key, then select Custom.
dropdown arrow in the row where you want to set a comparison key, then select Custom.
2. In the Key column, select the checkbox for the required column.
3. Click OK to save the changes.
Warning
You must select at least one column as a comparison key.
Note
Differences in records for which the Compare column isn’t selected are ignored during comparison.
Records where the Sync column isn’t selected are excluded from the
UPDATE,INSERT, andDELETEstatements and are not synchronized.
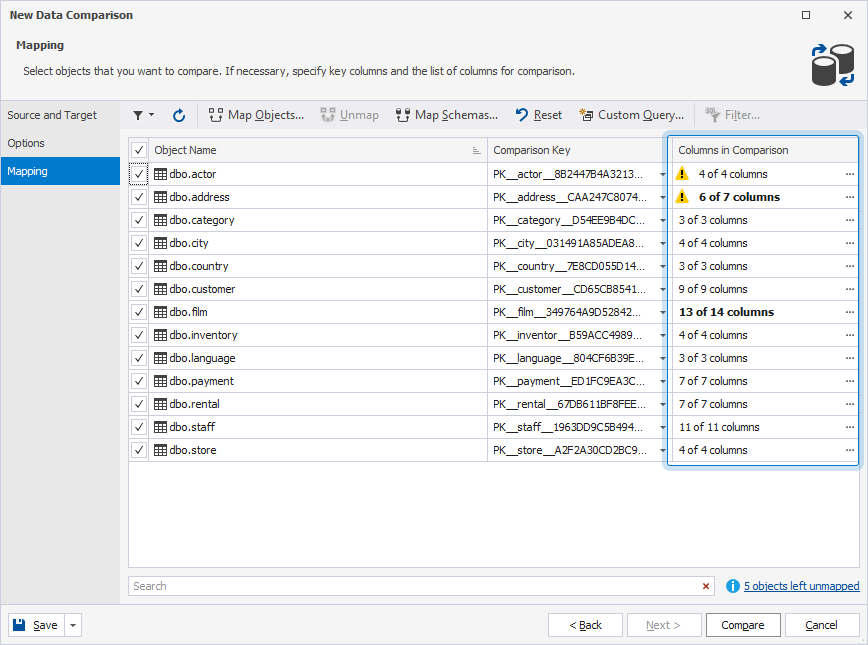
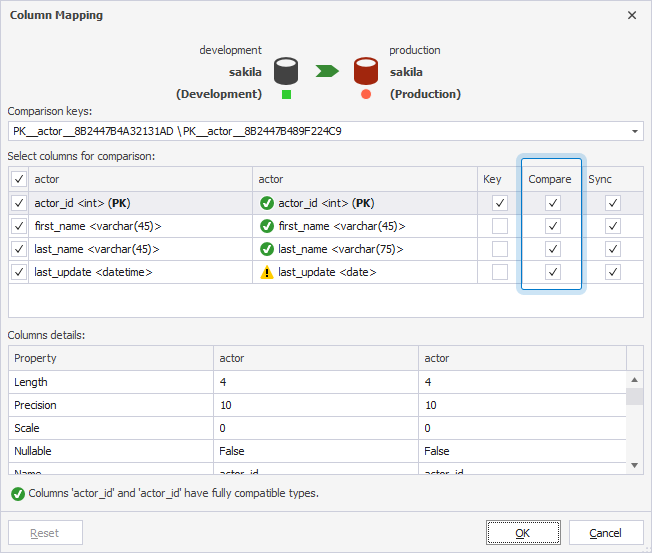
Select the columns to be compared
On the Mapping page, you can view the number of columns to be compared.
To select the columns for comparison:
1. In the Columns in Comparison column, double-click the row or click the ellipsis (…) for the object whose columns you want to select.
2. In the Compare column, select the checkbox for the column you want to include in the comparison, or clear the checkbox to exclude the column.
3. Click OK to save the changes.
Warning
Columns used as a comparison key can’t be excluded from comparison.
Map objects
To map objects that remain unmapped:
1. On the Mapping toolbar, click Map Objects.

Alternatively, in the lower-right corner of the page, click [X] objects left unmapped.
2. In the Objects Mapping dialog, select a source and target object you want to map.
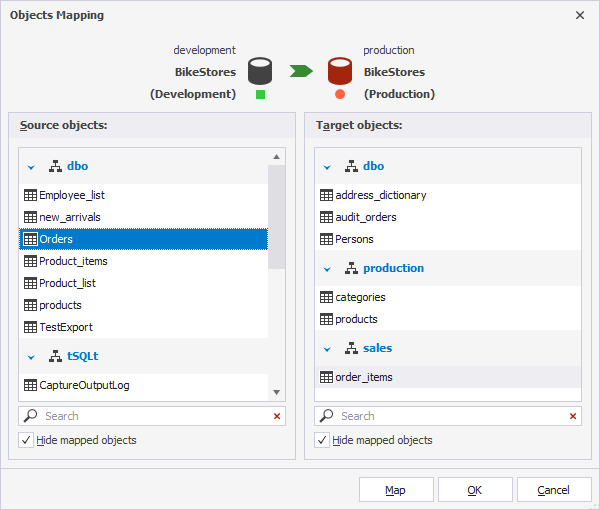
3. Click Map.
4. Repeat steps 2-3 for each object pair you want to map.
Tip
To search for a required object, start typing the text in the search box. The matching names will be highlighted.
By default, mapped objects are hidden in the Object Mapping dialog. To show mapped objects, clear the Hide mapped objects checkbox.
To discard the changes, click Cancel.
5. Click Close to close the dialog.
The mapped objects appear in the grid on the Mapping page.
Limitations to object mapping
- Tables or views that contain columns with incompatible data types can’t be compared and will be excluded from the comparison.
- After the objects have been mapped for comparison and synchronization, you may encounter mapping warnings that should be taken into account before you proceed.
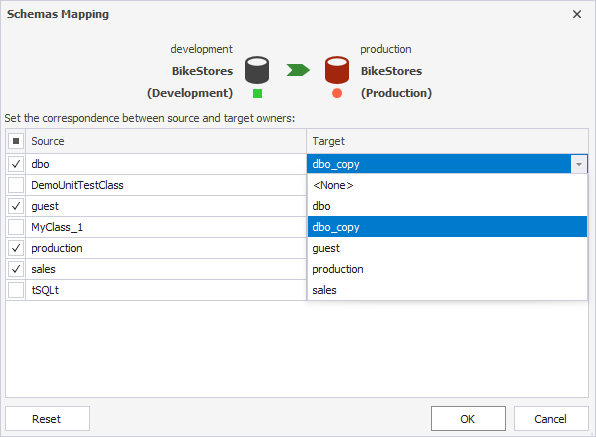
Map schemas
dbForge Studio enables you to compare objects that have the same name, but belong to different schemas.
To map schemas:
1. On the Mapping toolbar, click Map Schemas.
2. In the Target column, click the dropdown arrow for the target schema you want to map to the source schema.
3. Repeat steps 1-3 for each schema pair you want to map.
4. Click OK.
5. Click Close to close the dialog.
Tip
To restore the original mapping, click Reset.
Limitations to schema mapping
dbForge Studio for SQL Server supports only one-to-one schema mapping. To synchronize data between one source schema and multiple target schemas (or vice versa), you must run separate comparison and synchronization operations.
Unmap objects
To unmap all objects, on the Mapping toolbar, click Unmap.
To unmap specific objects, do one of the following:
- Select the object you want to unmap, then click Unmap on the Mapping toolbar.
- Select the object you want to unmap, right-click it, then select Unmap.
Compare custom queries
You can use the Custom Query option to filter data, convert data types, define key columns, or compare query results instead of comparing entire tables or views.
To compare custom queries:
1. On the Mapping page, click Custom Query.
2. In the Custom Queries Mapping dialog:
- To use tables or views from the list, click Table or View for the source and target objects.
- To use a query, click Query for the source and target objects.
3. In the Name fields, specify the name for the queries.
4. In the SQL fields, enter the queries.
5. To verify the queries, click Validate, then click OK.
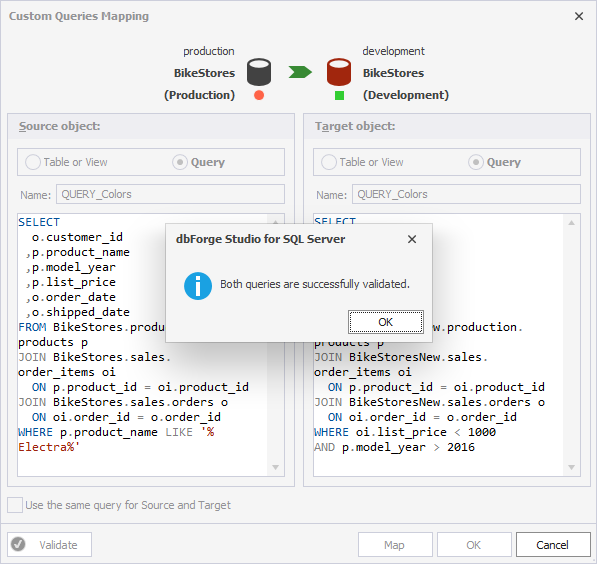
6. Click Map.
7. Click Close to close the dialog.
8. Set a comparison key.
Tip
Click Cancel to close the dialog window and discard mappings.
Click Reset to restore the default mapping of objects.
Filter objects in the grid
To display specific objects in the grid, on the Mapping toolbar, click  , then select the required option from the list.
The table provides available options.
| Name | Description |
|---|---|
| All | Displays all objects, regardless of a mapping status. |
| Valid Mappings | Shows objects mapped between the source and target. |
| Invalid Mappings | Lists objects that could not be mapped correctly. |
| Auto Mapped Objects | Displays objects automatically mapped by the tool. |
| User Mapped Objects | Shows objects mapped manually by the user. |
| Fully Mapped Objects | Lists objects where all elements are completely mapped. |
| Partially Mapped Objects | Displays objects with only some elements mapped. |
| Included Objects | Shows objects selected for comparison. |
| Excluded Objects | Lists objects excluded from comparison. |
Restore default mappings
To restore mappings to their original state, on the Mapping toolbar, click Reset.
Configure data filter options
By default, dbForge Studio for SQL Server compares all rows in the selected tables or views. If they contain a large amount of data, the comparison can take a lot of time and result in running out of disk space. To avoid these issues, filter the rows to be compared by applying a WHERE clause.
Warning
WHEREclauses can’t be used for backups and scripts folders.
To filter the comparison with a WHERE clause:
1. In the objects grid, select the object to apply the filter to.
2. On the Mapping toolbar, click Filter.
3. In the WHERE Filter dialog, specify a WHERE clause to exclude the rows from comparison.
Tip
To insert a column in a
WHEREclause, right-click the box and select Insert Column > column name.
4. To verify the clause, click Validate, then click OK.

5. To apply the expression to both the Source and the Target, select Use the same expression for Source and Target.
6. Click OK to apply the filtering condition and close the dialog.
The filtered object gets a filter icon in the grid.
Search for objects
To search for objects, type a search query in the search box.
Search behavior:
- Matching text is highlighted in yellow.
- The number of matches appears in the search box.
- The search is case-insensitive. For example, searching for pro matches Pro, PRO, and pro.
- If the query contains multiple words, each word is matched separately, and all matches are highlighted.
To clear the search results, click ![]() in the search box.
in the search box.
Keyboard shortcuts in the search box
The table describes the list of keyboard shortcuts you can use in the search box.
| Shortcut | Action |
|---|---|
| Ctrl+A | Selects all. |
| Ctrl+Left Arrow (←) | Moves the caret to the beginning of the word. |
| Ctrl+Right Arrow (→) | Moves the caret to the end of the word. |
| Ctrl+Shift+Left Arrow (←) | Selects text from the current caret position to the beginning of the current word and moves the caret to the beginning of the word. |
| Ctrl+Shift+Right Arrow (→) | Selects text from the current caret position to the end of the current word and moves the caret to the end of the word. |
| Ctrl+Backspace | Deletes the word to the left of the caret. |
Mapping warnings
Some objects may show instead of a checkbox in the grid. Hover over the icon to view the warning details.
The table provides a list of possible warnings.
| Name | Description |
|---|---|
| Objects to compare have no key column | A custom comparison key is selected but not defined. You must mark at least one column pair as the comparison key. |
| No columns to compare | There are no columns with the same name in this pair of tables (views). To compare columns, map them manually. |
| Decimal columns have different precisions or scales, migrating the data may cause rounding or overflows. | Decimal columns in the source have greater precision and/or scale than those in the target. If a source column contains values exceeding the target capacity, those records can’t be synchronized. If source values include a fractional part longer than the target scale, they will be rounded during synchronization. |
| Columns have different sizes, migrating the data may cause truncation. | When comparing BINARY or TEXT columns, if the source column is larger than the target, any data exceeding the target size will be truncated during synchronization. |
| Columns have incompatible types. | When the source column data type can’t be converted to the target column data type, for example TEXT to BINARY. |
| Source column allows Nulls which can not be stored in Target. | When a source column is nullable, while a target column is not. The source table data with NULLs can’t be synchronized. |
| Data in timestamp columns can’t be synchronized. | Data in rowversion (formerly timestamp) columns can’t be synchronized. These columns are automatically updated by SQL Server and can’t be modified. |
Compare data
After you select data sources and configure data comparison options (optional), or map schemas, tables, or columns, click Compare to start a data comparison process.
Note
You can start the data comparison process from any page of the wizard.