Adjust the query
After you add database objects to the diagram, you can select the required elements and adjust the data structure as needed.
These changes can be made in either panel: the Tabbed Editor or the diagram. Any updates in one panel are automatically synchronized with the other.
Tip
Tabbed Editor opens in Query Builder by default. If you close it, you can reopen it in one of these ways:
On the Query toolbar, click
.
On the menu bar, select Query > Show Tabbed Editor.
Add columns
You can add columns to a query to include specific data in the results. Selecting the appropriate columns lets you control what information is retrieved and displayed.
Note
You can add tables or views only from the same database connection.
When you drag a table onto the diagram, all its columns are added to the query by default.
To add columns to the query, use one of these ways:
-
On the diagram, select the checkbox for the column you want to add.
-
In Tabbed Editor:
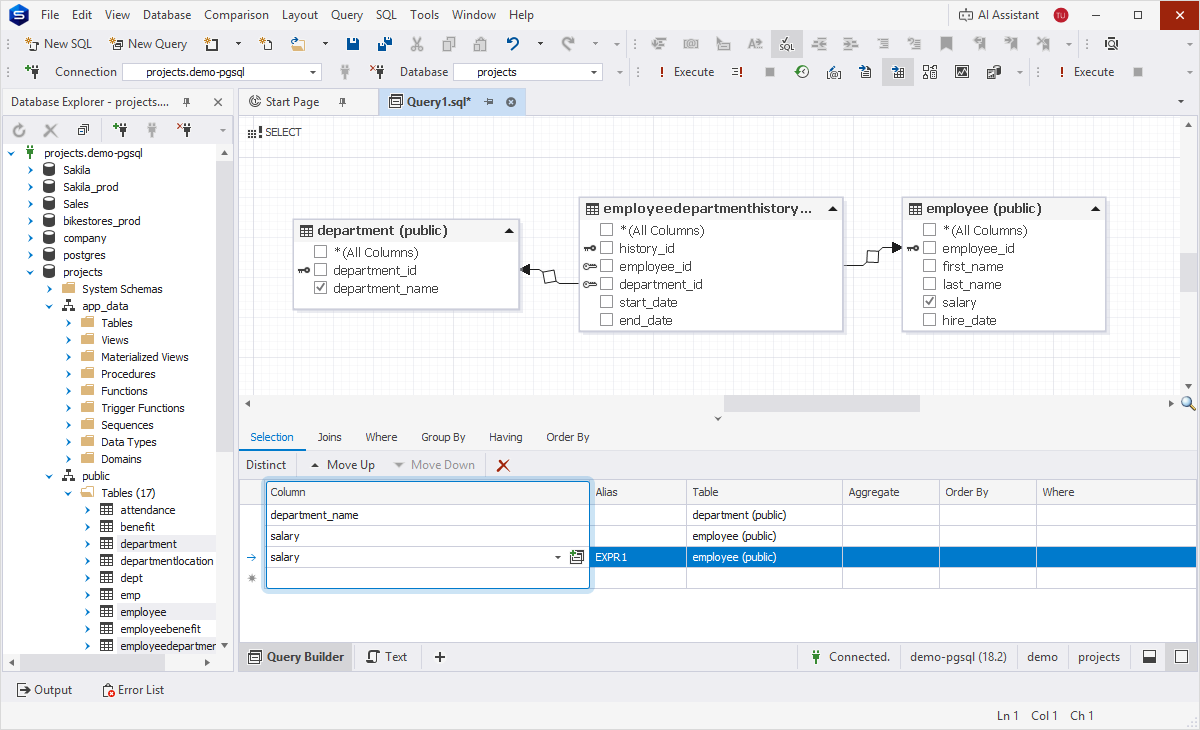
1. Navigate to Selection > Column.
2. In the row marked with an asterisk (*) > Column grid column, select a table and double-click the column you want to add.
3. Optional: To create a nested query, see Create subqueries.
Tip
To reorder columns in the grid, select the column name and click Move Up or Move Down.
To return only unique values and eliminate duplicate rows from the result set, click Distinct.
To remove a column from the grid, select a column name, then click

Add an alias
You can use aliases to assign temporary names to columns or tables.
Add a table alias
1. On the diagram, double-click the table header, then enter an alias name.
2. Press Enter.
Add a column alias
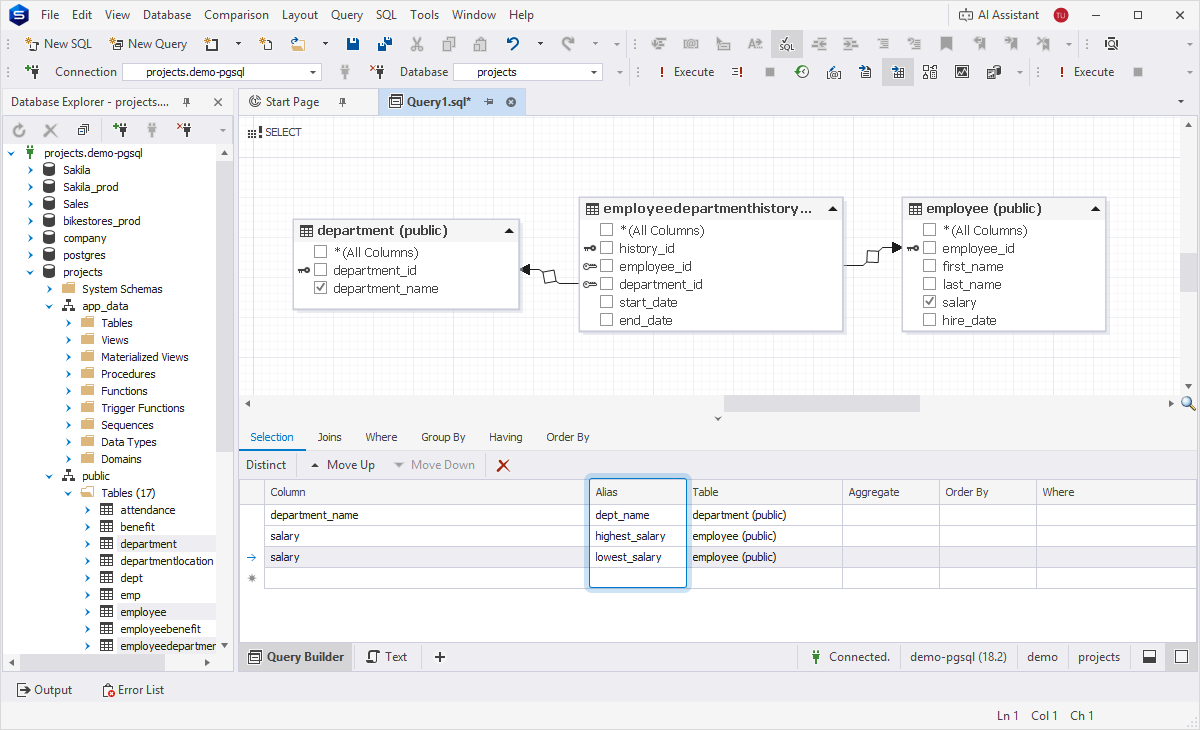
1. Navigate to Tabbed Editor > Selection.
2. Select the column for which you want to add an alias.
3. Under Alias, enter an alias name.
4. Press Enter.
Add a function
You can use functions in expressions to transform, calculate, or format data dynamically within your query.
Apply an aggregate function to a column
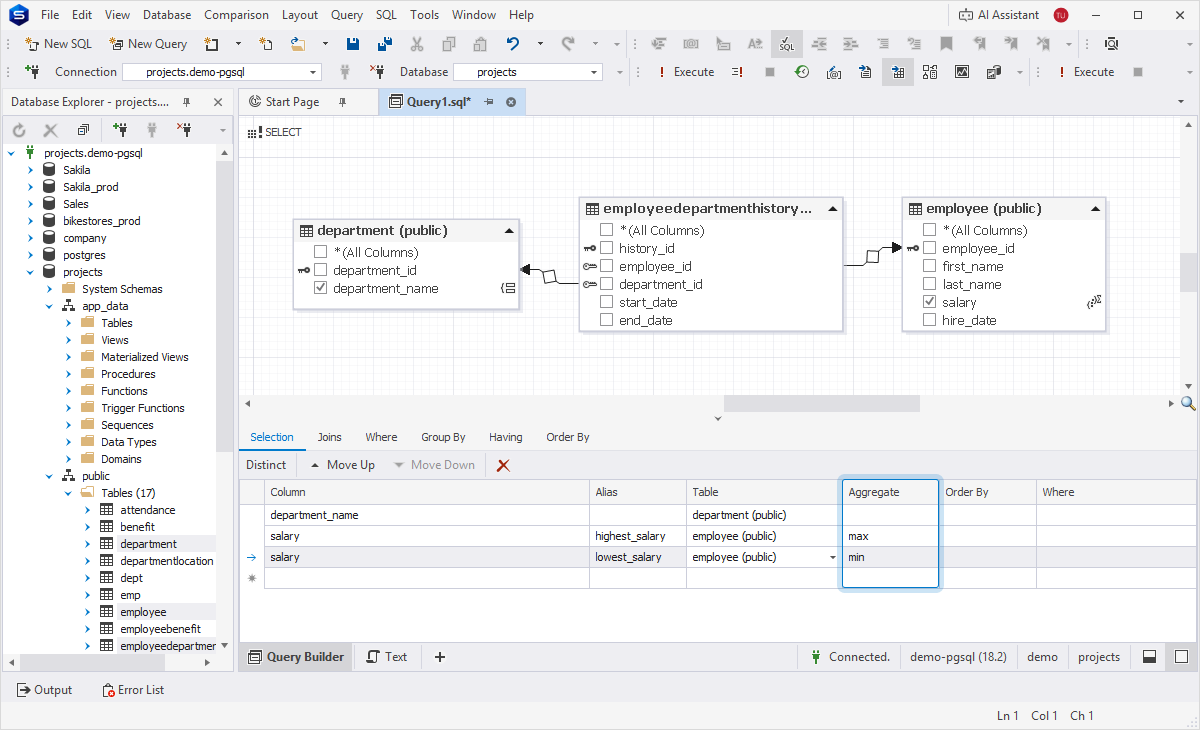
1. Navigate to Tabbed Editor > Selection.
2. Select the column for which you want to add a function.
3. Under Aggregate, select an aggregate function you want to apply to the column. For a complete list of aggregate functions, see Aggregate functions.
Use functions in conditions
You can use arithmetic, aggregate, and analytical functions in JOIN, WHERE, GROUP BY, and HAVING clauses. The functions help you define conditions for grouped results, sort and filter data, create join logic between tables, and transform values within queries.
For more information about using functions in queries, see the following sections:
Add joins
dbForge Studio automatically adds joins between tables when:
-
The database contains metadata that defines relationships between the tables.
-
Each table includes a column with the same name and data type, and at least one of the columns is a primary key.
-
A search condition implies a join, such as a
WHEREclause that compares the same column in both tables.
If the automatically added JOIN doesn’t meet your needs, you can edit or delete it. If no JOIN is created, you can add one manually.
Add a table join
To add a JOIN between two tables, use one of these ways:
-
On the diagram, drag a column from the source table to a column in the target table.
-
In Tabbed Editor:
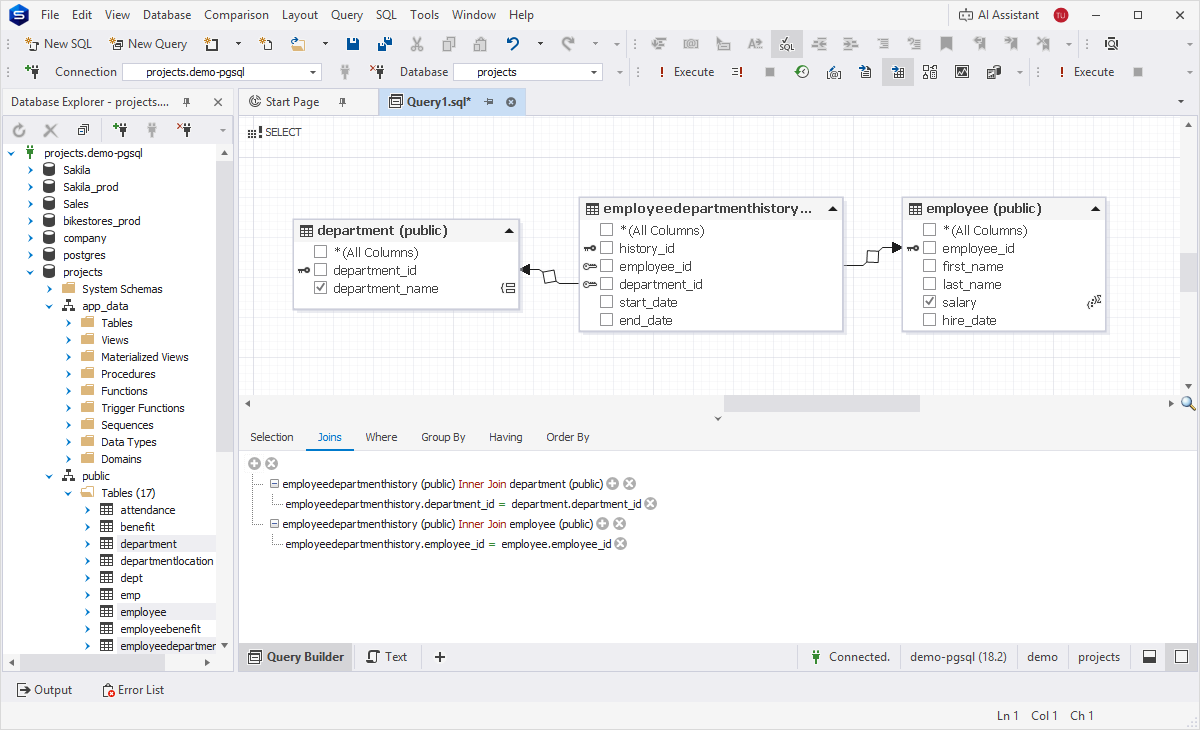
1. On the Joins tab, click
 .
.2. Click the <enter table name> placeholders and specify the source and target tables.
3. Select a join type that defines how data is retrieved. By default, Inner Join is selected. To change it, click the current join type and select an option from the dropdown list. The available options are: Left Outer Join, Right Outer Join, Inner Join, Cross Join, Full Outer Join, Natural Join, Natural Left Join, and Natural Right Join.
4. Add a join condition:
4.1. Click the <enter column name> placeholders to define the columns by which to create a join, or select a function or create an expression. Alternatively, click a join type and select Add Condition in the list.
4.2. Select a condition operator that defines how the selected columns are compared. By default, the equal sign (
=) is used. To change it, click the current condition operator and select an option from the dropdown list.
Note
You can add multiple conditions to a join.
Create a compound join condition
1. In the existing join condition, click a query operator.
2. On the menu, select Add Group.
3. Define additional filtering conditions.
Remove joins
You can remove a JOIN in either panel: the diagram or the Tabbed Editor.
On the diagram, use one of the ways:
-
Right-click the arrow connecting the tables, then select Remove from Diagram.
-
Select an arrow connecting the tables and press Delete.
In Tabbed Editor, use one of the ways:
-
On the Joins tab, click
 for the join you want to delete.
 -
Click the join type and select Remove Join.
Note
Removing a
JOINalso removes any conditions associated with that join.
Remove a JOIN condition
1. On the Joins tab, locate the condition with the join.
2. Click for the condition.
Filter data
You can define filtering conditions on the selected columns to return only those records that meet a specified condition.
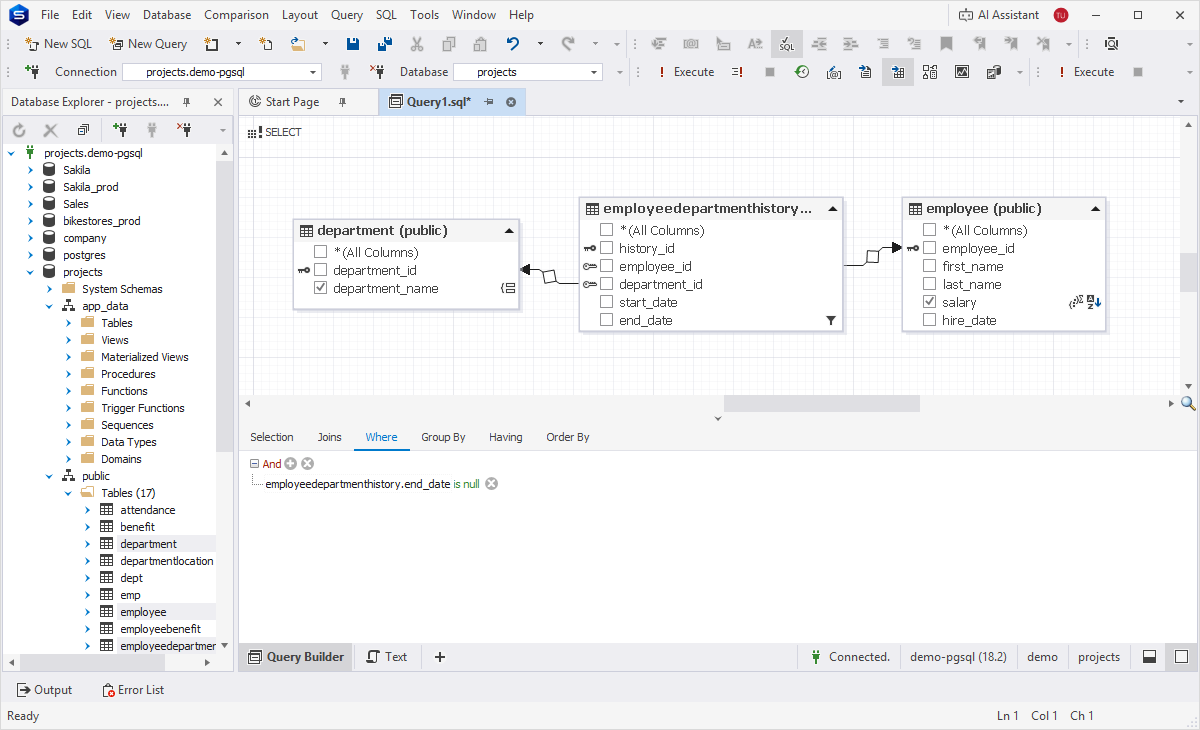
Add filtering
1. Navigate to Tabbed Editor > Where, then click . Alternatively, click a query operator and select Add Condition.
2. Select a query operator. By default, the AND operator is used. To change it, click the current operator and select an option from the dropdown list. The available options are: And, Or, Not And, and Not Or.
3. Configure the WHERE condition:
3.1. Click the leftmost <enter a value> placeholder, then select a column by double-clicking it, or define a function or expression.
3.2. Select a condition operator that defines how the selected columns are compared. By default, the equal sign (=) is used. To change it, click the current condition operator and select an option from the dropdown list.
3.3. Click the rightmost <enter a value> placeholder, then select the corresponding column, function, or expression.
Add compound filtering
1. In the existing filtering, click a query operator.
2. On the menu, select Add Group.
3. Define additional filtering conditions.
Remove filtering
1. In Tabbed Editor, locate the filtering condition you want to remove.
2. Click .
Group data
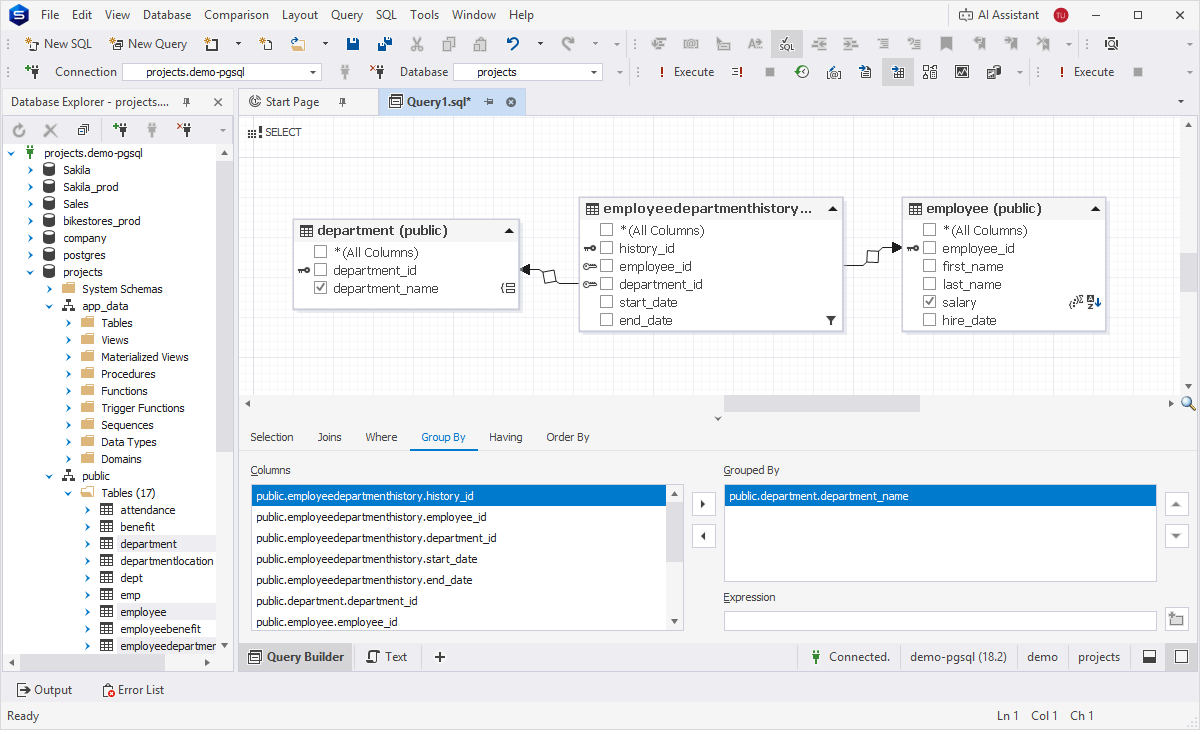
You can group rows that share the same values in one or more columns. You can use GROUP BY with aggregate functions, such as SUM, COUNT, or AVG to return summarized data. Each defined group is represented by a single row in the result set.
To group data:
1. Navigate to Tabbed Editor > Group By.
2. Under Columns, select the column by which to group data.
3. Click  to move the column to Grouped By.
4. Optional: To group by an expression or function, in Expression, enter the required expression or function, then click  .
.
Tip
To move a column back to Columns, click
.
To reorder columns, under Grouped By, click
or
.
Filter grouped results
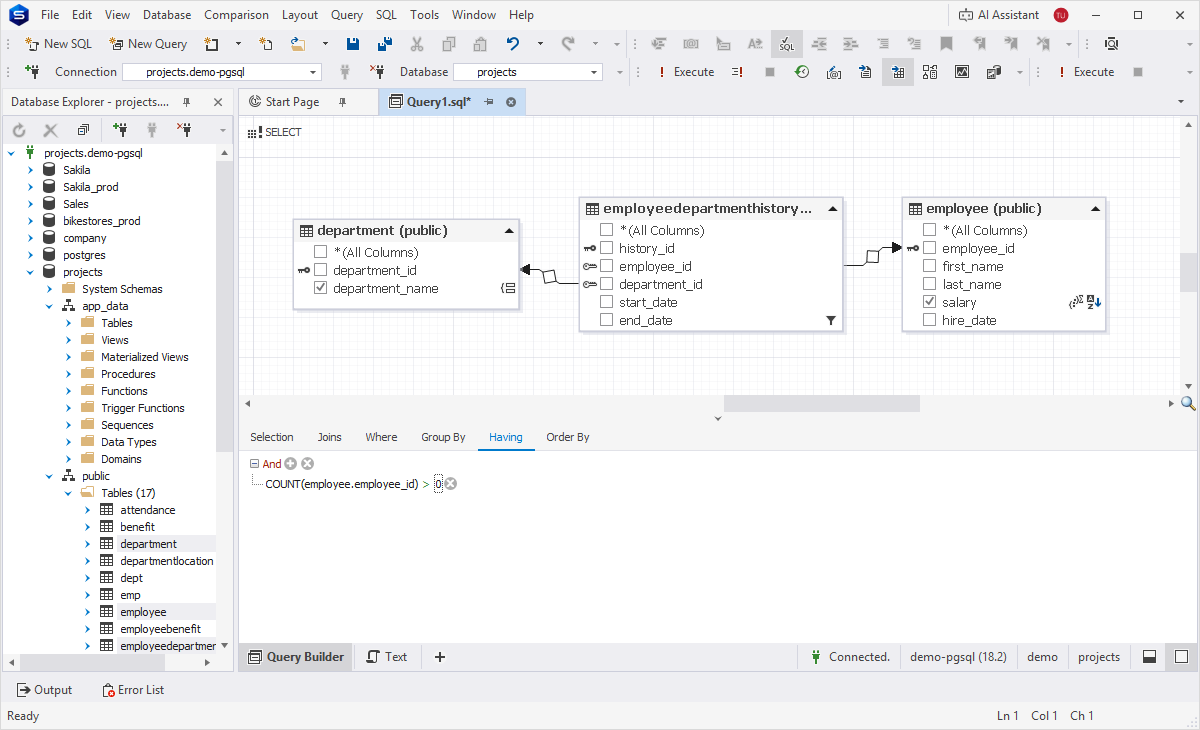
You can create filtering conditions for grouped results to return only groups that meet a specified condition.
Add filtering to grouped results
1. Navigate to Tabbed Editor > Having.
2. Click . Alternatively, click a query operator and select Add Condition.
3. Select a query operator. By default, the AND operator is used. To change it, click the current operator and select an option from the dropdown list. The available options are: And, Or, Not And, and Not Or.
4. Configure the HAVING condition:
4.1. Click the leftmost <enter a value> placeholder, then select a column by double-clicking it, or define a function or expression.
4.2. Select a condition operator that defines how the two parts are compared. By default, the equal sign (=) is used. To change it, click the current condition operator and select an option from the dropdown list.
4.3. Click the rightmost <enter a value> placeholder, then select the corresponding column, function, or expression.
Add compound filtering to grouped results
1. In the existing filtering, click a query operator.
2. On the menu, select Add Group.
3. Define additional filtering conditions.
Sort data
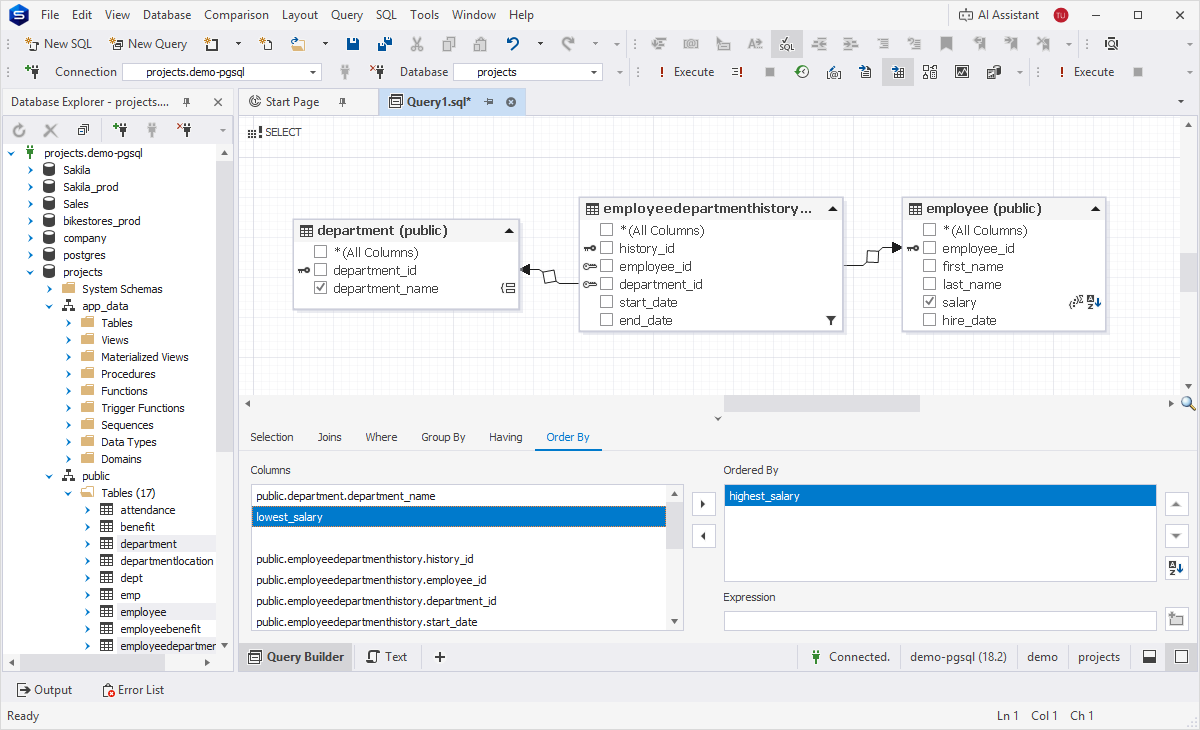
You can sort the query results set based on one or more columns in ascending or descending order.
To sort data:
1. Navigate to Tabbed Editor > Order By.
2. Under Columns, select the column by which to sort data.
3. Click to move the column to Ordered By.
4. Click  to select the sorting direction: ascending or descending.
5. Optional: To define multi-level sorting, add additional columns.
After you build a query, you can preview and execute it.