Сompare and synchronize data from Oracle to a PostgreSQL table
dbForge Studio for PostgreSQL allows users to migrate data from the Oracle table to the PostgreSQL table. For example, data migration may be used in the following cases:
-
Cost reduction: Oracle is a commercial database management system (DBMS) that comes with significant licensing and maintenance costs. Migrating to PostgreSQL, an open-source DBMS, can lead to substantial cost savings for organizations, especially for smaller businesses or those with budget constraints.
-
Open-source advantage: PostgreSQL is an open-source DBMS, which means it is freely available, and users have access to the source code. This enables organizations to customize and extend PostgreSQL to meet their specific needs, providing more flexibility and control over the database.
-
Cross-platform: PostgreSQL is available on various operating systems, including Windows, Linux, and macOS. This allows organizations to migrate their database to different platforms without major compatibility issues. Oracle, on the other hand, is primarily associated with enterprise-level systems and may not be as versatile when it comes to platform support.
Before migrating data from Oracle to the PostgreSQL table, make sure to perform the following:
- Analyze the Oracle database structure, including tables, views, indexes, constraints, stored procedures, and triggers.
- Map the data types, constraints, and database objects from Oracle to PostgreSQL.
- Grant appropriate permissions to the user performing the migration in both databases.
Prerequisites
The steps to be performed on the Oracle side:
- Create the Oracle table by executing the CREATE TABLE statement, for example:
CREATE TABLE ORACLE_TABLE (
    ID NUMBER(11, 0) DEFAULT 1,
    C_BIN_FLOAT BINARY_FLOAT,
    C_BLOB BLOB,
    C_CHAR CHAR(20 CHAR),
    C_CLOB CLOB,
    C_DATE DATE,
    C_INTEGER NUMBER(*, 0),
    C_INT_D_TO_SEC INTERVAL DAY(2) TO SECOND(6),
    C_NVARCHAR2 NVARCHAR2(50),
    CONSTRAINT PK_ORACLE_TABLE_ID PRIMARY KEY (ID) USING INDEX
);
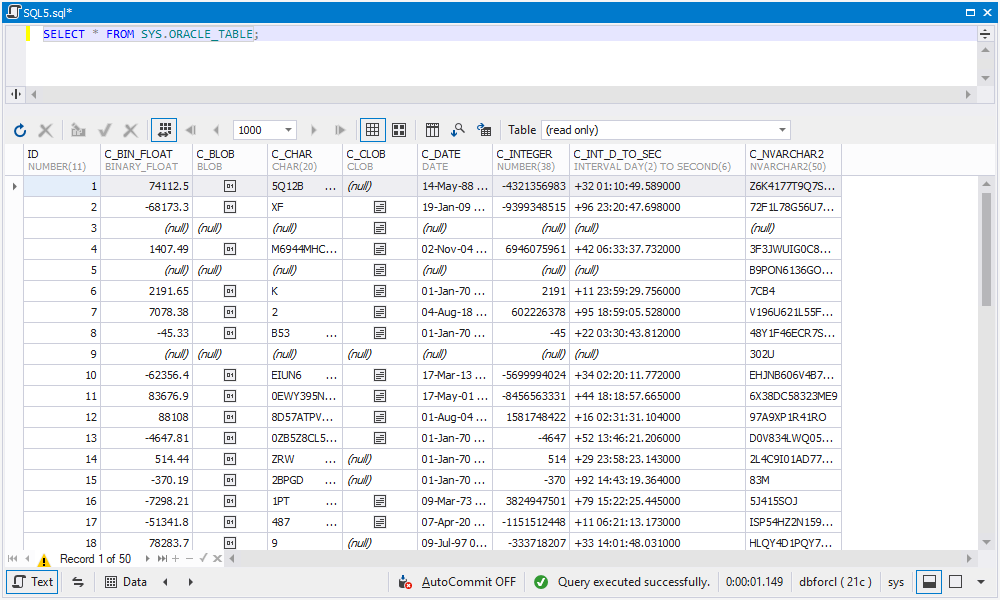
- Populate the Oracle table with data. In our example, we used the Data Generator tool available in dbForge Studio for Oracle. For more information about how to populate the table with test data, see Setting up Data Generator.
The result may be as follows:
Migrate data from Oracle to PostgreSQL
You can migrate table data from Oracle to PostgreSQL using the oracle_fdw foreign data wrapper and the Data Compare tool available in dbForge Studio for PostgreSQL.
Step 1: Install the PostgreSQL server
Download the PostgreSQL server from the official website and then run the installer by following the steps. This will install the PostgreSQL server and create a default PostgreSQL superuser - postgres. When asked, create a password for this user.
Step 2: Install the Oracle client
The foreign data wrapper for Oracle - oracle_fdw - requires the Oracle client to be installed on your machine to access the remote Oracle database. Otherwise, you may get an error - Oracle client library (oci.dll) not found. You can download the Oracle client from their download pages and install it on your machine.
Step 3: Install the Oracle data wrapper
oracle_fdw is a PostgreSQL extension that allows PostgreSQL to connect to Oracle databases.
How oracle_fdw works
The client initiates a query to the foreign table created on the PostgreSQL side. In response, the PostgreSQL server communicates with the oracle_fdw wrapper, requesting the retrieval of data from the corresponding Oracle table. The oracle_fdw wrapper accesses the foreign server and user mapping data to obtain the necessary access details. Using the OCI (Oracle Call Interface) library, the wrapper transmits the query to the Oracle database. That’s why make sure that the library is installed for the proper work of the oracle_fdw wrapper. The Oracle database processes the query and generates the result set. After the oracle_fdw wrapper receives the result from Oracle, it sends it to the PostgreSQL server. Finally, the client gets the result from the PostgreSQL server.
To install the Oracle data wrapper:
1. Download the oracle_fdw archive and extract it. The versions of the PostgreSQL server and oracle_fdw file should match, i.e. if you have the PostgreSQL server, v.15 installed, download the oracle_fdw version 15.
2. Copy oracle_fdw.dll from the lib folder to the \PostgreSQL\15\lib directory.
3. Copy all the files including oracle_fdw.control and the other .sql files from the share\extension folder to the PostgreSQL\15\share\extension directory.
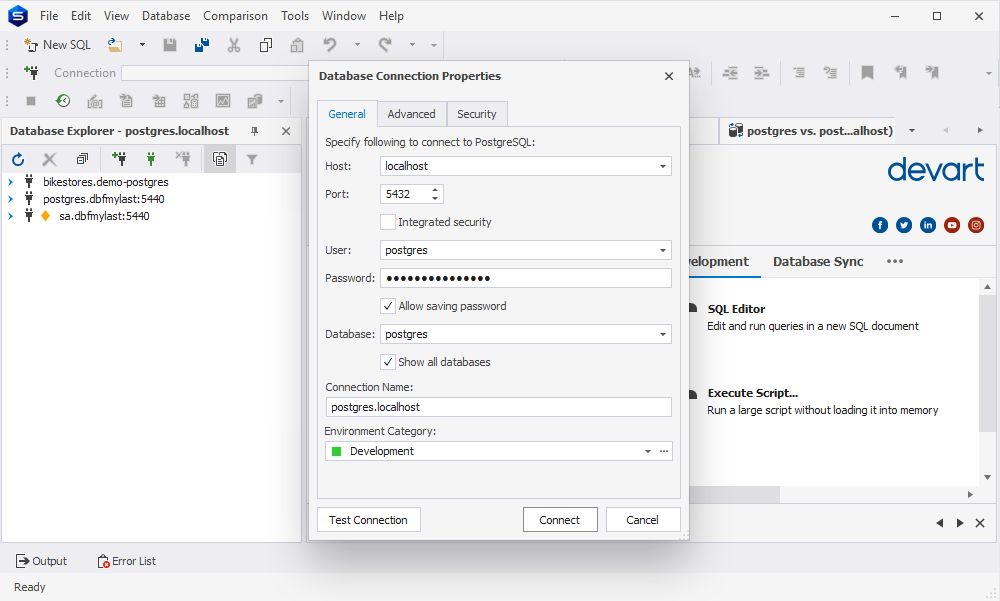
4. Launch dbForge Studio for PostgreSQL to create a connection to your local PostgreSQL server with a superuser:
- In Database Explorer, click Create a new database connection.
- In the Database Connection Properties dialog that opens, enter a Postgres host, a port, a username and a password, and select the database.
- Click Connect to establish the connection to the PostgreSQL server.
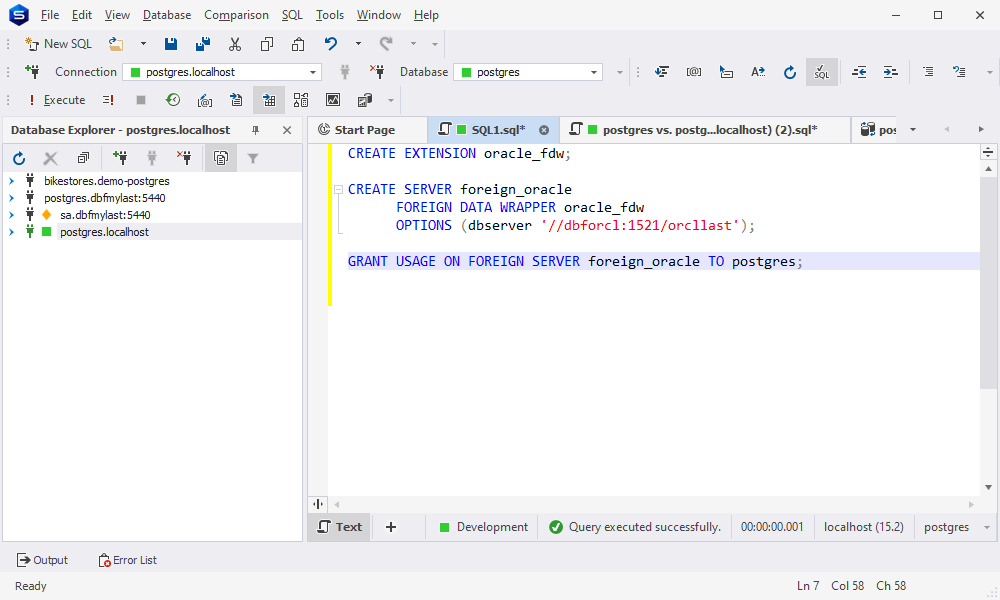
5. On the toolbar, click New SQL. In the SQL editor that opens, execute the following statement to create a wrapper:
CREATE EXTENSION oracle_fdw;
Step 4: Create a foreign server
In PostgreSQL, a foreign server is created to establish a connection to the Oracle database. The foreign server represents the Oracle database as a remote server in PostgreSQL.
1. In the SQL editor, execute the CREATE SERVER statement to create an Oracle foreign server:
CREATE SERVER foreign_server_name
      TYPE 'server_type'
      VERSION 'server_version'
      FOREIGN DATA WRAPPER oracle_fdw
      OPTIONS (dbserver '//host:port/service_name');
Replace the following values with your actual data:
- foreign_server_name
- server_type (optional)
- server_version (optional)
- host, port, and service_name of the Oracle server on which the Oracle table has been created.
2. Grant privileges to the local user - postgres - to use the foreign server.
GRANT USAGE ON FOREIGN SERVER foreign_server_name TO postgresql_username;
Step 5: Define a user mapping
User mapping is necessary to associate a PostgreSQL user with a user in the Oracle database. This allows the PostgreSQL user to access the Oracle tables via the foreign server.
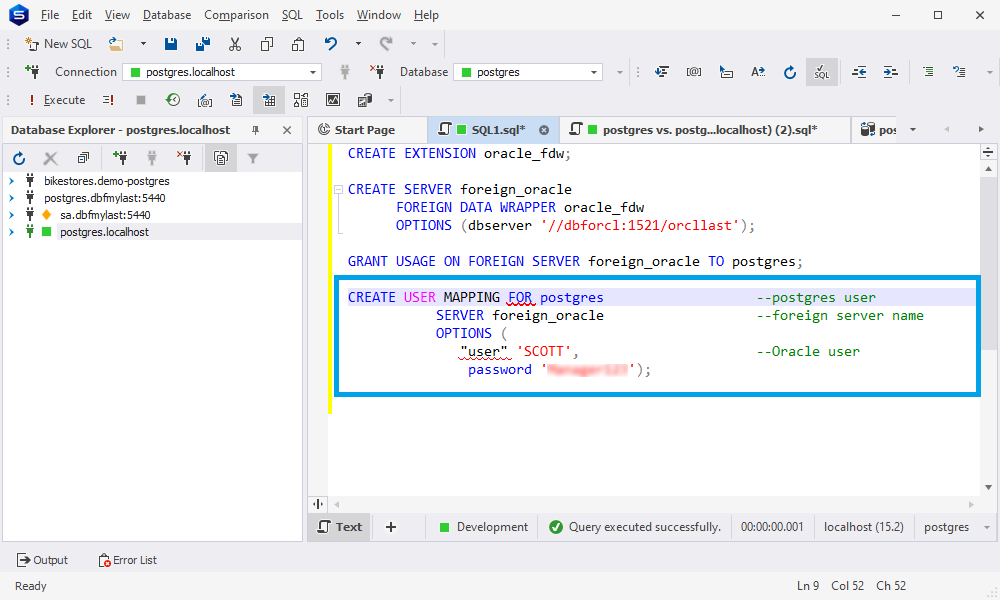
In the SQL editor, create a user mapping so that a user on the local server can use the credentials to access the remote server:
CREATE USER MAPPING FOR postgresql_username
           SERVER foreign_server_name
           OPTIONS (
              "user" 'oracle_username',
               password '********');
Replace the following values with your actual data:
- postgresql_username is the name of the user connected to the PostgreSQL server.
- foreign_server_name is the name of the Oracle foreign server from which the data will be extracted and migrated to PostgreSQL.
- oracle_username is the name of the user who created the Oracle table on the Oracle side. It is necessary to have the appropriate privileges to access and extract data from the Oracle table.
- password is the password for the specified Oracle username. It is required to authenticate and establish a connection to the Oracle database.
Step 6: Create a foreign table
After the foreign server and user mapping are set up, you can create a foreign table in PostgreSQL that represents a table in the Oracle database. This allows you to access and query the Oracle table from within PostgreSQL.
To create a foreign table:
1. In the SQL editor, execute the CREATE FOREIGN TABLE statement:
CREATE FOREIGN TABLE foreign_table (
    id NUMERIC,
    c_bin_float DOUBLE PRECISION,
    c_blob BYTEA,
    c_char CHAR(20),
    c_clob TEXT,
    c_date DATE,
    c_integer NUMERIC,
    c_int_d_to_sec INTERVAL,
    c_nvarchar2 VARCHAR
  )
  SERVER foreign_oracle
  OPTIONS ("table" 'table_name');
table_name is the Oracle table name that contains data to be migrated. In our example, ‘table_name’ is ‘ORACLE_TABLE’.
Note
The columns of the foreign table must be created with the same data types as the Oracle table or view.
For the database schema and table names, use the same capitalization as used in the table on the Oracle side.
The schema and table names must be enclosed in single quotation marks in OPTIONS.
2. To check that the foreign table works properly, retrieve data by executing the SELECT statement:
SELECT * FROM foreign_table;
3. To compare and synchronize data, we also need to create a PostgreSQL table parallelling the foreign table:
CREATE TABLE PG_TABLE (
   ID numeric,
   C_BIN_FLOAT double precision,
   C_BLOB bytea,
   C_CHAR char(20),
   C_CLOB text,
   C_DATE date,
   C_INTEGER numeric,
   C_INT_D_TO_SEC interval,
   C_NVARCHAR2 varchar,
   CONSTRAINT PK_PG_TABLE_ID PRIMARY KEY (ID)
 );
When everything is set up, we can compare and synchronize data using the Data Compare tool available in dbForge Studio for PostgreSQL.
Step 7: Compare and synchronize data from Oracle to PostgreSQL
1. On the main Comparison menu, click New Data Comparison.
2. In the New Data Comparison wizard that opens, specify the PostgreSQL server and the database as Source and Target.
3. Go to the Mapping page and click Custom Query.
4. In the Custom Queries Mapping dialog that opens, do the following:
- Under Source objects, select Query (it is a default option) and enter the SELECT statement of the foreign table.
- Under Target objects, select Table or View and select the PG_TABLE table you’ve created for the data comparison and synchronization.
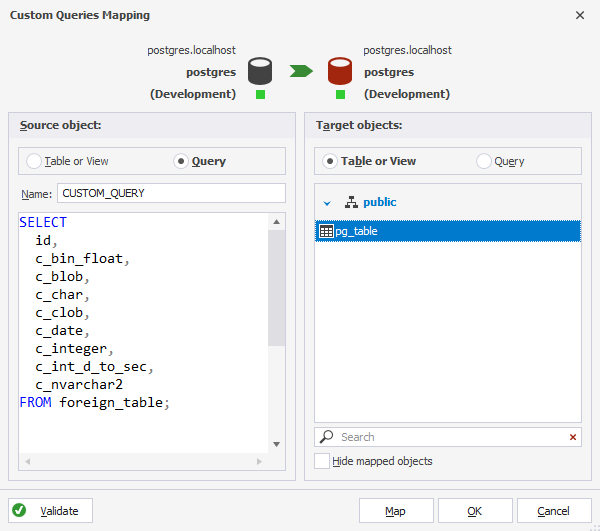
Then, click Map and then Close.
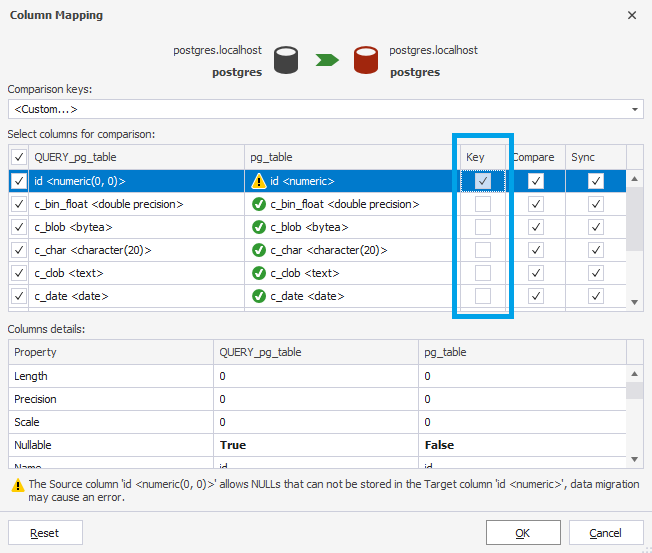
5. On the Mapping page, select Custom from the Comparison Key column dropdown list to map columns.
6. In the Column Mapping dialog that opens, select the Key checkbox for the id column and click OK.
7. To run the data comparison, click Compare.
8. In the .dcomp document that opens, click Synchronize to run the synchronization.
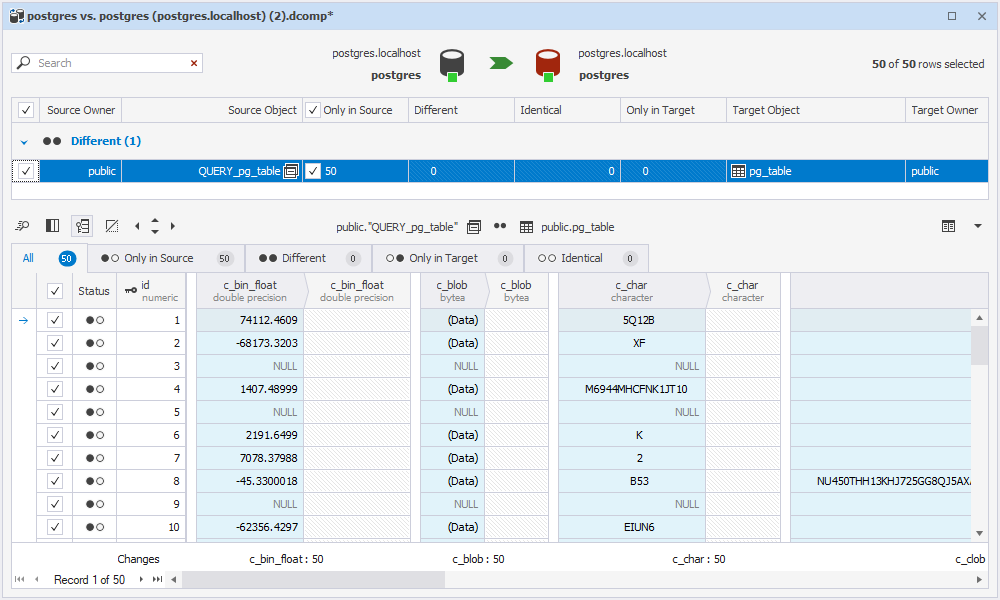
9. In the Data Synchronization Wizard that opens, select the output option to manage the synchronization script, set up synchronization options, and click Synchronize.
Done! You can also automate data synchronization using the command-line interface available in the dbForge tool. For more information, see the blog post - Migrating data from Oracle to PostgreSQL.