Best practices for managing user and object privileges in Oracle databases
This topic describes best practices for managing users, roles, and privileges in Oracle databases by using Security Manager or SQL Editor in dbForge Studio for Oracle.
Security Manager provides a visual interface for granting, revoking, and auditing privileges. It helps minimize errors and ensure compliance with security standards.
SQL Editor is a text editing interface for writing, editing, and executing SQL queries, scripts, and statements in Oracle databases.
Use the principle of least privilege (PoLP)
This principle implies that users and roles should be granted only the minimum privileges necessary to perform their tasks.
Implement using SQL Editor
1. On the standard toolbar, click New SQL to open SQL Editor.
2. Enter the following query:
GRANT SELECT ON HR.EMPLOYEES TO APP_USER;
GRANT SELECT ON HR.DEPARTMENTS TO APP_USER;
Warning
Avoid using
GRANT SELECT ANY TABLE. This privilege gives a user read access to all tables in the database, including tables that may contain sensitive or confidential data. Granting broad access increases security risks and conflicts with the principle of least privilege. Instead, grantSELECTprivileges only on the specific objects required by a user or role.
3. Click Execute.
4. Run the queries to verify the granted access.
-- Check current session privileges
SELECT * FROM SESSION_PRIVS;

-- Check specific user privileges
SELECT * FROM ALL_TAB_PRIVS WHERE GRANTEE = 'APP_USER';
Implement using Security Manager
1. On the menu bar, select Database > Security Manager.
2. Under Users, select the user.
3. On the System and Object tabs, clear the checkboxes for any privileges that are not required.
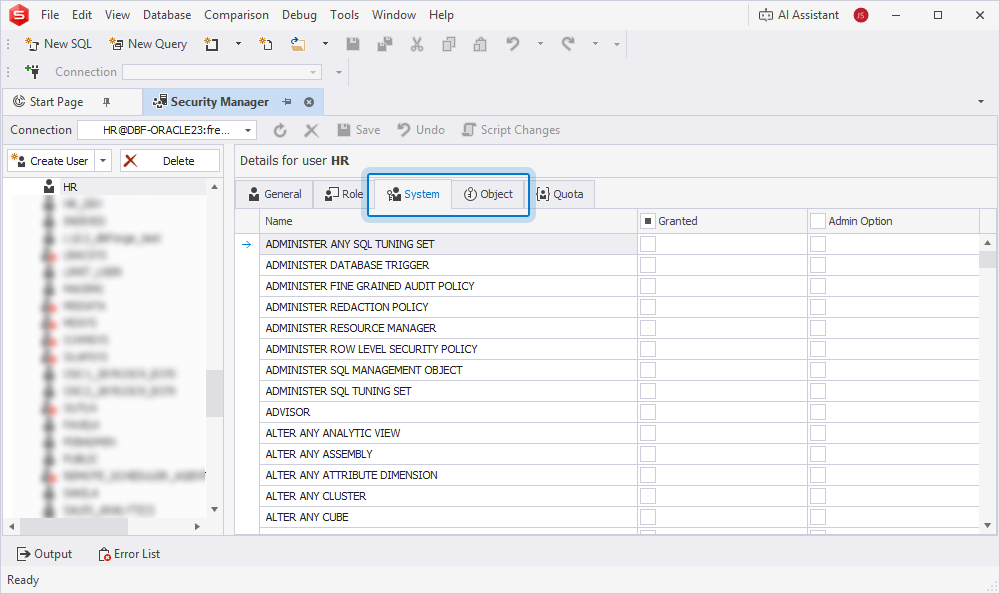
4. On the Security Manager toolbar, click Save.
Use the role-based access control (RBAC)
The RBAC security principle lets you grant privileges to roles rather than directly to users.
Implement using SQL Editor
1. Open SQL Editor.
2. Enter the following query:
-- Create an application-specific role
CREATE ROLE APP_READONLY_ROLE;

-- Grant necessary privileges to a role
GRANT SELECT ON HR.EMPLOYEES TO APP_READONLY_ROLE;
GRANT SELECT ON HR.DEPARTMENTS TO APP_READONLY_ROLE;
GRANT SELECT ON HR.JOB_HISTORY TO APP_READONLY_ROLE;

-- Grant a role to users
GRANT APP_READONLY_ROLE TO USER1, USER2, USER3;

-- Enable a role by default
ALTER USER USER1 DEFAULT ROLE APP_READONLY_ROLE;
3. Click Execute.
Implement using Security Manager
1. In Security Manager, right-click Roles and select New Role.
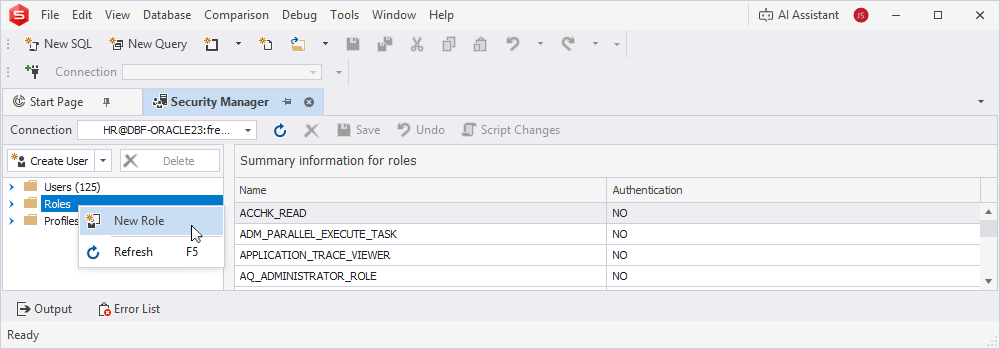
2. On the General tab, enter a role name, for example, APP_READONLY_ROLE.
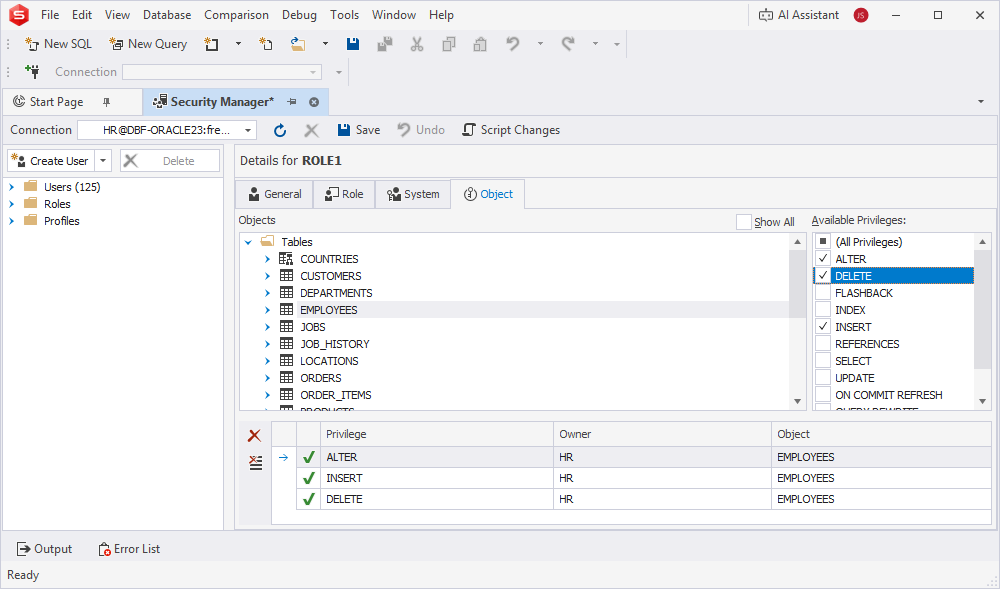
3. On the Object tab:
3.1. Under Objects, select the objects you want to grant privileges to.
3.2. Under Available Privileges, select the checkboxes for the required privileges.
4. Click Save.
Use predefined roles with caution
Oracle provides predefined roles for common administrative and development tasks. However, these roles may grant more privileges than required. To follow the principle of least privilege, create custom roles for specific tasks whenever possible.
The following table describes common predefined roles in Oracle databases.
| Role | Privileges | Risk level | Recommended use |
|---|---|---|---|
| DBA | All system privileges. | Critical | Use only for database administrators. Do not grant this role to application accounts. |
| RESOURCE | Object creation privileges, such as CREATE TABLE and CREATE PROCEDURE. |
Medium | Use only in development environments. |
| CONNECT | Basic connection privileges, such as CREATE SESSION. |
Low | Use for basic database connectivity. |
| SELECT_CATALOG_ROLE | Access to data dictionary views. | Low | Use for monitoring and reporting tools. |
Warning
Avoid granting the DBA role to application accounts:
GRANT DBA TO APP_USER;
Create a custom role
If the predefined Oracle roles don’t meet your security requirements, create a custom role that contains only the privileges required for a specific task or application.
To create a custom role:
1. Open SQL Editor.
2. Enter the following query. Replace the role and user names with your actual values.
-- Create a custom role
CREATE ROLE APP_ADMIN_ROLE;
GRANT CREATE SESSION TO APP_ADMIN_ROLE;
GRANT CREATE TABLE TO APP_ADMIN_ROLE;
GRANT CREATE PROCEDURE TO APP_ADMIN_ROLE;
GRANT APP_ADMIN_ROLE TO APP_USER;
3. Click Execute.
Use WITH GRANT OPTION and WITH ADMIN OPTION
Privilege propagation occurs when a user who has been granted a privilege with WITH GRANT OPTION or a role with WITH ADMIN OPTION can grant those privileges to other users or roles. This creates a chain of privilege assignments that may extend access beyond the original grant.
The following table outlines the differences between WITH GRANT OPTION and WITH ADMIN OPTION.
| Aspect | WITH GRANT OPTION | WITH ADMIN OPTION |
|---|---|---|
| Applies to | Object privileges | System roles |
| Revocation cascades | Yes | No |
| Risk level | Medium | High |
Grant and revoke privileges using SQL Editor
To grant object and system privileges with propagation, run the following statements. Replace the placeholders with your actual values.
-- Object privilege with propagation
GRANT SELECT ON HR.EMPLOYEES TO USER1 WITH GRANT OPTION; -- User1 can now grant SELECT on employees to others

-- System privilege with propagation
GRANT CREATE TABLE TO USER2 WITH ADMIN OPTION; -- User2 can now grant CREATE TABLE to others
To revoke object and system privilege cascades, run the following statements. Replace the placeholders with your actual values.
-- Revoke object privilege cascades
REVOKE SELECT ON HR.EMPLOYEES FROM USER1;
-- All downstream grants are automatically revoked

-- Revoke system privilege does NOT cascade
REVOKE CREATE TABLE FROM USER2;
-- Must manually revoke from all downstream users
Grant and revoke privileges using Security Manager
1. In Security Manager, under Users, select the required user.
2. On the Security Manager toolbar, click Script Changes to generate revocation scripts.
3. In a new SQL document that opens, review and execute the generated scripts to handle complex cascades.
Note
Only a user or a role that originally granted a privilege or a DBA can revoke it. Otherwise, the following error occurs:
ORA-01927: cannot REVOKE privileges you did not grant.
Perform regular auditing
You can audit privileges and roles in an Oracle database:
- Weekly to review new users and role assignments.
- Monthly to monitor all users.
- Quarterly to review and update role definitions.
- Annually to perform a full security assessment.
To view a list of users and roles (GRANTEE) with powerful system privileges, use the following query:
SELECT GRANTEE, PRIVILEGE
FROM DBA_SYS_PRIVS
WHERE PRIVILEGE IN ('DBA', 'SELECT ANY TABLE', 'DROP ANY TABLE', 'DELETE ANY TABLE')
ORDER BY GRANTEE;
To view which roles are assigned to users or other roles, use the following query:
SELECT GRANTEE, OWNER, TABLE_NAME, PRIVILEGE, GRANTABLE
FROM DBA_TAB_PRIVS
WHERE OWNER = 'HR' AND TABLE_NAME = 'EMPLOYEES'
ORDER BY GRANTEE;
To find all users who can grant object privileges to others, use the following query:
SELECT GRANTEE, TABLE_NAME, PRIVILEGE
FROM DBA_TAB_PRIVS
WHERE GRANTABLE = 'YES'
ORDER BY GRANTEE;
Lock account and revoke privileges
You can lock accounts or revoke all or specific privileges using SQL Editor or Security Manager.
Revoke privileges using SQL Editor
1. In SQL Editor, enter the following statements. Replace the values with your actual data.
-- Lock an account
ALTER USER DEPARTED_USER ACCOUNT LOCK;

-- Revoke roles
REVOKE APP_USER_ROLE FROM DEPARTED_USER;

-- Revoke specific privileges
REVOKE SELECT ON SENSITIVE_TABLE FROM DEPARTED_USER;

-- For complete cleanup
DROP USER DEPARTED_USER CASCADE;
2. Click Execute.
Lock the account and revoke privileges using Security Manager
1. In Security Manager, under Users, select the required user.
2. On the General tab, select Account locked.
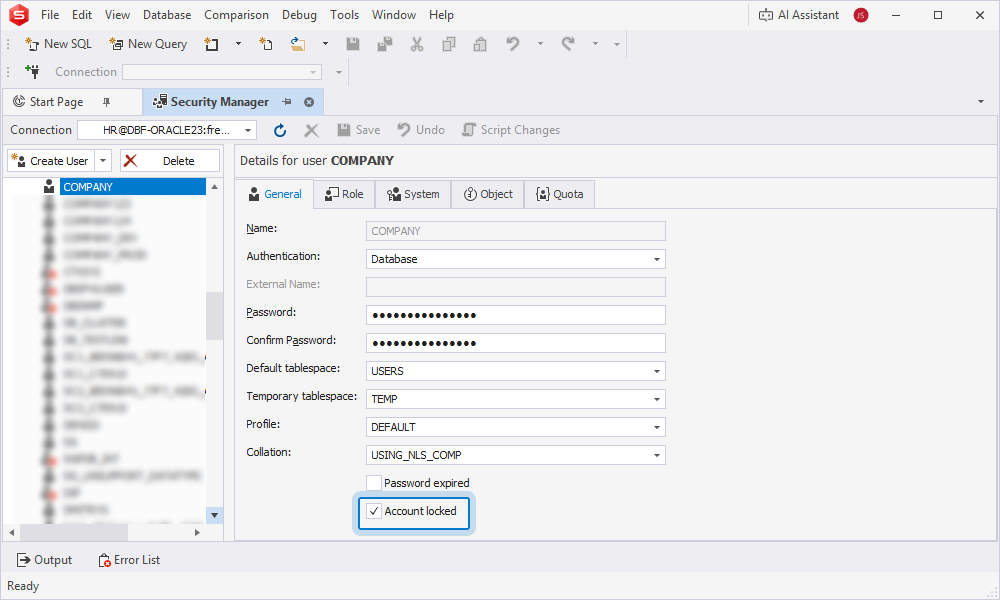
3. On the Role tab, in the Granted column, clear the checkboxes next to the privileges you want to revoke.
4. On the Object tab:
4.1. Under Objects, select the object from which you want to revoke the privileges.
4.2. In Available Privileges, clear the checkboxes next to the privileges you want to revoke.
5. On the Security Manager toolbar, click Save.
Avoid PUBLIC grants
It isn’t recommended to grant permissions to all users, for example:
-- Grant permissions to all users, including future ones
GRANT SELECT ON sensitive_data TO PUBLIC;
Instead, grant to specific roles, for example:
CREATE ROLE DATA_READERS;
GRANT SELECT ON sensitive_data TO DATA_READERS;
GRANT DATA_READERS TO AUTHORIZED_USER1, AUTHORIZED_USER2;
To find all PUBLIC grants, run the following query:
SELECT * FROM DBA_TAB_PRIVS WHERE GRANTEE = 'PUBLIC';
To revoke PUBLIC grants, run the following statements:
REVOKE EXECUTE ON UTL_FILE FROM PUBLIC;
REVOKE EXECUTE ON DBMS_JOB FROM PUBLIC;
Create a security profile
You can create a security profile to protect against poor passwords and unauthorized access or limit resource usage.
Create using SQL Editor
1. Open SQL Editor.
2. To create a security profile and assign it to users, run the following query:
CREATE PROFILE SECURE_APP_PROFILE LIMIT
SESSIONS_PER_USER 3
CPU_PER_SESSION UNLIMITED
CPU_PER_CALL 3000
CONNECT_TIME 480
IDLE_TIME 30
LOGICAL_READS_PER_SESSION UNLIMITED
LOGICAL_READS_PER_CALL 1000
PRIVATE_SGA 15M
COMPOSITE_LIMIT UNLIMITED
FAILED_LOGIN_ATTEMPTS 3
PASSWORD_LIFE_TIME 90
PASSWORD_REUSE_TIME 180
PASSWORD_REUSE_MAX 5
PASSWORD_LOCK_TIME 1
PASSWORD_GRACE_TIME 7
PASSWORD_VERIFY_FUNCTION ora12c_strong_verify_function;

-- Assign to users
ALTER USER APP_USER PROFILE SECURE_APP_PROFILE;
Create using Security Manager
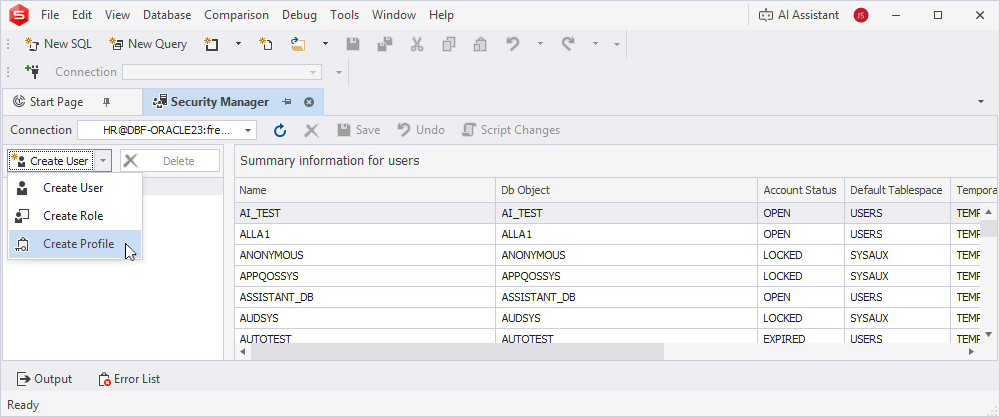
1. In Security Manager, click the arrow next to Create User and select Create Profile.
2. In Name, enter the profile name.
3. Set the required general and password parameters.
4. On the Security Manager toolbar, click Save.
5. Under Users, select the required user to whom you want to assign the profile.
6. On the General tab, in Profile, select the profile.
Repeat this step for each user to whom you want to assign the profile.
7. On the Security Manager toolbar, click Save.
Test in a non-production environment
You can test whether granting privileges work correctly before you deploy them to production.
You can use SQL Editor or Schema Compare to validate the changes. Schema Compare helps identify object-level differences and generate a synchronization script.
Test using SQL Editor
1. Open SQL Editor.
2. Run the following scripts. Replace the values with your actual data.
-- 1. Export current privilege state
CREATE TABLE privilege_backup AS
SELECT * FROM DBA_SYS_PRIVS WHERE GRANTEE = 'TEST_USER';

-- 2. Make changes in development
GRANT SELECT ON TEST_TABLE TO TEST_USER;

-- 3. Validate changes
SELECT * FROM USER_TAB_PRIVS WHERE TABLE_NAME = 'TEST_TABLE';

-- 4. If successful, apply to production using the generated script
Test using Schema Compare
1. Run schema comparison.
2. Analyze comparison results.
3. Run schema synchronization.
Tip
To generate a synchronization script, on the Output page of Schema Synchronization Wizard, select Open the synchronization script in the internal editor. After schema synchronization, the script opens in SQL Editor. You can review and edit the script, and then run it to synchronize the databases.
Generate documentation
You can generate documentation to review existing roles and the privileges assigned to them.
Generate using SQL Editor
1. Open SQL Editor.
2. Run the following query:
SELECT
r.ROLE AS ROLE_NAME,
rsp.PRIVILEGE AS SYSTEM_PRIVILEGE,
tp.TABLE_NAME AS OBJECT,
tp.PRIVILEGE AS OBJECT_PRIVILEGE
FROM DBA_ROLES r
LEFT JOIN ROLE_SYS_PRIVS rsp ON r.ROLE = rsp.ROLE
LEFT JOIN ROLE_TAB_PRIVS tp ON r.ROLE = tp.ROLE
WHERE r.ROLE = 'APP_USER_ROLE'
ORDER BY rsp.PRIVILEGE, tp.TABLE_NAME;
Generate a report
1. On the menu bar, select Database > Report Designer.
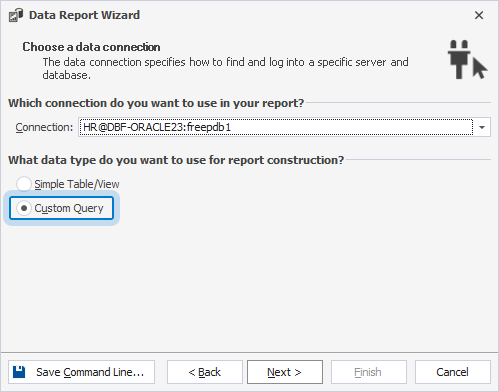
2. In Data Report Wizard, select Standard Report, then click Next.
3. Select Custom Query.
4. Enter the query.
SELECT
r.ROLE AS ROLE_NAME,
rsp.PRIVILEGE AS SYSTEM_PRIVILEGE,
tp.TABLE_NAME AS OBJECT,
tp.PRIVILEGE AS OBJECT_PRIVILEGE
FROM DBA_ROLES r
LEFT JOIN ROLE_SYS_PRIVS rsp ON r.ROLE = rsp.ROLE
LEFT JOIN ROLE_TAB_PRIVS tp ON r.ROLE = tp.ROLE
WHERE r.ROLE = 'APP_USER_ROLE'
ORDER BY rsp.PRIVILEGE, tp.TABLE_NAME;
5. Select the columns you want to display in the report.
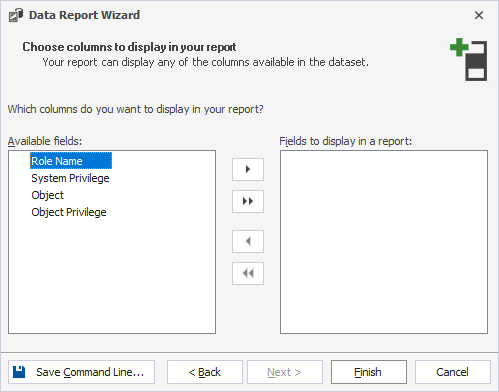
6. Click Finish.
The report opens in Report Designer.
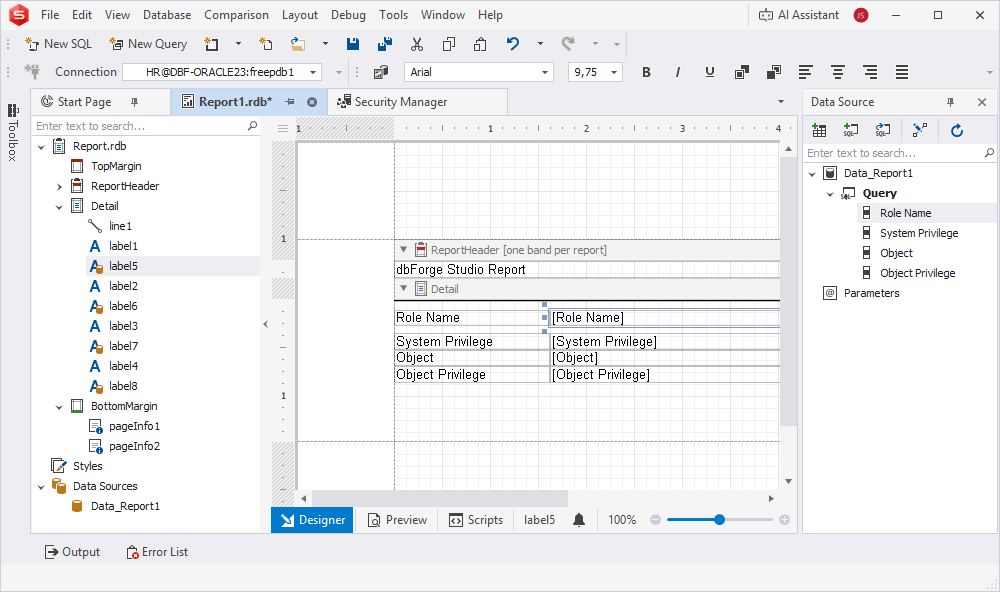
7. Navigate to Preview.
8. Click  , then select the export format, for example, HTML or PDF.
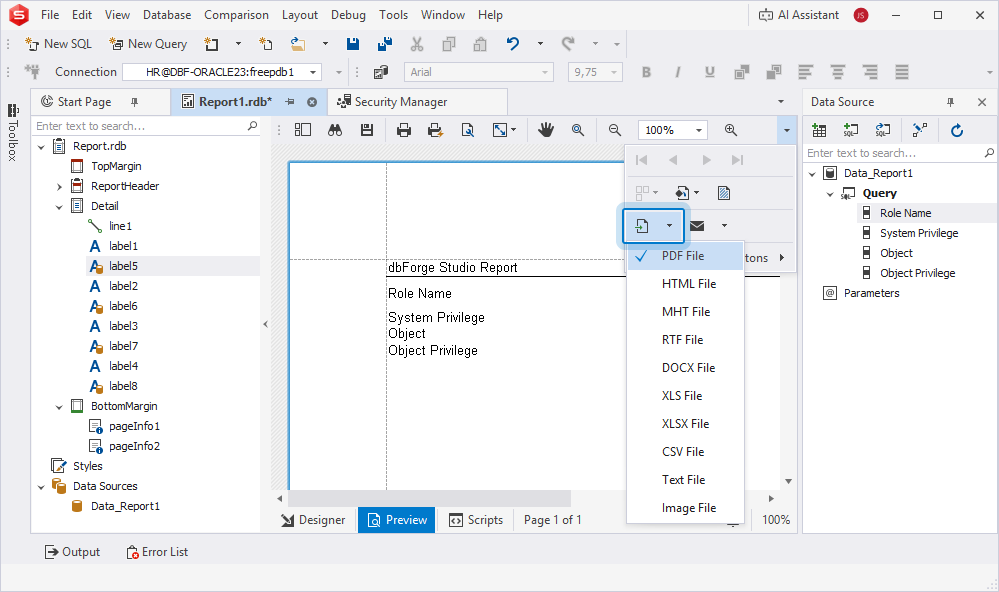
9. Configure the export options.
10. Specify the file name and the folder to store the file.
Control access by assigning roles
You can create separate roles for different administrative responsibilities to reduce risk of mistakes, prevent unnecessary or excessive access, and minimize unintended changes. Each role may be responsible for different tasks, for example:
DBA_USER1manages users.DBA_USER2handles data.DBA_USER3manages schema.
Create and manage roles using SQL Editor
1. Open SQL Editor.
2. Run the following script:
CREATE ROLE USER_ADMIN_ROLE;
GRANT CREATE USER TO USER_ADMIN_ROLE;
GRANT ALTER USER TO USER_ADMIN_ROLE;
GRANT DROP USER TO USER_ADMIN_ROLE;

-- Data access role
CREATE ROLE DATA_ADMIN_ROLE;
GRANT SELECT ANY TABLE TO DATA_ADMIN_ROLE;
GRANT INSERT ANY TABLE TO DATA_ADMIN_ROLE;

-- Schema management role
CREATE ROLE SCHEMA_ADMIN_ROLE;
GRANT CREATE ANY TABLE TO SCHEMA_ADMIN_ROLE;
GRANT ALTER ANY TABLE TO SCHEMA_ADMIN_ROLE;
GRANT DROP ANY TABLE TO SCHEMA_ADMIN_ROLE;

-- Grant separate roles to different administrators
GRANT USER_ADMIN_ROLE TO DBA_USER1;
GRANT DATA_ADMIN_ROLE TO DBA_USER2;
GRANT SCHEMA_ADMIN_ROLE TO DBA_USER3;
Create and manage roles using Security Manager
1. In Security Manager, select the user or create a new one.
2. Navigate to the Role tab and select the checkboxes for the roles you want to grant to the user.
3. On the Security Manager toolbar, click Save.
Set up proxy users
A proxy user helps control how users connect to the database:
- Users cannot log in directly to the database.
- All access goes through the application.
- The database still tracks which user performs each action.
You can use this script to create a proxy user, end users, and grant proxy privileges.
-- Create a proxy user
CREATE USER APP_PROXY IDENTIFIED BY strong_password;
GRANT CREATE SESSION TO APP_PROXY;

-- Create end users (no direct login)
CREATE USER END_USER1 IDENTIFIED BY password ACCOUNT LOCK;
CREATE USER END_USER2 IDENTIFIED BY password ACCOUNT LOCK;

-- Grant proxy privileges
ALTER USER END_USER1 GRANT CONNECT THROUGH APP_PROXY;
ALTER USER END_USER2 GRANT CONNECT THROUGH APP_PROXY;

-- Connect as proxy
-- Connection string: APP_PROXY[END_USER2]
An application connects using APP_PROXY[END_USER1]. Oracle verifies that APP_PROXY can connect and END_USER1 allows proxy access. The session starts, where the identity is END_USER1 and the connection is APP_PROXY.
Monitor over-privileged accounts
You can use the following queries to monitor accounts.
SELECT GRANTEE, PRIVILEGE
FROM DBA_SYS_PRIVS
WHERE PRIVILEGE LIKE '%ANY%'
AND GRANTEE NOT IN ('SYS', 'SYSTEM')
ORDER BY GRANTEE, PRIVILEGE;

-- Users with the DBA role
SELECT GRANTEE
FROM DBA_ROLE_PRIVS
WHERE GRANTED_ROLE = 'DBA'
AND GRANTEE NOT IN ('SYS', 'SYSTEM');

-- Objects granted to PUBLIC
SELECT OWNER, TABLE_NAME, PRIVILEGE
FROM DBA_TAB_PRIVS
WHERE GRANTEE = 'PUBLIC'
ORDER BY OWNER, TABLE_NAME;

-- Users who can grant privileges
SELECT GRANTEE, PRIVILEGE
FROM DBA_SYS_PRIVS
WHERE ADMIN_OPTION = 'YES'
AND GRANTEE NOT IN ('SYS', 'SYSTEM');
Alternatively, you can create a view that identifies potential security risks in the database and marks users with high privileges.
CREATE OR REPLACE VIEW v_security_risks AS
SELECT 'Over-privileged User' AS risk_type,
GRANTEE AS user_name,
PRIVILEGE AS details
FROM DBA_SYS_PRIVS
WHERE PRIVILEGE LIKE '%ANY%'
AND GRANTEE NOT IN ('SYS', 'SYSTEM')
UNION ALL
SELECT 'DBA Role Granted',
GRANTEE,
'Has DBA role'
FROM DBA_ROLE_PRIVS
WHERE GRANTED_ROLE = 'DBA'
AND GRANTEE NOT IN ('SYS', 'SYSTEM');
Back up security settings
You can export security settings by running the following script:
SELECT DBMS_METADATA.GET_DDL('USER', USERNAME)
FROM DBA_USERS
WHERE USERNAME NOT IN ('SYS', 'SYSTEM', 'OUTLN', 'DBSNMP');

-- Export roles
SELECT DBMS_METADATA.GET_DDL('ROLE', ROLE)
FROM DBA_ROLES
WHERE ROLE NOT IN ('CONNECT', 'RESOURCE', 'DBA');

-- Export system grants for APP_USER
SELECT DBMS_METADATA.GET_GRANTED_DDL('SYSTEM_GRANT', 'APP_USER')
FROM DUAL;
Common mistakes and their solutions
The following table describes some potential mistakes and how to resolve them.
| Mistake | Problem | Explanation | Solution |
|---|---|---|---|
| Granting a DBA role to application accounts | GRANT DBA TO APP_USER; |
|
Grant specific roles to usersCREATE ROLE app_admin_role;GRANT CREATE SESSION TO app_admin_role;GRANT CREATE TABLE TO app_admin_role;GRANT CREATE PROCEDURE TO app_admin_role;Grant only what’s needed GRANT app_admin_role TO APP_USER; |
| Using SELECT ANY TABLE | GRANT SELECT ANY TABLE TO APP_USER; |
|
GRANT SELECT ON SCHEMA1.TABLE1 TO APP_USER;GRANT SELECT ON SCHEMA1.TABLE2 TO APP_USER;GRANT SELECT ON SCHEMA2.TABLE1 TO APP_USER; |
| Forgetting to revoke when users leave |
|
1. Lock account.ALTER USER DEPARTED_USER ACCOUNT LOCK;2. Kill active sessions. SELECT 'ALTER SYSTEM KILL SESSION ''' || SID || ',' || SERIAL# || ''' IMMEDIATE;' FROM V$SESSION WHERE USERNAME = 'DEPARTED_USER';3. Revoke roles. REVOKE ALL PRIVILEGES FROM DEPARTED_USER;4. Drop the user. DROP USER DEPARTED_USER CASCADE; |
|
| Granting WITH GRANT OPTION | GRANT SELECT ON sensitive_data TO user1 WITH GRANT OPTION; |
Provides access to anyone. | Grant WITH GRANT OPTION only to trusted administrators.GRANT SELECT ON sensitive_data TO DBA_USER WITH GRANT OPTION;Regular users get standard grants. GRANT SELECT ON sensitive_data TO regular_user; |
| Using default passwords | CREATE USER new_user IDENTIFIED BY welcome1; |
Provides weak passwords. | CREATE USER new_user IDENTIFIED BY "Str0ng!P@ssw0rd#2026"PASSWORD EXPIRE;Force change on first login. Set a strong password profile. ALTER USER new_user PROFILE secure_profile; |
| Not auditing privilege changes |
|
Enable auditing.AUDIT GRANT ANY PRIVILEGE;AUDIT REVOKE ANY PRIVILEGE;AUDIT ROLE;Review audit trail regularly. SELECT EVENT_TIMESTAMP, DBUSERNAME, ACTION_NAME, OBJECT_NAME, SQL_TEXTFROM UNIFIED_AUDIT_TRAILWHERE ACTION_NAME IN ('GRANT', 'REVOKE')AND EVENT_TIMESTAMP > SYSDATE - 7ORDER BY EVENT_TIMESTAMP DESC; |
Troubleshooting
The following section describes common issues in privilege management and how to resolve them.
Issue 1: ORA-01927: Cannot REVOKE privileges you did not grant
Problem: This error occurs when you try to revoke a privilege that was granted by another user.
Solution: Apply one of the following approaches.
-
If you are not the original grantor, connect as a privileged user and revoke.
CONN sys/password AS SYSDBA REVOKE SELECT ON TABLE1 FROM USER1; -
If the privilege was originally granted with
GRANT OPTIONand dependent grants exist, useCASCADE CONSTRAINTS.REVOKE SELECT ON TABLE1 FROM ORIGINAL_GRANTEE CASCADE CONSTRAINTS;
Issue 2: ORA-01031: Insufficient privileges
Problem: This error occurs when a user tries to perform an action without having the required permissions.
You can use these queries to identify what privileges you currently have and what might be missing.
SELECT * FROM SESSION_PRIVS;

-- Check what you need
SELECT PRIVILEGE
FROM DBA_SYS_PRIVS
WHERE GRANTEE = USER;

-- Check role privileges
SELECT PRIVILEGE
FROM ROLE_SYS_PRIVS
WHERE ROLE IN (SELECT GRANTED_ROLE FROM USER_ROLE_PRIVS);
Solution: Request the required privilege from a DBA. If the privilege is granted through a role, verify that the role is enabled.
Issue 3: User can’t access table despite having SELECT privilege
The user has the SELECT privilege but still cannot access the table.
Problem: This issue can occur if the privilege is granted through a role that is not enabled in the current session.
You can use these queries to identify which roles are currently enabled in the session and whether the privilege is granted directly to the user or through a role.
SELECT * FROM SESSION_ROLES;

-- Check if the privilege is through role
SELECT GRANTEE, PRIVILEGE, GRANTABLE
FROM DBA_TAB_PRIVS
WHERE TABLE_NAME = 'PROBLEM_TABLE'
AND GRANTEE IN (
SELECT GRANTED_ROLE FROM DBA_ROLE_PRIVS WHERE GRANTEE = 'PROBLEM_USER'
UNION
SELECT 'PROBLEM_USER' FROM DUAL
);
Solution: Apply one of the following approaches.
-
Grant the privilege directly to the user.
GRANT SELECT ON PROBLEM_TABLE TO PROBLEM_USER; -
Enable the required role for the current session.
SET ROLE ROLE_WITH_PRIVILEGE; -
Set the role as default so it is always enabled for the user.
ALTER USER PROBLEM_USER DEFAULT ROLE ROLE_WITH_PRIVILEGE;
Issue 4: Changes not taking effect
After you grant or revoke privileges, the changes are not immediately visible.
Problem: This happens because the current session doesn’t automatically refresh its privileges.
Solution: Reconnect to the database or start a new session. If necessary, terminate the existing session and reconnect.
ALTER SYSTEM KILL SESSION 'sid,serial#' IMMEDIATE;
Issue 5: CASCADE must be specified to drop user
You cannot drop a user because the user still owns database objects, such as tables, views, or procedures.
Problem: Oracle requires the CASCADE option when dropping a user who owns objects. Without it, the statement fails.
You can run the following query to check what objects the user owns before dropping.
SELECT OBJECT_TYPE, COUNT(*)
FROM DBA_OBJECTS
WHERE OWNER = 'USER_TO_DROP'
GROUP BY OBJECT_TYPE;
Solution: Drop the user together with all owned objects.
DROP USER USER_TO_DROP CASCADE;