Backing up a Database
In this example, we will create the HR database backup.
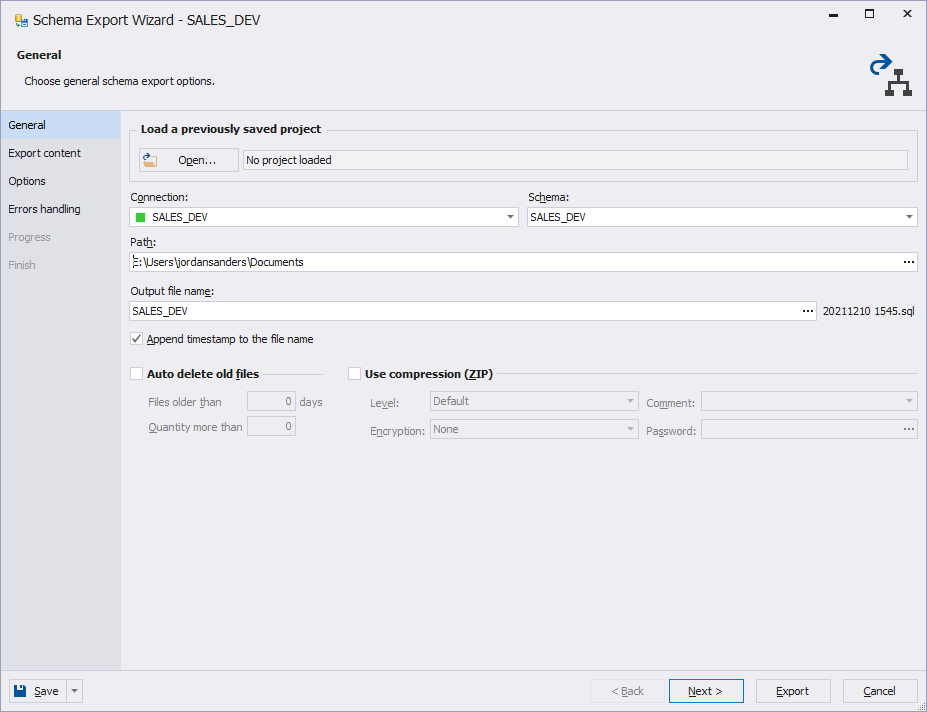
To back up a database:
- On the Start Page, click Data Pump, and then click Schema Export. The Schema Export Wizard opens.
- Select a connection or click < Manage… > in the Connection list, then click New to create a new connection.
- Once the connection is established, select a database you want to back up in the Schema list.
- Specify a folder path to store backups in the Path text box.
- Specify an output file name in the Output file name text box.
- Optional: You can set up some optional settings such as Append timestamp to the file name, Auto delete old files, Use compression (ZIP), etc.
- Click Next.
- Select database objects to export. Click Next.
- Specify detailed options on how schema export should be performed. Click Next.
- Select the Write a report to a log file check box to save the backup process information to a log file. Enter the path where to store the file, for instance: C:\Users\Documents\Export\SchemaExport.log
- Click Export.
- As soon as the export process is finished, click Save Project.
A project file contains all the information that you have entered while walkthrough the wizard pages.
Running Backup from the Command Line
To run backup from the command line:
- Click Start.
- Type cmd in the Search programs and files text box and press the Enter button.
Note
To run the Command Line in Windows 8:
From the Desktop Mode
- Move the mouse cursor to the exact lower left corner until the desktop shortcuts menu appears.
- Right-click to see the shortcut menu and than click Run
From the Charms Bar
- Move your mouse to the upper right corner until the Charms Bar appears.
- Select Apps from the list and type run in the search box.
- Click Run from the search results.
Use Windows+R Shortcut Keys
- In desktop mode, press the Windows+R keys, to show the Run command line.
- Enter the command line as follows:
"c:\Program Files\Devart\dbForge Studio for Oracle\dbforgeoracle.com" /schemaexport/projectfile:c:\Backup\HR.backup
Press Enter.
When the process is over, a backup file appears in the specified directory.
Here are some additional commands that can help you work within the command line. Type the one you need, and then press ENTER.
- To see available commands, type:
/schemaexport /?
- To specify a connection, type:
/connection:<connection_string>
- To specify a file name for storing the schema, type:
/outputfile
- To specify a server password, type:
/password:<pw>
- To specify a schema export project to use, type:
/projectfile
- To specify a schema to export, type:
/schema
Scheduling Database Backup
You can use the Windows Task Scheduler to create and manage backup tasks that your computer will carry out automatically at the times you specify.
To create Windows task:
- Run Windows Task Scheduler.
Note
To run Windows Task Scheduler:
- Click Start and then click Control Panel.
- Click Administrative Tools.
Note
If your current view is Category, click System and Security, and then click Administrative Tools
- Click Task Scheduler.
- Click the Action menu, and then click Create Basic Task.
- Type a name for the task and an optional description, and then click Next.
- Do one of the following:
- To select a schedule based on the calendar, click Daily, Weekly, Monthly, or One time, click Next. Specify the schedule you want to use, and then click Next.
- To select a schedule based on common recurring events, click When the computer starts or When I log on, and then click Next.
- To select a schedule based on specific events, click When a specific event is logged, click Next. Specify the event log and other information using the drop-down lists, and then click Next.
- To schedule a program to start automatically, click Start a program, and then click Next.
- Click Browse to enter a path to the .bat file that stores the command line string. For instance, a .bat file can contain a command line string as follows: “c:\Program Files\Devart\dbForge Studio for Oracle\dbforgeoracle.com” /schemaexport /projectfile:c:\Backup\HR.backup.
- Click Next.
- Click Finish.