Inserting and Retrieving Data
This walkthrough describes how to insert data into a table and perform a query using the SQL Editor.
Adding a Database Connection
First of all a connection to the MySQL server should be created.
1. To open the Database Explorer window, click Database Explorer on the View menu.
2. In the Database Explorer window, click the New Connection button.
3. Set up connection parameters in the dialog window that appears.
4. To navigate through the connection created, click on the plus mark to the left of the tree nodes.
Note
The Database Explorer is not available in the dbForge Data Compare for MySQL, bForge Schema Compare for MySQL.
Creating Database and Tables
1. Open the SQL editor by clicking the Create New SQL button on the Standard toolbar.
2. In the displayed document, type the following text:
CREATE DATABASE demobase;
CREATE TABLE demobase.dept (
DeptNo INT(11),
Dname VARCHAR(14) NOT NULL,
Loc VARCHAR(13),
PRIMARY KEY (DeptNo)
);
CREATE TABLE demobase.emp (
EmpNo INT(11),
EName VARCHAR(10),
Job VARCHAR(9),
MGR INT(11),
HireDate DATETIME,
Sal FLOAT,
Commission FLOAT,
DeptNo INT(11),
PRIMARY KEY (EmpNo),
UNIQUE INDEX index1 USING BTREE (EmpNo)
);
3. Click the Execute SQL button or press the F5 key.
Inserting Data into a Table
There are two ways to insert data into a table. First, you can do it using a query. The second way is to use the grid-based data editor. Here both ways are described.
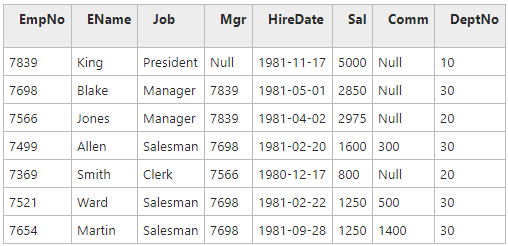
Here goes content of the Emp table:
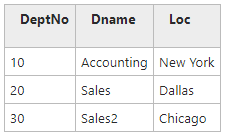
Content of the Dept table should be like this:
Using the SQL Editor to Insert Data
1. Establish a connection to the server.
2. Open SQL editor by clicking the Create New SQL button on the Standard toolbar.
3. In the displayed document, type the following text:
INSERT INTO Dept (DeptNo, Dname, Loc) VALUES (10,'Accounting','New York')
4. Click the Execute SQL button or press the F5 key.
If there were no mistakes in the statement, the Output window appears with the report that 1 record has been affected.
The query used is a full form of the statement INSERT INTO. To insert bigger blocks of data, use the following form:
INSERT INTO Dept VALUES (20,'Sales','Dallas'), (30,'Sales2','Chicago')
Note that names of the fields are omitted and several rows are inserted with the simple query. After executing it you must receive message 2 rows affected.
Using the Grid-based Data Editor to Insert Data
1. In Database Explorer, navigate to the Emp table.
2. Right-click it and choose Select All Rows on shortcut menu.
The editor is displayed where you can view the data the table contains, if any.
3. Click the Append button (+) or press the INSERT key.
4. Click in the very first cell. Type in the value: 7839.
5. Click in the next cell or press TAB, type in: King.
6. In the following cell, type: President.
7. Go on filling the row until you reach the last column. In the DEPTNO column, click the  button and use the Foreign Keys Lookup editor to choose the required department from the displayed grid. Press ENTER to apply inserting the row.
8. Click in the first cell of the second row. Now you have to fill it starting with value 7698. Repeat steps 3-7 to insert all the required rows into the table.
Now, when there is a table populated with data, let’s see how it can be retrieved.
Retrieving Data from Tables
The most simple example of an SQL statement is selecting all data from a single table.
1. In Database Explorer, make sure that connection to your server containing the database (FirmStaff) is active.
2. Click the Create New SQL button on the Standard toolbar to open a new SQL document.
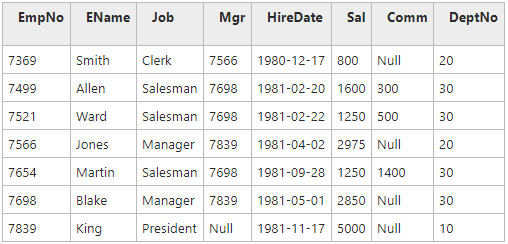
3. In the document, type the string SELECT * FROM Demobase.Emp.
or
drag the table from the Database Explorer onto the document area to make this string appear automatically.
4. Click the Execute SQL button on the SQL toolbar.
Alternatively, you can right click the table and select Select All Rows.
If everything is correct, either the Data window or the Data view of a document should appear containing all data in the table.
Note
You can edit results of a query in these windows as described in the previous part of this topic.
You can execute any kind of queries using the SQL editor. Consider this:
SELECT count(*) Quantity, Job, Sum(Sal) Money FROM Demobase.Emp
WHERE Sal>800 GROUP BY Job HAVING count(*)>1 ORDER BY Money
The query returns all categories of employees (GROUP BY job) that have more than one member in the category (HAVING Count()>1). For every category the total salary is shown (SELECT … Sum(Sal) Money) together with the number of members in the category (SELECT Count() Quantity). Employees that have salary of 800 or less are excluded. The whole grid is ordered by salary amount (ORDER BY Money).
| Quantity | Job | Money |
|---|---|---|
| 3 | Salesman | 4100 |
| 2 | Manager | 5825 |
Now when you’ve learned how to retrieve data from a single table, it is time to find out how to perform SELECT on several tables.