How to connect to SQL Server
You can create a new connection or modify the existing one.
To connect to SQL Server
1. On the Database menu, select New Connection.
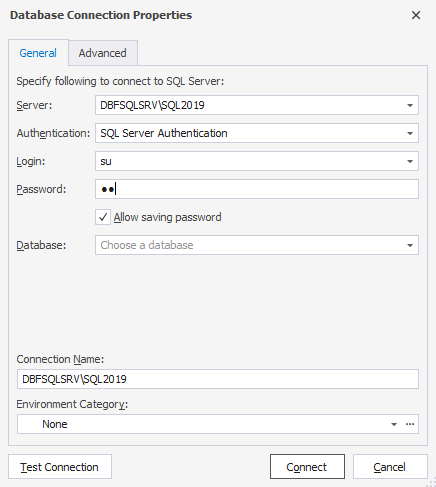
2. On the Database Connection Properties > General tab, specify the connection details:
- Server: Select the server from the drop-down list.
- Authentication: Choose the authentication mode from the drop-down list.
- Windows Authentication
- SQL Server Authentication
- Active Directory - Universal with MFA authentication
- Azure Active Directory - Password
- Azure Active Directory - Integrated
For more information about how to connect to a database with the Azure Active Directory authentication, refer to Connect with Azure Interactive Authentication.
- Login and Password: Enter the user credential details respectively. By default, the password is saved automatically. If you don’t want to save the password, clear the Allow saving password check box.
- Database: Enter the name of a SQL database you want to connect to or select the database from the drop-down list.
- Optional: Connection Name: The connection name is generated automatically from the host name. If you want to create a distinctive name for the connection, type the new name.
- Optional: Environment Category: Select the document category (Development, Production, Sandbox, and Test) from the drop-down list.
Note
To connect to a SQL Server using a custom port, specify the server name followed by a comma and the custom port number. For example, localhost,62005.

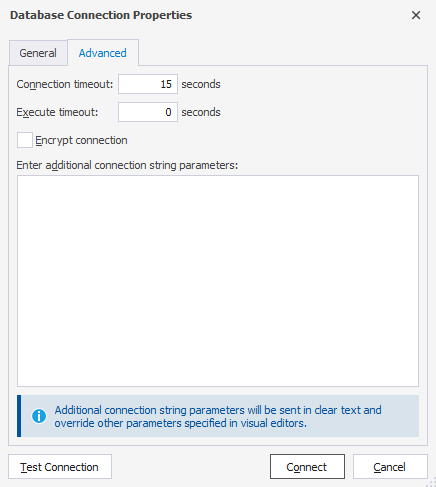
3. Optional: On the Advanced tab, configure additional connection properties:
- Connection timeout: Set the amount of time (in seconds) during which the server should wait to establish a connection. The default value is 15 seconds.
- Execute timeout: Set the amount of time (in seconds) during which the task should be completed. The default value is 0 seconds.
- Encrypt connection: Select the check box if you want to use the encrypted connection.
- Enter additional connection string parameters: Set additional connection properties to the connection string.

4. Optional: To verify the connection, click Test Connection.
5. Click Connect to create the connection.
Note
If you set up a connection in one of the following tools, it will be automatically added to other dbForge SQL Tools:
- dbForge Data Compare for SQL Server
- dbForge Data Generator for SQL Server
- dbForge Schema Compare for SQL Server
- dbForge Documenter for SQL Server
- dbForge Data Generator for SQL Server
- dbForge Event Profiler for SQL Server
You can migrate connections and assigned categories between dbForge SQL tools (for example, from dbForge Data Compare for SQL Server to dbForge Data Generator for SQL Server). To do that, you should create an export settings file with the help of Import and Export Settings Wizard in one tool and then import it in another dbForge SQL tool. For more information, see Import and export settings.